Sending/Receiving Data: MIDI, OSC, DMX, and Data Sources
Receiving data from other applications or hardware and sending data from VDMX to other apps or hardware is a major component of VDMX- every UI element is capable of both being controlled via MIDI/OSC/DMX/other data sources created by VDMX and of sending its data out via MIDI/OSC/DMX. The procedure for doing so is consistent across all UI items- you add a receiver (which receives data from things) or a sender (which sends data out via MIDI/OSC/DMX) to the UI element you're working with using the UI Inspector.
A "receiver" is nothing more than an object which receives data from somewhere. Receivers can receive data from any source- MIDI, OSC, DMX, or other data sources within VDMX such as the values from an Audio Analysis plugin/LFO/clock/etc. Receivers can be found everywhere- they're used to control UI items, trigger presets, trigger tabs: they're part of the backbone of VDMX, and can be used to control nearly every aspect of the application. The receiver inspectors always appear in the UI Inspector window- if you keep it open, you may be surprised how frequently you encounter a receiver inspector of some sort- and all receivers work with Hardware Learn Mode. There are four different kinds of receivers, depending on what kind of data they provide to VDMX: Boolean Data Receiver (YES/NO), float/decimal receivers (decimal numbers, like 0.75), string receivers (letters and words), and color receivers.
A "sender" is an object which sends data to other applications via MIDI or OSC or DMX (ArtNet). The procedure for working with senders is similar to that of working with receivers- you inspect a UI item, and then use the UI inspector to add and configure your receiver (choosing MIDI, OSC or DMX, picking a data type to send, etc).
Receiver Inspector Consistency and Similarities
Because all receivers share the common goal of receiving data from somewhere, there's a certain amount of similarity in the various receiver inspectors. All receiver inspectors have a "Detect" button and a pop-up button for narrowing down the detection source to something specific; immediately to the right of these is a pop-up button with the list of existing data sources to chose from. Below these UI items is a toggle which enables/disables the inspected receiver.
Booleans: On/Off
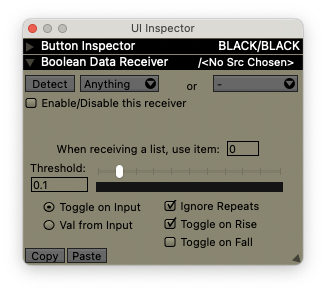
Boolean receivers take an incoming numeric value (presumed to be in the range of 0.0-1.0) and converts it to a YES/NO value which may be applied to whatever owns the receiver. Boolean receivers have a number of options because it's assumed that some data sources have to be "cleaned up" a bit to work with their values.
- If your receiver is receiving a list of values via OSC, there's a text field for choosing which item in the list to use
- If your receiver is receiving from OSC or MIDI, there will be a toggle for enabling "echo" and a pop-up button for selecting the OSC/MIDI destination you want to echo values back to
- The "Threshold" slider and text field specifies the threshold of the receiver, which helps determine how the receiver responds to incoming data
- The "Toggle on Input" vs. "Val from Input" radio buttons determines the receiver's behavior
- "Toggle on Input" toggles the value of whatever owns the receiver when the receiver's value crosses the threshold value. the "Toggle on Rise" vs. "Toggle on Fall" checkboxes determine whether the receiver toggles when the value rises above or falls below the threshold (or both)
- "Val from Input" takes the received value and applies it directly to whatever owns the receiver, giving you direct control over whatever owns the receiver: if the received value is above the threshold, the receiver gets a YES, otherwise it gets a NO. If a receiver's using "Val from Input", an "Invert" checkbox appears which allows you to invert the received value.
- "Ignore Repeats" does just what it sounds like: it ignores duplicate incoming values
Floats: Decimal Numbers and Number FX Chains
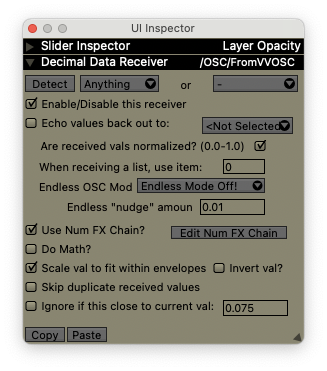
Decimal receivers take an incoming numeric value, optionally modifying it via a series of number fx, and apply it to whatever owns the receiver.
- If your receiver is receiving from OSC or MIDI, there will be a toggle for enabling "echo" and a pop-up button for selecting the OSC/MIDI destination you want to echo values back to
- The "Use Num FX Chain?" toggle determines whether or not this receiver uses a number fx chain to modify the received data before passing it on to the object which owns the receiver.
- The "Edit Num FX Chain" button uninspects the receiver and its attached UI item and inspects the receiver's num fx chain, allowing you to edit and add to it.
- The "Do Math?" toggle lets you enter a basic algorithm that modifies the received values (the text field for the equation appears when enabled).
- "Scale val to fit within envelopes" takes the received value and scales it to fit within the min/max envelopes of whatever owns the receiver (usually a slider). This lets you use the full range of a hardware control to manipulate a specific range of a slider.
- "Invert val?" inverts the received value.
- "Skip duplicate received values" does just what it sounds like.
- "Ignore if this close to current val:" and its accompanying text field will optionally ignore received values unless they differ from the current value by more than the specified value.
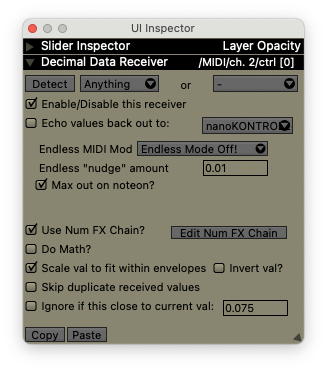
- The middle of the Decimal Data Receiver Inspector changes depending on whether the receiver is receiving data from a MIDI, OSC, or DMX data source.
- When receiving from MIDI or OSC sources, there's an option to work with "endless" modes. Some MIDI and OSC sources send increment/decrement messages when turning infinite knobs: this is how you work with this data in the context of a slider with a finite range. Typically you pick which increment/decrement messages your hardware is using from the pop-up button, and then specify how much each "nudge" should move the slider.
- When receiving from OSC/data sources, there's a toggle for choosing whether or not the receiver's values are "normalized". By default, all receivers are expected to be normalized (the values are expected to be ranged from 0.0-1.0): if you disable this, the receiver will send its values outside this range to whatever owns it. This is particularly useful if you want to control the exact value of a slider directly.
- When receiving from OSC/data sources, a text field becomes visible which allows you to choose which item in the list you want the receiver to work with. Some OSC devices and software encodes values in lists- this lets you work around such contrivances and extract the data you need from them.
The Do Math? feature uses DDMathParser for processing math expressions.
- Introduction to DDMathParser Usage
- DDMathParser Operators
- DDMathParser Functions
- Use $VAL within your expression to access the value of the data-receiver.
- Use $MIN and $MAX within your expression to access the min and max range values of the slider.
Strings: Words and Letters
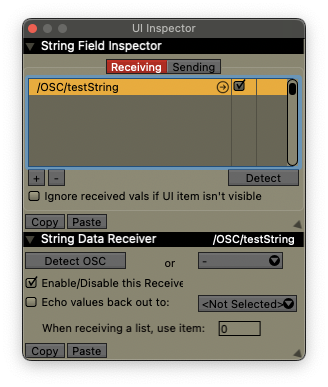
There's not much to say about string receivers, because they're comparatively straightforward and rarely encountered (strings can only be received via OSC, and there aren't many applications or hardware devices capable of sending OSC string values). The inspector allows you to specify which item in a list of values to receive the string from, and optionally to echo string values back out via OSC.
Colors
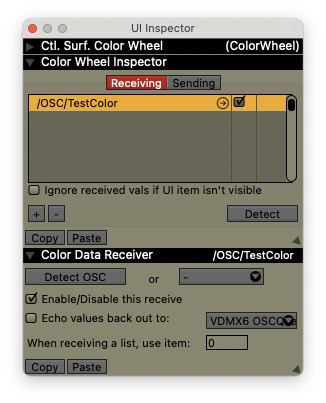
Much like the String Data Receiver, the Color Data Receiver is rarely encountered and has comparatively few options- there's just a text field for determining which item in a list of values to receive from, and some controls for echoing the received color values back out.
Sending data by MIDI, OSC, and DMX
 S
S
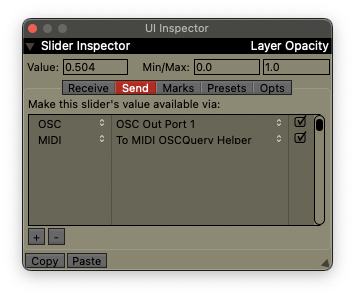
The procedure for sending MIDI data from VDMX is similar wherever you encounter it: inspect the UI item whose value you want to send, click on the "Send" tab in the UI inspector, and then create a new sender by clicking the "+" button. Once you've created a sender, you need to specify what kind of data it'll be sending- MIDI or OSC or DMX- and select a destination MIDI or OSC output. MIDI outputs are created automatically by other hardware/software- OSC outputs are created automatically if the other hardware/software makes its presence known via bonjour/zero-conf networking (VDMX supports auto-discovery of OSC services), and you can also create your own inputs and outputs manually via the MIDI preferences or OSC preferences or DMX preferences.
Sending MIDI data
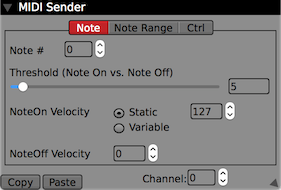
Once you've created a MIDI sender and chosen the target output, the MIDI Sender Inspector appears and lets you further configure what kind of MIDI data you want to send. At the top of the inspector are three buttons which allow you to determine whether you want to send the value out as a single note, a range of notes, or a control value. As you switch between these buttons, the inspector updates itself to present a range of different options relevant to each of the different output types. If one or more of these options is greyed out or unavailable, it's because the value you're trying to send cannot be expressed with that particular data type.
- All three MIDI sending types share the common "Channel" text field to determine which channel the MIDI data will be sent out on.
- "Note" sends a single MIDI note- which note is determined by the "Note #" text field. If the value you're trying to send is greater than the threshold a noteon is sent, if the value is less than the threshold a noteoff is sent. The velocity of the note can either be static (the value specified by the text field) or variable (based on the value being sent).
- "Note Range" sends the value as a range of MIDI notes. If you're sending noteoffs, you can choose between sending the noteoff immediately, or only sending the noteoff when the next noteon is pressed (mutex noteoff).
- "Ctrl" sends a single MIDI CC value out.
Sending OSC data
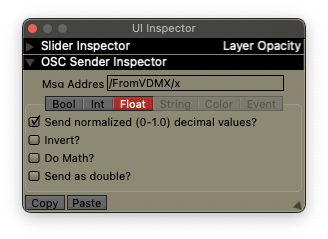
Once you've created an OSC sender and chosen the target output, the OSC Sender Inspector appears and lets you further configure what kind of OSC data you want to send. At the top of the inspector are five buttons which allow you to determine what kind of OSC data you want to send.
- Usually, one or more of these data types is disabled. This happens because the item sending the data can't express its value as the disabled data type- for example, there's no "clean" way to convert a slider value (a single float) as a color, so this data type is disabled on OSC senders in sliders.
- "Bool" sends the value out as a single boolean values (YES or NO). If the value is greater than the threshold, YES is sent. An option "Invert?" toggle lets you invert the value if desired.
- "Int" sends the value out as an integer (a non-decimal number). The range of the integers being sent are specified via text fields- this output type also has an "Invert" toggle.
- "Float" sends the value out as a floating-point number (a decimal number). By default these values are normalized (ranged 0.0 - 1.0), but this option may be disabled to use the native range of whatever's sending the data. This is most commonly seen with sliders, and allows you to send the "actual" value of the slider out to something.
- "String" sends the value out as a string- a series of letters or words. This option is most commonly seen when sending the value of a pop-up button (it sends the name of the selected item).
- "Color" sends the value out as a color, using the standard OSC color data type. This option is most commonly seen when sending the value of a color picker UI item.
Sending DMX data
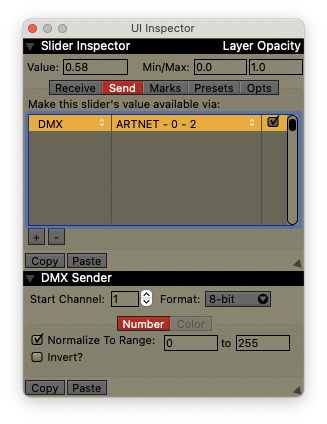
Once you've created an DMX sender and chosen the target output, the DMX Sender Inspector appears and lets you further configure the format of the DMX data you want to send.
The start channel lets you specify where in the target universe the values being sent should write to.
- Usually, one or more of these data types is disabled. This happens because the item sending the data can't express its value as the disabled data type- for example, there's no "clean" way to convert a slider value (a single float) as a color, so this data type is disabled on DMX senders in sliders.
- "Number" sends the value out as a single integer values between 0 and 255. The range of values can be set and an option "Invert?" toggle lets you invert the value if desired.
- "Color" sends the value out as a color, using the standard DMX color data type, RGB or CMY.