Basic Workflow
VDMX is a modular, highly flexible realtime performance application. You define a layer-based rendering engine and play back (or "trigger") files on the layers, producing video streams- image filters (typically referred to as "FX") may be applied to any of these video streams, which are composited with other layers using a variety of composition modes. All of this is controlled by various UI items, all of which are deeply interactive and may be controlled remotely by MIDI, OSC, and DMX (ArtNet), or by local data sources. A series of plugins are available to add further functionality- preview windows, oscillators, audio analyzers, etc.
While the whole point of VDMX is to allow users to create their own video instruments- their own performance workflow- VDMX has a basic structure designed to help you in this task. VDMX's workflow revolves around two inspectors: the Workspace Inspector and the UI Item Inspector. These two windows form the basis of your interaction with VDMX- and, most importantly, they've been designed to be closed: when you're done using them to define your interface you can hide them, freeing up valuable screen space you can use to for your performance interface.
These inspectors serve similar, but very distinct roles. While both allow you to inspect and modify the properties of things, the Workspace Inspector is used to inspect high-level parts of the application: layers, plugins, video inputs, etc. The UI Inspector inspects and modifies the UI items found everywhere in VDMX: sliders, buttons, pop-up buttons, section presets, etc.
Workspace Inspector
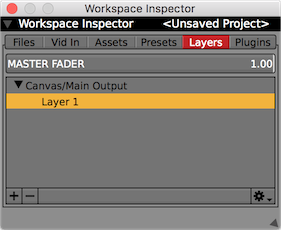
Your "workspace" is roughly defined as everything VDMX is doing: the project file you've got open with the files you've imported and organized, your presets, layers, video inputs, plugins, and saved resources (assets). These are the major components of VDMX: they're the high-level pieces you use to build your setup- and the Workspace Inspector is how you create and work with these pieces. The Workspace Inspector should be visible by default when you launch VDMX- it can be shown/hidden manually via the "Window" menu.
The Workspace Inspector inspects your workspace, and is split up into six sections, accessible via a series of buttons/tabs at its top: Files, Video Inputs & Digitizers, Assets, Presets, Layer, and Plugins. Each tab allows you to create and modify a different section of your workspace. The Workspace Inspector appears in its own window.
UI Inspector
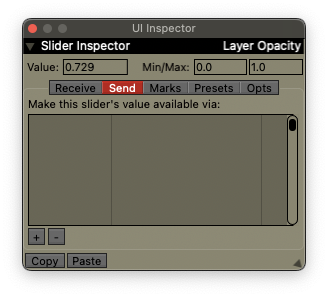
Much of your use of VDMX is based on your interaction with its sliders, buttons, and other UI elements, so the UI Inspector is an extremely important window because it allows you to configure these UI elements to do a variety of tasks. This will will appear automatically as you click on sliders/buttons/etc and work normally with VDMX- if it's open, it will always be inspecting whatever UI item you're working with. The window may be shown or hidden manually via the "Help" menu. The UI Inspector is just the name of a window- many different inspectors will appear in this window as you work with VDMX.
The UI Inspector is highly contextual- as you modify the UI item you're inspecting by adding data receivers/senders/etc, these additions will get inspected as you work with them for further modification. In other words, the UI inspector gets bigger and more specific automatically as you work with it- you'll never have to hunt around for an inspector for something, it will always be presented to you automatically.
The image here depicts the UI Inspector displaying the Slider Inspector- this is what you'd see if you clicked on a slider and the UI Inspector was visible.
Window Management
While using VDMX, you're going to wind up creating your own windows with all sorts of things in them- FX chains, preview windows, playback controlls, etc. The Workspace Inspector and UI Item Inspector are inspectors- they float above all these other windows, because they were designed to be closed to free up room for the interface you make. In many cases, you'll be able to open items in the workspace inspector into their own windows:

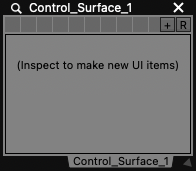
Non-inspector windows- such as the one pictured at right- have a number of properties which make them easier to work with:
- Non-inspector windows "snap" to adjacent windows you're resizing or dragging them- and you can drag from the tab bar at the bottom, too. If you hold down the "Option" key while you click and drag on a window, all the windows snapped to it (and all the windows snapped to them) will be dragged at the same time, so you can move large groups of windows easily.
- Non-inspector windows can be "tabbed"- each piece of content is in its own tab, and each window can have as many tabs as you want (tabs are located at the bottom of the window). Dragging a tab out of a window will make a new window, and tabs may be rearranged.

- Tabs can be synced to MIDI/OSC/DMX/data sources- open the UI Inspector and click on a window tab, its On/Off (Boolean Data Receiver) will get inspected. From here, you can configure the data receiver to trigger the tab using whatever source you want.
- Non-inspector windows have a big "X" in their top-right corner: clicking this will close the tab. You can always open the tab into its own window again by inspecting it in the Workspace Inspector and clicking the "open in new window" button.
- Many non-inspector windows have a mangifying glass in their top-left corner: clicking this will inspect whatever's in the window, opening the Workspace Inspector, switching to the appropriate section (Layers/Plugins/etc), and selecting the relevant item from the list of layers/plugins.
- By default, windows can't be dragged outside the main screen (the screen with your menu bar)- you can disable this from the "Window" menu's "Keep windows on main screen" option.
- Windows can be locked in place completely via the "Window" menu's "Lock Windows" option. When windows are locked, their close and resize handles disappear and new windows can't be opened from the Workspace Inspector.
Other tips:
- Hold ⌘ while dragging or resizing a window to move the whole "column" of windows at the same time.
- Hold ⌥ while dragging a window to move all connected windows at the same time.
Copy/Paste
By default, the "Copy" and "Paste" commands in the "Edit" menu work with the UI inspector window: when you "copy" or "paste", you copy/paste the UI item inspected by the top inspector in the UI inspector window, which will flash to indicate that it's done something. Functionally, this means that you can click on UI items and then copy/paste them. The cmd-C and cmd-V keyboard shortcuts for copy/paste do not funciton with the Workspace Inspector. Copy/pasting isn't limited to just UI items- you can also copy and paste multiple layers, plugins, and presets at a time. Because this can potentially involve substantial changes to your workspace, the commands for copy/pasting layers and plugins are tucked away in the "sprocket" menus in their sections of the workspace inspector, where they can't be activated accidentally.
"Copy" performs a full copy of the state of whatever UI item you had inspected- all its receivers, senders, presets, etc. "Paste" works similarly,completely replacing the value/senders/receivers/etc of the inspected item with the contents of the clipboard. "Paste local" works with UI items that have local presets- it leaves the local presets of the inspected UI item alone, but pastes the contents of the clipboard's current state onto the inspected UI item.
VDMX has multiple clipboards: every item that can be copied has its own clipboard, so you never need to remember what the "last" thing you copied was. In practical terms, this means that if you copy slider A, then copy button B, you can click on slider C and paste the contents of slider A over it. This applies to copying presets, layers, and plugins, too...
While the default cmd-C and cmd-V shortcuts will work for most situations, you'll notice that every inspector that supports copy/pasting has copy/paste buttons on it. If you don't want to copy or paste the contents of the top item in the inspector- if, for example, you only want to copy a "sender" and not the entire state of the UI item- you can simply click the "copy" button in the sender inspector, inspect a different send, and click its "paste" button. This is extremely useful because everything that can be copied has its own clipboard.
Undo / Redo
The Workspace Inspector has some support for undo / redo:
- Actions in the layers tab.
- Actions in the plugins tab.
- Actions in the presets tab.