Plugins
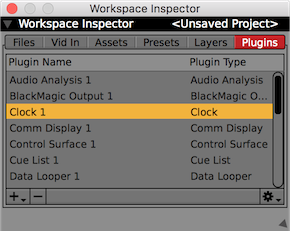
The "Plugins" tab of the Workspace Inspector reveals the interface for creating, deleting, inspecting, and otherwise working with VDMX's plugins. A "plugin" is basically anything in VDMX that isn't a layer- plugins provide data sources and interface items that you can use with VDMX. To create a plugin, click on the "+" button in the toolbar below the list of plugins, and select the plugin type you want to create from the pop-up menu that appears. To delete a plugin, select the plugin in the list of plugins and click the "-" button in the toolbar. To rename a plugin, double-click on the plugin name in the list of plugins and enter a new name. To copy, paste, or duplicate plugins, click on the "sprocket" icon in the toolbar below the list of plugins.
- "Audio Analysis": Analyzes an audio stream from an audio input and makes a variety of data sources available that describe the audio stream.
- "Blackmagic Output": outputs a video stream via a Blackmagic video output device.
- "Clock": A simple clock plugin that can be slaved to a MIDI clock, configured by tapping a tempo, or controlled via several other means.
- "Comm Display": Displays incoming MIDI and OSC data for checking incoming data streams.
- "Control Surface": Lets you create a variety of UI items for custom use. These UI items can also be published as data sources, and thereby used to control other UI items within VDMX.
- "Cue List": Use this plugin to set up pre-planned clip triggers and locally-created data sources that occur at specific times during a performance.
- "Data Looper": records data from input devices into tracks, allows you to edit them, and then loops them back, published as data sources.
- "HID Input": publishes data sources in VDMX for the controls on a connected HID device (such as a gamepad or a joystick).
- "LFO": LFOs are low-frequency oscillators. Each LFO can have a number of waves which are highly configurable- these waves are published as data sources available to any receiver in VDMX.
- "Media Bin": The primary means of importing, organizing, and triggering media files on layers.
- "Movie Recorder": Records audio and video from VDMX into QuickTime movie files.
- "OCR": Detects text and QR codes in video streams and publishes them as strings to use inside of VDMX.
- "OSCQuery Client": Access remote parameters published by other applications via OSCQuery Protocol.
- "Preview": Preview plugins display the video streams you're working with- and provide a number of built-in controls for working with layers and different source types.
- "Scopes": Generates and displays a variety of useful visualizations of the color data for a provided video stream.
- "Step Sequencer": Step sequencers let you sequence values of different types (integers, booleans, decimal numbers- even colors). Each step sequencer can have multiple tracks, and their values are published as data sources.
- "Sticky": A quick and easy way to leave notes for later in your workspace
- "Syphon Output": Publish any of the video streams you're working with via Syphon, making it available to other apps that support it.
- "Timecode": receives timecode (via LTC, MTC, OSC- anything), generates timecode, publishes timecode as data sources in VDMX, and publishes timecode via LTC/MTC/OSC/etc.
- "Two Channel Mixer": The quickest and easiest way to adjust the opacity of two different layers at the same time, "mixing" between them.
- "Video To DMX": Convert video pixels to DMX values to control lights.
- "Video Tracking": Human body tracking including torso, hands, faces, and person segmentation.
- "Wiimote": The fastest and easiest way to use a Wiimote with VDMX.
- "QC-based plugins" (Deprecated): This isn't a specific plugin- this is a category of plugins which you can create by loading QC compositions as plugins: any published input splitters are made available as UI items in VDMX, and any published output splitters in the plugin are published as data sources of the appropriate type in VDMX.
- "TouchDesigner-based plugins": This isn't a specific plugin- this is a category of plugins which you can create by loading TouchDesigner compositions as plugins: any published input splitters are made available as UI items in VDMX, and any published output splitters in the plugin are published as data sources of the appropriate type in VDMX.
- "Vuo-based plugins": This isn't a specific plugin- this is a category of plugins which you can create by loading Vuo compositions as plugins: any published input splitters are made available as UI items in VDMX, and any published output splitters in the plugin are published as data sources of the appropriate type in VDMX.
Audio Analysis

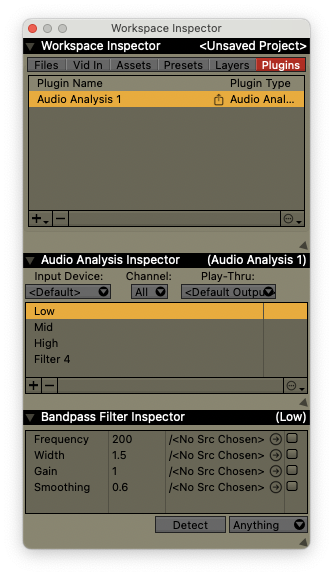
The Audio Analysis plugin lets you take an incoming audio signal, say from a microphone or line-input, and convert it into data-sources to use as control data within VDMX or send to other applications.
For each audio analysis plugin you can specify- * An audio source and channel to analyze * The amount of gain to apply to the incoming sound * Any number of frequency ranges to track (filters) * An audio output for previewing
Like all plugins in VDMX, you can have as many copies of the audio analysis plugin as needed, each with their own custom settings.
Main Plugin Interface
Most of the options for the audio analysis can be accessed from the main plugin interface or its right+click contextual menu.
On / Off button:
In the lower left corner is a button to enable the audio analysis plugin. To save on CPU usage you may want to turn this off when it is not needed.
Signal preview and filter setup panel:
To change the position or width of a filter, click on its grab bar. To adjust the center frequency drag left and right. To adjust the frequency range drag up (wider) and down (narrower).
Gain slider:
This slider sets the overall gain level of the incoming audio before the analysis is performed.
In some cases you can also adjust the input volume of a built-in audio device (eg. microphone, line input) on a hardware level from the System Preferences under Sound / Input. Other external devices may have their own signal gain control as well.
When the play-thru option is enabled this will also affect the loudness of the sound output.
Section Preset UI:
Below the signal preview in the main plugin window is a standard VDMX section preset control for saving and restoring arrangements of frequency filters.
The current source, play-thru and gain levels are not affected.
Inspector Options
Input Device Menu:
Sets which audio source is used as an input for analysis. Choose a specific device or the system default as set in the System Preferences.
Channel:
Sets which channel of audio from the incoming signal is used as the input for analysis. Can bet set to a single specific channel or a summation of all incoming channels in the signal.
Play-Thru:
Sets the output destination for previewing the incoming sound.
Filter List:
In the filter manager you can add, remove and give custom names to your analysis filters.
Clicking on a filter in the list will reveal a sub-inspector for configuring data-receivers for adjusting the center frequency, range, gain and smoothing level for each individual filter.
Blackmagic Output
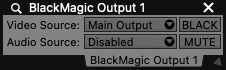
The Blackmagic Output plugin lets you send any video source in VDMX out any Blackmagic video hardware connected to your machine. A single plugin can publish one video source out output.
- The "Video Source" pop-up button lets you select which video source you'd like to send to the output device.
- The "Black" button lets you quickly black out the video output.
- The "Audio Source" pop-up button lets you select which audio source you'd like to send to the output device.
- The "Mute" button lets you quickly silence the audio output.
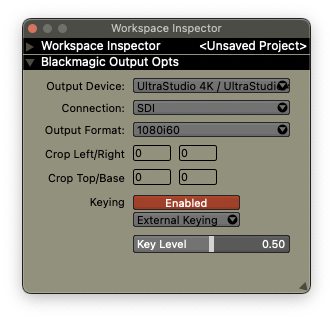
- The "Output Device" pop-up button lets you select which device you want to send the video out of. Please note that the output you want to use on that device- for example HDMI vs. SDI- is selected in the System Preferences on your machine (not in VDMX).
- The "Connection" pop-up button lets you set the primary output port. Note that the device may send duplicate signals on other output ports.
- The "Output Format" pop-up button contains a list of resolutions and output frequencies supported by the selected device- as soon as you select a viable output format, VDMX will begin publishing the video.
- The "Crop Video Src" interface lets you crop the chosen video source before publishing it.
Some Blackmagic output devices, such as the UltraStudio 4K series, support a special Keying option which allows for sending the alpha channel of a video signal out.
- Keying: Enabled / Disabled, sets if the device should use the alpha channel of the video as a key.
- External Keying / Internal Keying: Sets if the alpha channel should be applied internal or sent as an external masking stream.
- Key Level: Sets the level of the key stream.
When External Key is active the alpha channel of the video stream will be sent from the devices 2nd SDI port as a mask. This can be particularly useful when as a downstream key on hardware video mixers.
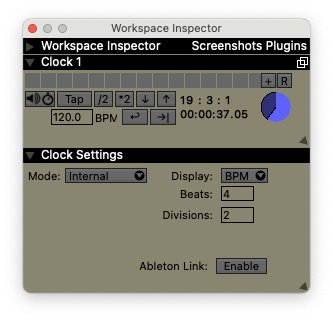
Clock
Since VDMX is frequently used to create performance setups for accompanying musicians, many aspects of it benefit from the ability to be synchronized to a central clock. The clock plugin is how you accomplish this in VDMX- other plugins that offer timing and quantization options (for example, triggering a clip on the nearest quantized beat) can simply present the user with a list of potential clock plugins to choose from.
The main interface provides a Pause / Resume button that shows the running state of the Clock. The behavior of the Pause / Resume button can be changed to a Stop / Start behavior from the Clock inspector panel under Options.
- A Clock plugin can be in one of three different modes- it can either be generating the clock internally, it can be slaved to a MIDI clock signal you're receiving, or it can be using sound input mode to automatically detect the BPM from an audio source. You select which mode by using the "Mode:" pop-up button in the clock's inspector.
- "Internal" mode generates a clock signal internally- this is the default state for a newly-created clock plugin. In this mode, you can enter the BPM manually by using the "BPM" text field in the plugin window, or clicking/triggering the "Tap" button on each down beat. The "/2" and "*2" buttons in the plugin window halve or double the BPM, and the up and down arrow buttons increase/decrease the BPM gradually.
- "MIDI Follow" mode slaves the clock to a MIDI clock signal sent to the destination you choose.
- "BPM Detection" is an extremely accurate beat tracker that can accurately detect the BPM of an audio input on your machine- you select which audio input you want to analyze in its submenu. By default, the default audio input defined in your System Preferences will be analyzed. This mode is so useful that there's a button in the plugin window to enable it (the button has a speaker and a clock icon on it). If you want to select a different audio source- or adjust the gain or silence threshold- you can do so in the clock inspector.
- The "→|" button skips the clock forward to the next downbeat and restarts the measure. This works with every clock mode.
- The "↩" button resets the measure and time count of the clock and restarts the clock. This works with every clock mode.
- The "BPM" text field will always display the BPM of the mode being used- it can also be used to set the BPM if the clock is in "Internal" mode. If you would prefer to enter the duration of the measure in seconds, you can do so by inspecting the plugin, and using the "Display:" pop-up button to select "Seconds".
- In addition to being available to plugin-specific timing and quantization options, the clock plugin also publishes several data sources which can be used by any receiver- there are a variety of data sources, including for individual beats, every downbeat, every couple bars, etc. The "Beats" and "Divisions" fields in the clock's inspector determine how many beats per measure and how many subdivisions per beat, respectively.
- The clock plugin has a section preset UI item- this saves/restores the contents of this plugin and this plugin alone.
The Sync tab of the inspector for the Clock plugin also contains settings for enabling two modes of synchronizing with other software and hardware:
- Ableton Link: The position and BPM of the clock can automatically be synchronized with other software using Ableton Link by using the Enable on/off toggle. Note this can not be used when the source type for the Clock plugin is set to MIDI clock.
- MIDI Clock Out: Use the provided list of MIDI destinations to specify where VDMX should send MIDI clock messages to.
The Options tab of the inspector for the Clock plugin also contains additional options for fine tuning the behavior when synchronizing with other software and hardware:
- Start / Stop Mode: The pause / resume button in the main interface will instead behave as a start / stop toggle. This can be useful when syncing with Eurorack clocks, and other situations where MIDI song posiiton / MIDI continue messages are not supported.
- External hardware sync on set downbeat: Sends additional MIDI stop / start messages when the downbeat changes for keeping tighter sync with external hardware. These messages may wait until the next downbeat occurs to be sent. When using this option with Automatic BPM Detection, the "→|" button switches to a resync on next downbeat action for manually resyncing.
Comm Display
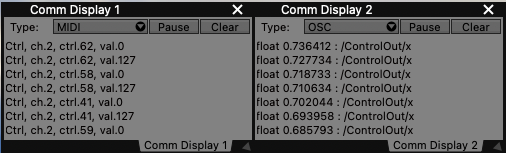
The Comm Display plugin displays any MIDI and OSC data received by VDMX and is useful for checking and debugging the data streams you're receiving. There are only three controls: the "Type" pop-up button for choosing MIDI or OSC data to display, a "Pause" toggle which pauses (disables) the display of new input, and a "Clear" button. If you're not explicitly using a Comm Display plugin you should either pause or delete it to avoid wasting resources- this plugin was created as an aid in debugging OSC and MIDI data received by other applications (particularly OSC data, which may be received as lists of arbitrary values depending on the software sending it).
Control Surface
Video Tutorial: Control Surface Plugins
The Control Surface plugin let's you create custom sets of interface controls with a custom layout.
There are many useful ways that the Control Surface can be used as part of setups, such as:
- Building a consolidating set of master UI elements that control various aspects of your project.
- Making an interface that sends OSC / MIDI / DMX data to remotely control other systems.
- Creating a virtual representation of a MIDI or OSC controller layout.
Individual layouts can be saved to a JSON file format and re-used in other projects.
Main Control Surface Interface
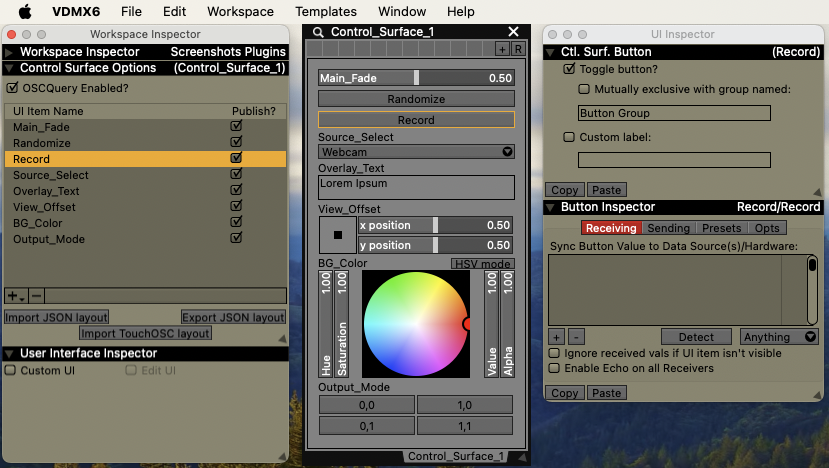
The main Control Surface interface contains:
- A section preset for quickly saving and restoring interface layouts within the plugin instance.
- Any UI items created for the plugin instance.
Control Surface Inspector
UI Items
From the UI Items tab of the Control Surface inspector you can:
- Add, remove and rename UI elements including:
- Sliders
- Buttons
- Pop-up button
- Color wheel
- Text field
- 2D position
- Multi-slider
- Multi-button
- Import / Export as JSON: The list of UI elements and all their settings can be saved as a file and loaded back into other projects.
- Import TouchOSC Layout: TouchOSC is a popular iOS application that is similar to the Control Surface in that it lets you create custom layouts of UI elements that connect to other systems. Using this option you can have the Control Surface automatically generate a set of controls that match against an existing TouchOSC project file from TouchOSC MK1 (.touchosc) (current TouchOSC .tosc files are not accepted).
Expressions
Along with the ability to create custom UI elements that are published as data-sources the Control Surface can be used to process their values with mathematical expressions and simple logic to create additional control values.
- Add, remove and rename expressions including:
- Float Expression
- Boolean Expression
- 2D Point Expression
- RGBA Color Expression
- Copy and Paste expressions
Select an Expression from the list to edit its code in the UI Inspector.
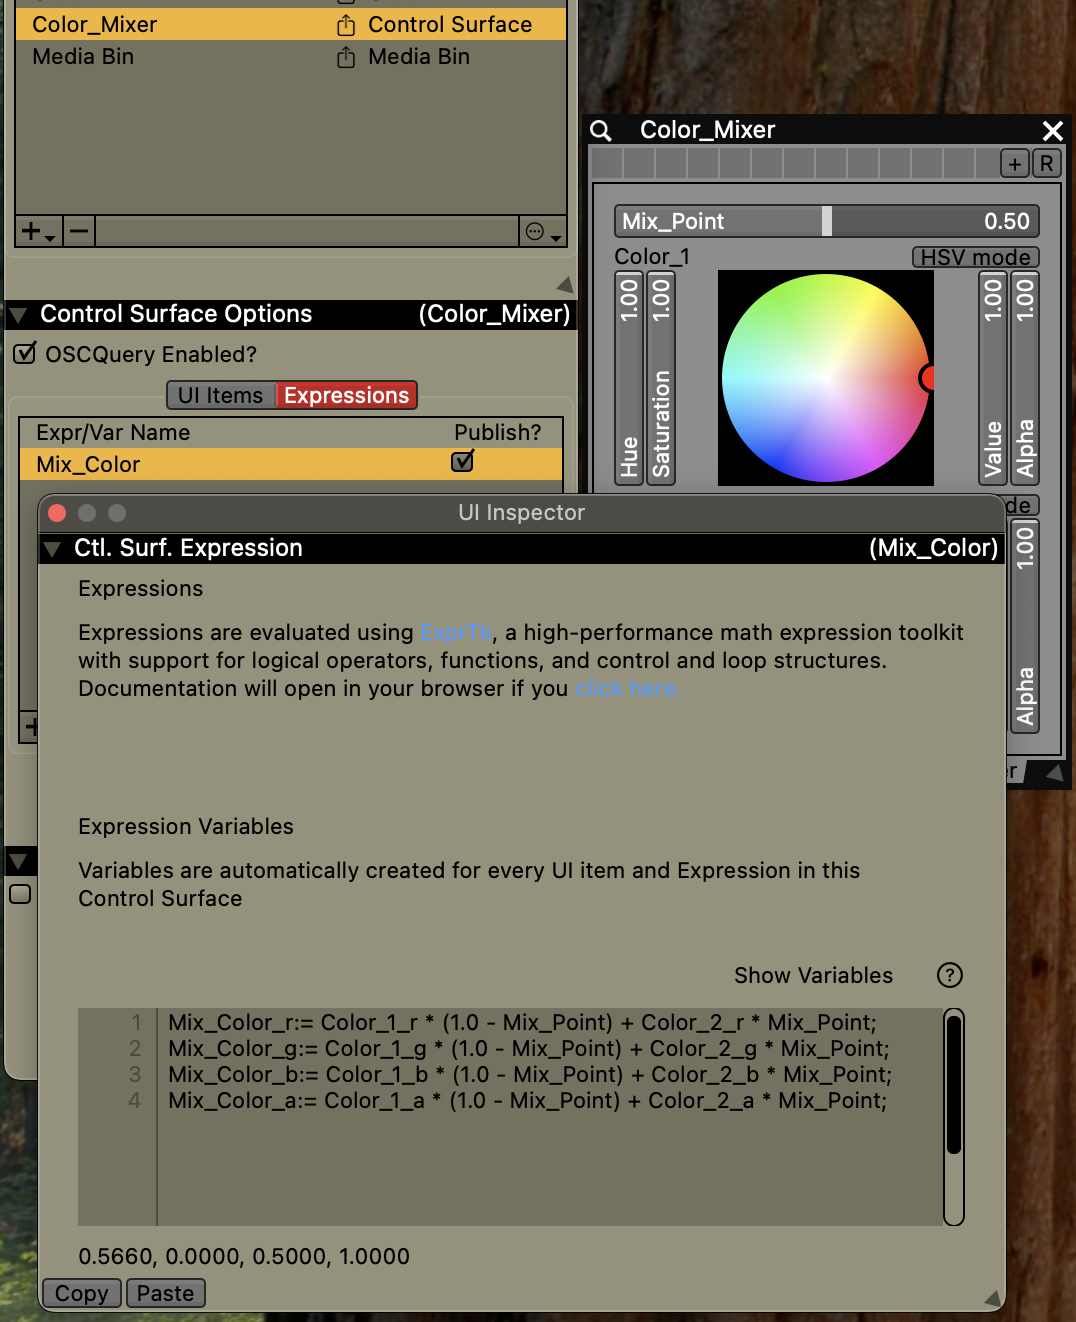
Code snippets for Expressions can reference the numeric values from UI items and other expressions within the same Control Surface. Click the 'Show Variables' button to reveal a pop-over that contains a list of the accessible variables.
The Control Surface expressions documentation page contains example use cases and sample code to get started with in VDMX.
Control Surface expressions are evaluated using the ExprTk library. A full listing of available built in functions and variables can be found on the ExprTk documentation page.
Inspecting Control Surface UI Elements
Many of the UI elements that can be added to a Control Surface have additional settings that can be adjusted from the UI Inspector.
- Buttons
- Toggle or momentary button
- Mutually exclusive with group: Toggle buttons can be groups with other toggle buttons such that only one can be in the 'on' state at a time.
- Custom label: Set a custom display label other than the published data-source name.
- Sliders
- Slider range: Set a custom min / max value for the slider.
- Publish normalized: Whether to automatically scale the range of the data-source to 0.0 to 1.0 before publishing, or to publish the value as set by the slider range.
- Custom label: Set a custom display label other than the published data-source name.
- Pop-up button
- Publish mode: Set the type of data that is published for this button, choose from one of three options,
- Publish as single index
- Publish as many BOOLs
- Publish as string
- Custom label: Set a custom display label other than the published data-source name.
- Publish mode: Set the type of data that is published for this button, choose from one of three options,
- Color wheel
- Publish RGBA values: Publish colors with Red, Green, Blue, and Alpha values as their own 0.0 to 1.0 data-sources.
- Publish HSVA values: Publish colors with Hue, Saturation, Value, and Alpha values as their own 0.0 to 1.0 data-sources.
- Custom label: Set a custom display label other than the published data-source name.
- 2D position
- Dimensions
- Publish normalized: Whether to automatically scale the range of the data-source to 0.0 to 1.0 before publishing, or to publish the value as set by the slider range.
- Custom label: Set a custom display label other than the published data-source name.
- Multi-button
- Toggle or momentary buttons
- Mutually exclusive: Toggle buttons can be groups with other toggle buttons such that only one can be in the 'on' state at a time.
- Number of buttons: Sets the number of buttons in grid.
- Publishing mode:
- Publish normalized float of last button
- Publish index of last button
- Publish as many BOOLs
- Custom label: Set a custom display label other than the published data-source name.
- Multi-slider
- Number of sliders: Sets the number of sliders in the grid.
- Slider range: Sets the range for each slider.
- Slider center: Sets the center point for the slider display fill.
- Publish normalized: Whether to automatically scale the range of the data-source to 0.0 to 1.0 before publishing, or to publish the value as set by the slider range.
- Custom label: Set a custom display label other than the published data-source name.
Enabling OSCQuery in the Control Surface
Each Control Surface plugin in VDMX can have its parameters automatically published on the local network for other software to remotely access using OSCQuery Protocol.
The "Enable OSCQuery?" toggle can be used to turn this feature on or off for each individual instance of a Control Surface, making it possible have both public and private controls.
Like with local data-sources in VDMX, there are many parameters specific to OSCQuery publishing that can be set using the UI Inspector.
Parameters that are published to OSCQuery can also be controlled from a web browser interface on smart phones, tablets and desktop computers. The URL to load can be found in the VDMX preferences in the OSC / OSCQuery section and is further discussed below.
Using the built-in OSCQuery Web Controller
Along with support for using OSCQuery to publish Control Surface for other software to access, VDMX also now includes a built-in web controller interface that can be loaded from standard web browsers on desktops, mobile devices and tablets. This means that, by default, every UI item on every Control Surface plugin can be controlled remotely from a browser with zero setup.
At the top of the web controller are two options:
- Listen for OSC: When enabled, the web page will work in 'bi-directional' mode and listen for OSC messages sent back from the server when values are changed from other clients.
- Dark / Light style: Switch between dark and light stylings of the web page.
The URL to load to get the web interface can be found in the VDMX preferences in the OSC section under OSCQuery. The link will look something like this:
https://your-ip-address:port/index.html?HTML
(for example, http://169.254.2.159:2345/index.html?HTML)
When loaded in a web browser, it will look something like this:
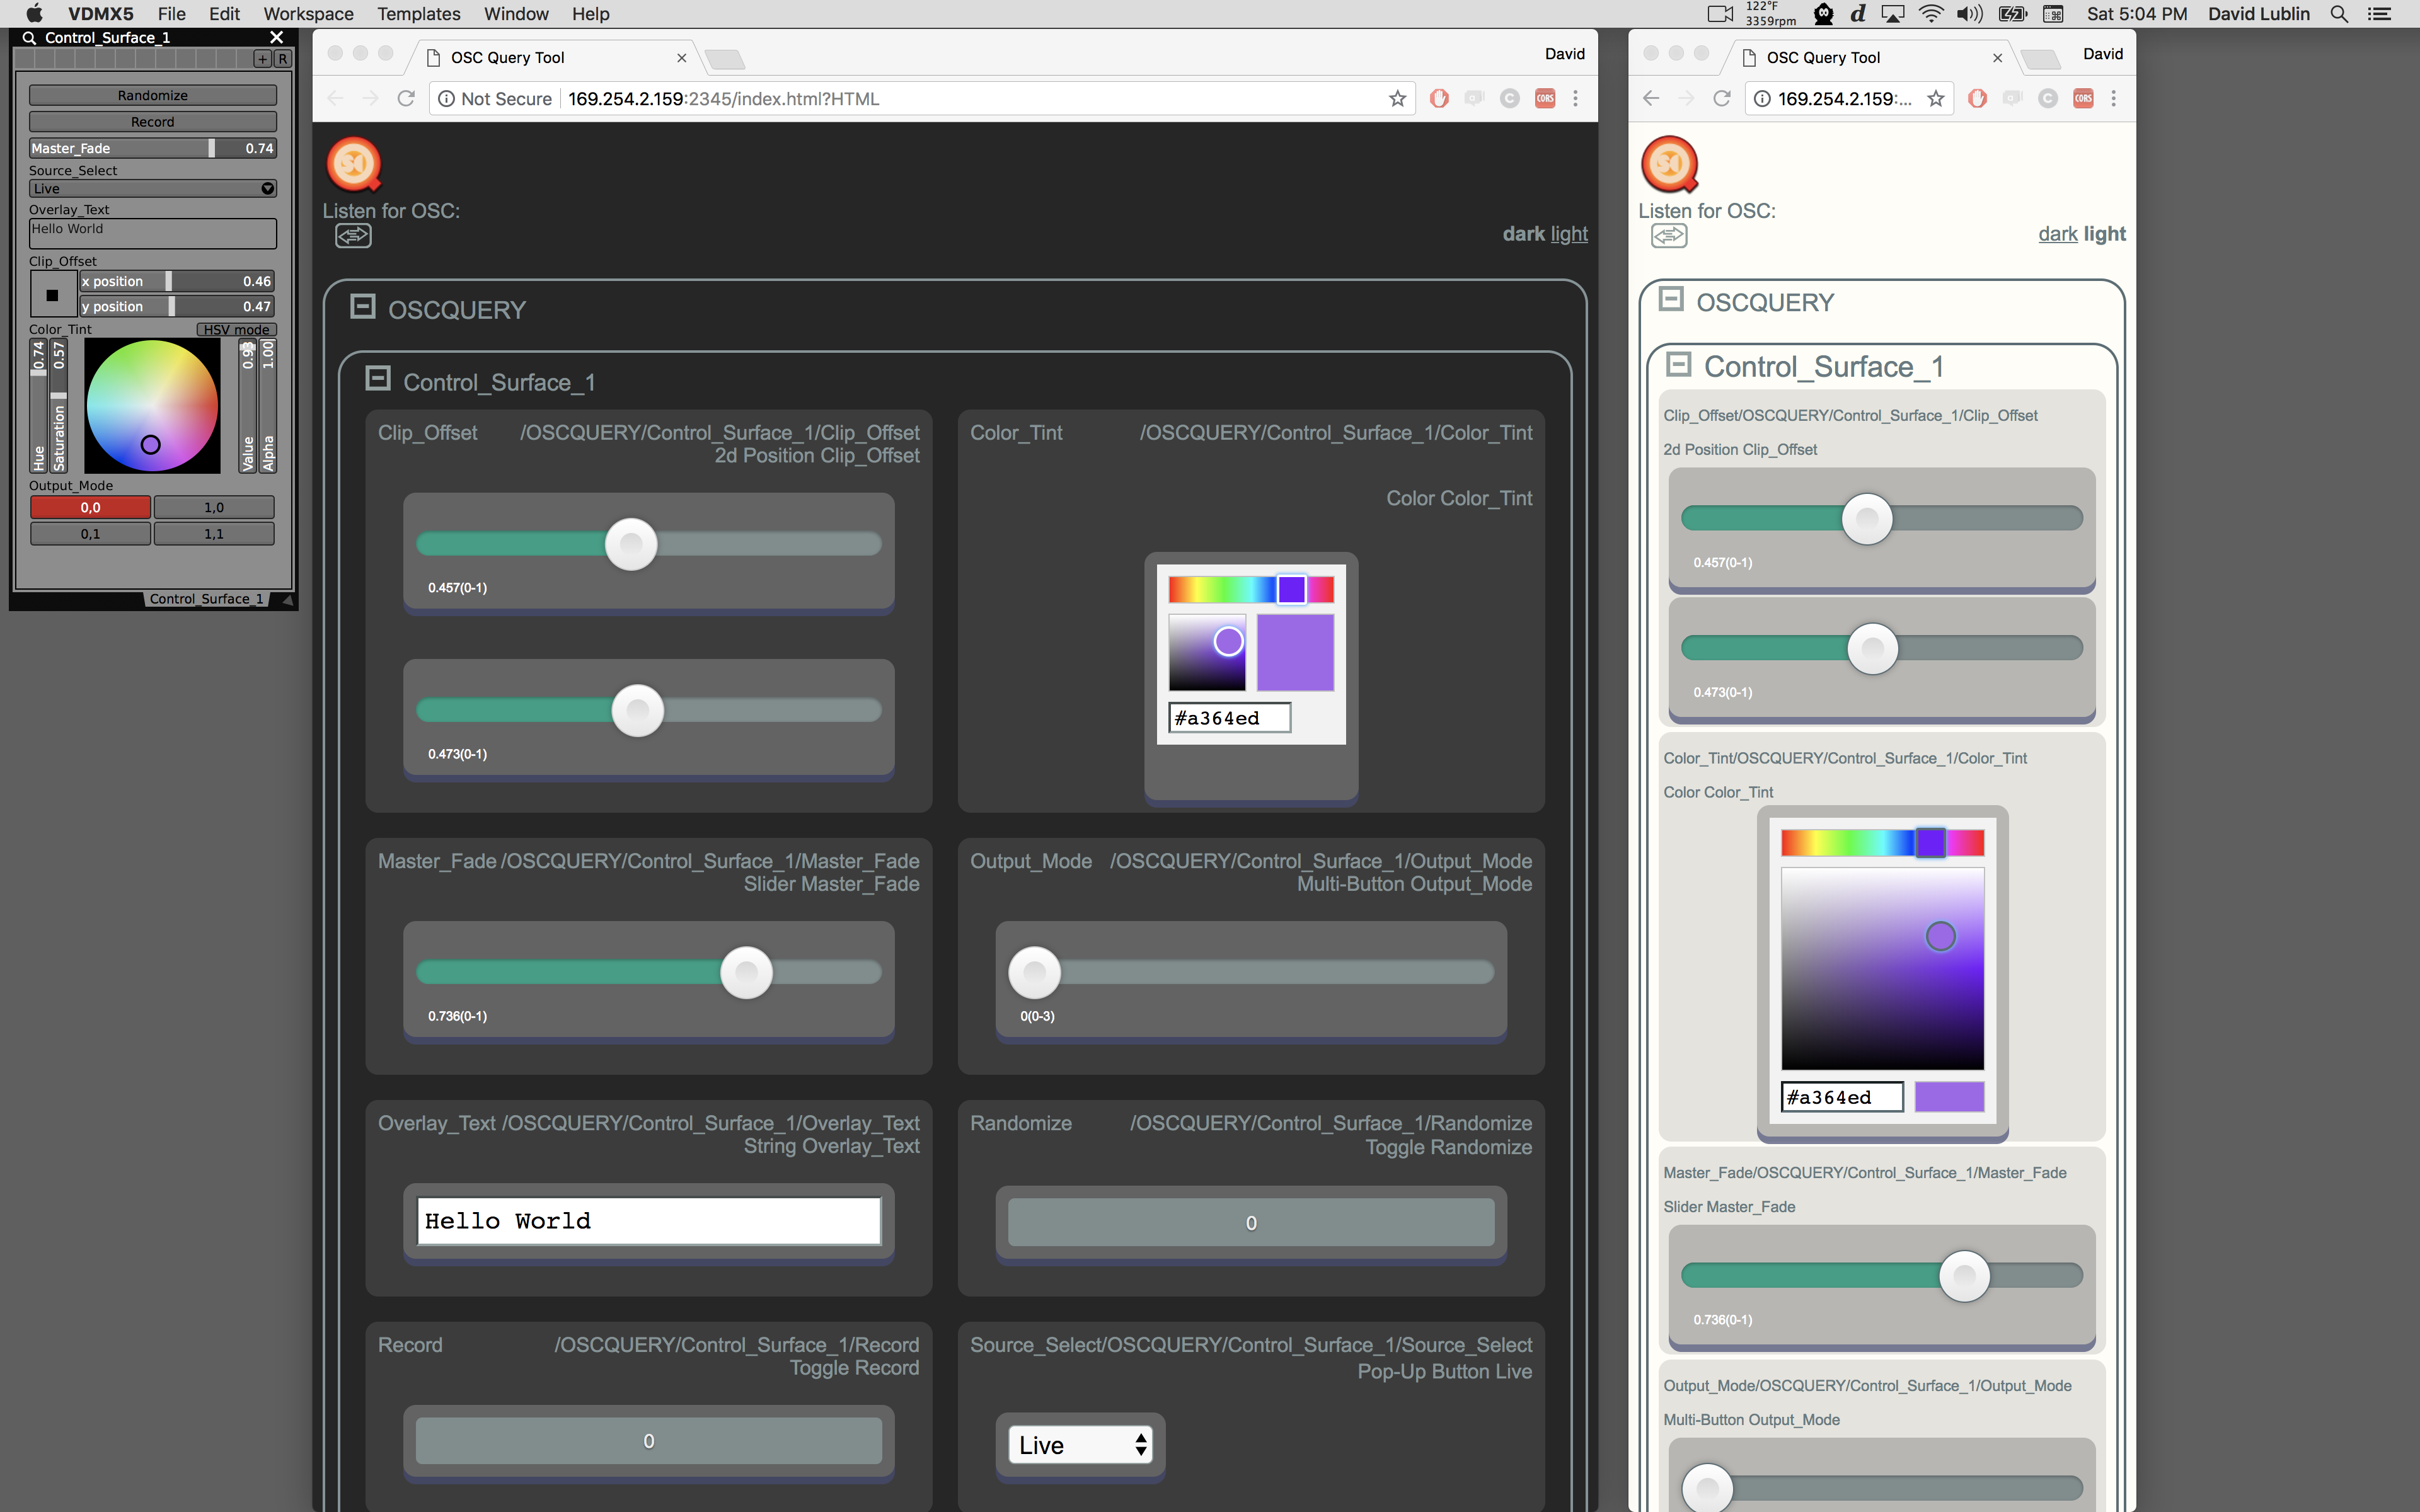
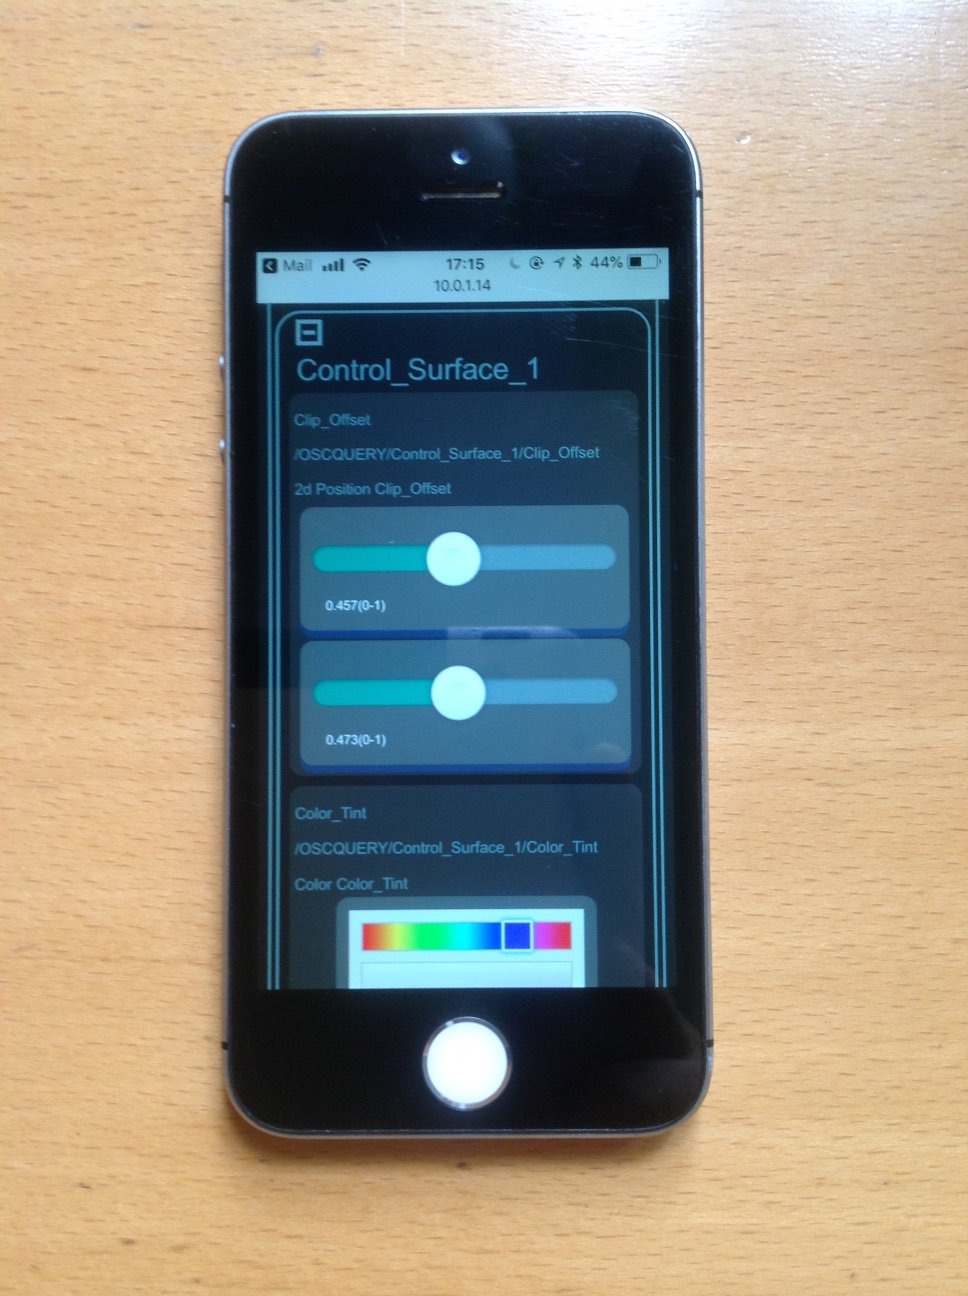
When loaded on an iPhone, it will look something like this:
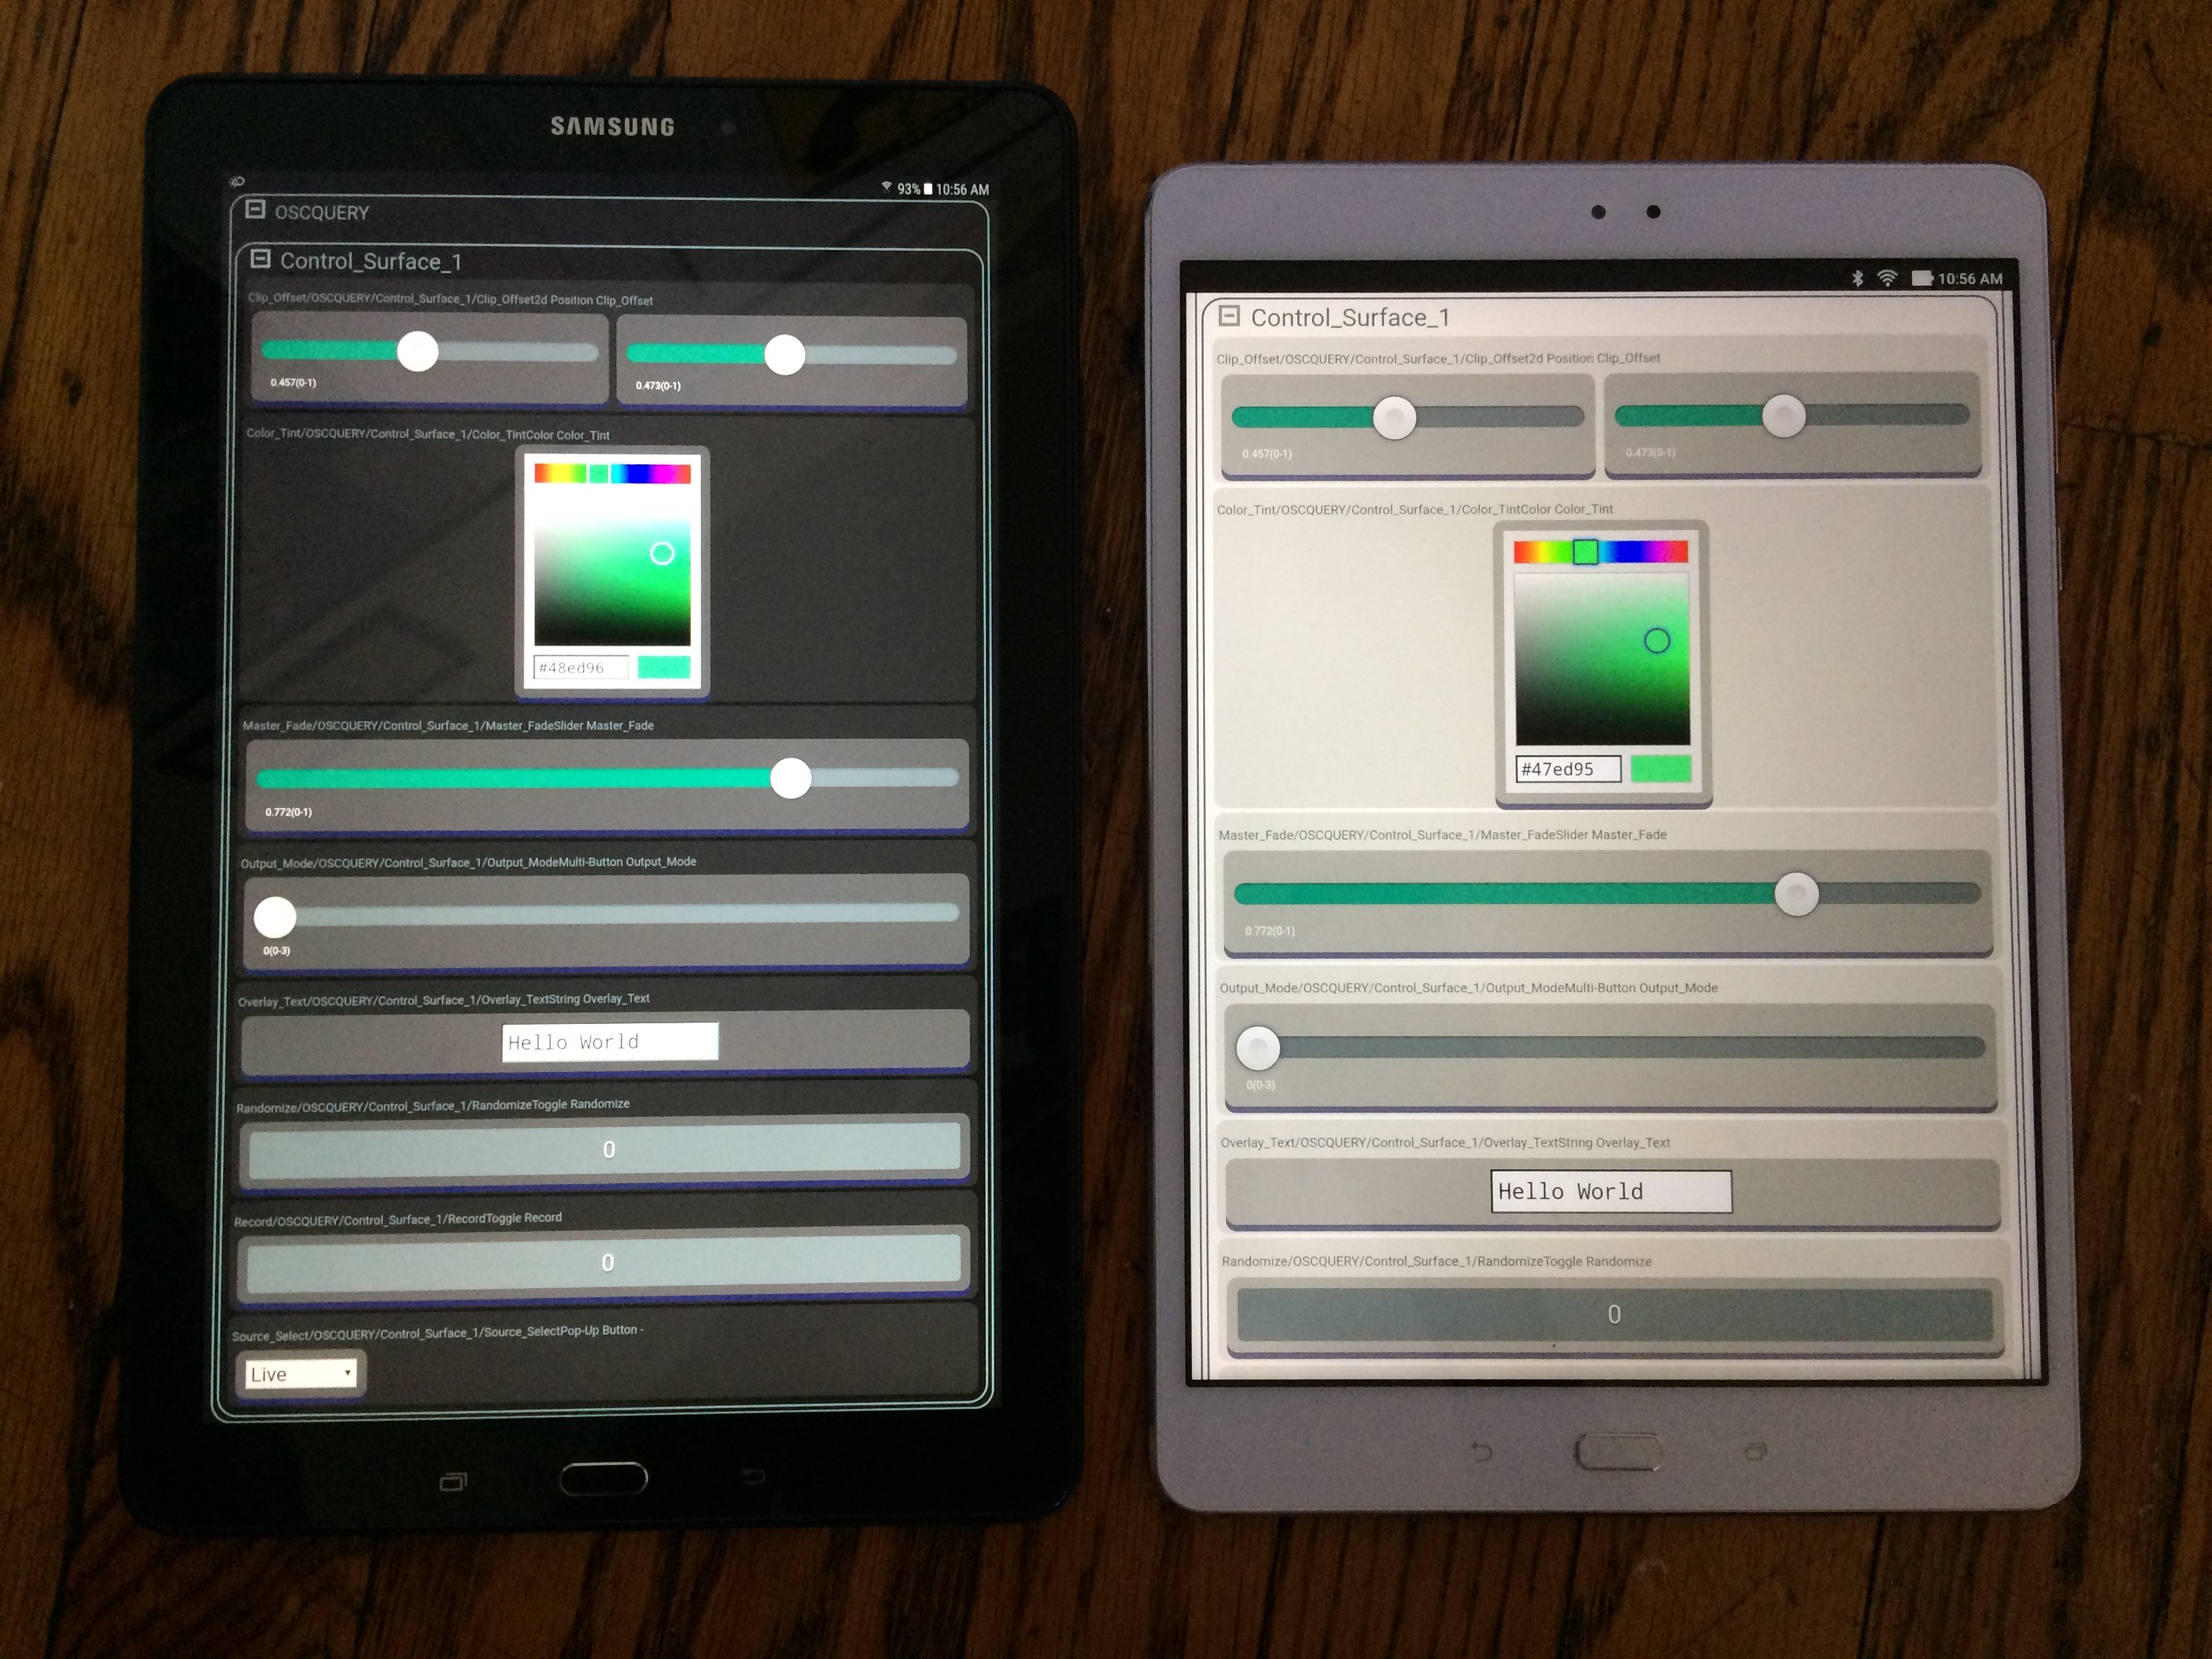
When loaded on an Android tablet, the Interactive HTML Interface will look something like this:
Note: Open source developers curious to see how this works behind the scenes can visit the oscqueryhtml project on GitHub.
Cue List
Use this plugin to set up pre-planned clip triggers and changes to locally-created data sources that occur at specific times during a performance. It has an assortment of timing control options (index/beats/measures/seconds/SMPTE), and can play back on its own or synchronized with other systems using internal (clock and timecode plugins) or external (MIDI, OSC, DMX, MTC, and LTC) data sources. Cues can also be exported and imported to a simple CSV document for collaboration or use in other projects.
Main Cue List View
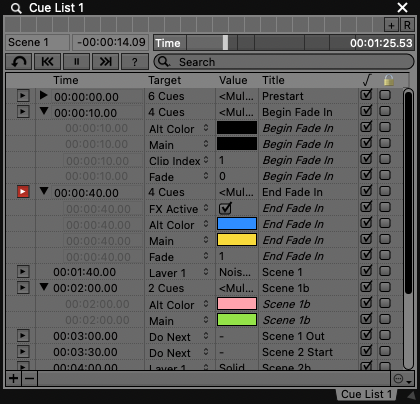
The main interface for the Cue List contains the controls for configuring and playing back actions for the plugin to execute at the specified times.
- Editing Cues
A list view showing all of the current cues fills most of main plugin interface. Each row in the list represents a single action that happens when the specified time is reached.
"Jump Button'" To jump to a specific cue, click the button in the left-most column. From the UI Inspector you can assign data-sources to trigger this button.
"Time'" column is used to set when an action takes place. Click in this text area to type in a new value for any row.
"Target'" column is used to set what kind of action takes place at the time for this cue. From the pop-up menu you can choose between changing the value of a data-source or selecting a layer that will have a clip triggered to it. Data-source targets can be added, removed and configured from the plugin inspector.
"Value'" column is used to set the media that will be triggered to a layer or the value that published by a data-source to control parameters. This field will update to the appropriate type for number entry (float or index), color selection (color), on/off switch (boolean), text field (string), or a clip selection menu for layers.
"Title" column allows for including an optional display name for each cue.
"Enabled" column can be used to turn cues off without deleting them from your list.
"Lock" column can be used to prevent changes from being made to individual cues.
Below this view are buttons to add ("+") and remove ("-") cues from the list. In the sprocket menu you’ll find additional useful features for grouping cues,
When editing row items in the Cue List, there are several options that are available by right-click or from the sprocket options menu. These include the ability to quickly expand / collapse all groups, change the enable or locked state of selected cues and creating new groups by selection.
Additionally for fast editing and entry of cues, the following keyboard shortcuts are available:
- ''⌘-enter'' – create new cue at selected time
- ''shift-enter'' – jump time to the selected cue
- ''shift-left'' – decrement the time of selected cues by one minor time unit
- ''shift-right'' – increment the time of selected cues by one minor time unit
Tip: Each row also contains a boolean receiver which can be used to jump to the specified cue. When a row is selected in the cue list, the UI Inspector will update to show the settings for its boolean receiver.
Tip: The format for the “Time” column can be changed from the plugin inspector to be represented as indexes, beats, measures, SMPTE or seconds. From the inspector you can also specify the appropriate frame rate or musical time signature that you would like to work with.
- Cue List Time Controls
Along the top of the Cue List is a standard Section Preset bar which can be used to save and restore different states for an instance of the plugin. These presets will change all of the cues, data-sources, controls and other options.
Next are the time controls, which include:
- "Time Slider" Use this to jump the playback position to a different time.
- "Cue Name / Time Display" Text labels that show the title and time at the current play position. Can be configured from the options panel to display as countdown to next cue, time within current cue, total time remaining and current elapsed time.
- "Restart Button" Jumps to the first cue. If using a time code or clock plugin to drive the plugin this will resync with the appropriate time.
- "Previous Cue Button" Jumps to the previous enabled cue.
- "Pause Button" Pauses the advancement of time.
- "Next Cue Button" Jumps to the next enabled cue.
- "Random Cue Button" The ? button jumps to a random enabled cue.
Cue List Inspector
The Cue List plugin can be customized in several ways using the inspector panel. The settings are arranged in 4 inspector panels.
- Cue List Data-Sources
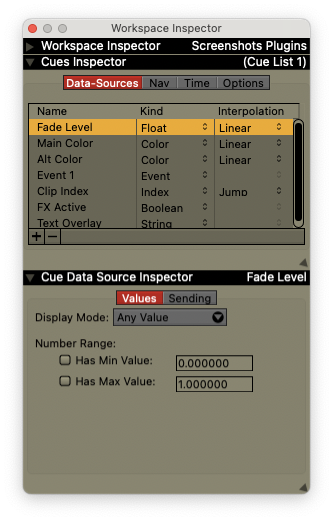
Each Cue List can publish any number of data-sources to control parameters in your project. The main data types of "float", "index", "boolean", "event", "color" and "string" are available.
Each data-source that is configured in the inspector shows up as an option in the pop-up menu for the target column in the main Cue List interface.
For applicable data-types, such as float numbers and indexes, you can specify how the published values should change as they go from cue to cue using the "Interpolation" column. The default setting is to "Jump" between values but for smoother transitions you can specify "Linear", "Smooth In", "Smooth Out" or "Smooth In and Out".
In addition to using these values internally, for each data-source that is configured for a Cue List you can also specify any number of Data-Senders for output over DMX, MIDI or OSC by using the Cue Value Data Source sub-inspector. Click on a data-source to see the sub-inspector for configuring these senders. See the section on Data-Senders for more information on configuring individual senders.
- Cue List Navigation
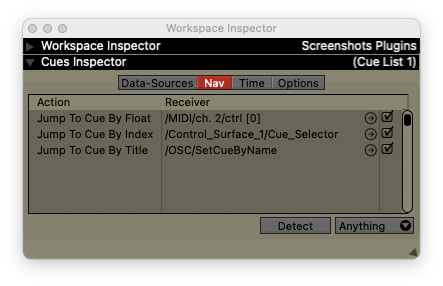
From this tab in the Cue List inspector you can configure data-receivers for jumping to different cues directly based on their index or their name:
- "Jump to Cue By Index": Expects a counting number ranged 0 to the number of cues available.
- "Jump to Cue By Float": Expects a normalized number ranged 0 to 1 and scales to the number of cues available.
- "Jump to Cue By String": Jumps to the first cue where the title field matches the provided string.
To jump to specific times, or to sync the time to a specific data-value, use the Time Slider in the main Cue List interface.
- Cue List Time Settings
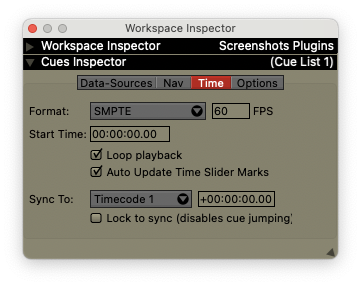
The formatting for the time column in the Cue List plugin can be set to several different modes to make it easier to work in different work environments:
- "Index mode": Cues times are displayed as increasing counting numbers starting at 1.
- "Measures": Enter times in clock notation, measure:beats:sub-beats. Requires entering a BPM to determine rate.
- "Beats": Enter time in number of beats. Requires entering a BPM to determine rate.
- "SMPTE": Enter time in standard SMPTE format. Allows for specifying number of frames per second.
- "Seconds": Enter time values in seconds.
Depending on the use case, the Cue List contains several options for the behavior for playback and editing of cues.
- "Start Time": For situations where time code does not start at 0, the Start Time option can be used to specify a different point to begin playback. When adjusting this setting you will be presented with an option to automatically shift existing cues to the new time offset.
- "Loop Playback": Sets whether nor not the Cue List should pause or restart from the beginning when it reaches its last cue.
- "Auto Update Time Slider Marks": When enabled, interesting marks on the time slider in the main interface will automatically update to match the times of cues.
Syncing time from other plugins: Each Cue List plugin can be set to update its time in sync with a "Clock or" "Timecode" plugin. From the pop-up menu in the inspector, select a plugin by name to receive its time values.
When receiving clock or timecode, the time offset text field can be used to add or subtract a specify amount before applying as the current time.
The "lock to source'" option can be used to force the time to stay in full sync with selected plugin time. When this option is enabled, the time slider and other time navigation controls become inactive.
- Other Cue List Options
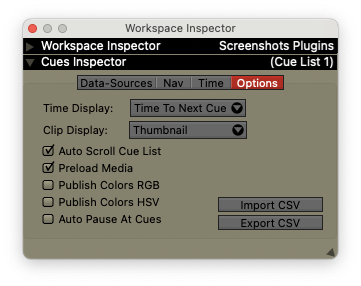
- "Time Display'": Set the display in the main interface between showing the Current Time, Cue Start, Cue Time, Next Cue Time, Time To Next Cue, or the Total Time Remaining.
- "Clip Display'": Switch between showing triggers to layer as thumbnails or names.
- "Auto Scroll Cue List'": During cue playback, automatically adjusts the scroll position of the main interface to include the currently active cue.
- "Preload Media'": When enabled, media references from clips will be preloaded for faster triggering.
- "Publish Colors RGB / Publish Colors HSV": In addition to publishing each color data-source as a ‘color’ data-type, these toggles can be used to publish the individual RGB / HSV channels of the color as individual data-sources.
- "Import / Export As CSV:'" The data from a cue list can be exported into a CSV formatted document that can be reused in other VDMX projects or edited in most popular spreadsheet software. To create a CSV file for your cues, click the "''Export CSV''" button in the options panel of the Cue List plugin. CSV formatted cue data can be loaded into a plugin by clicking the "''Import CSV''" button.
Data Looper
The Data Looper plugin lets you create tracks that record data (values) from a data source, and then loop that data back, publishing it to the track's data source. Recording and playback is always quantized to the chosen clock, and the plugin also has a built-in editor that allows for quick and extensive modification of the recorded data, including scaling, warping, translation, and deletion.
- Playback and recording is track-based: a single plugin can have multiple tracks. Each track's value is published as a data source in VDMX. You can choose this data source using any of the usual means, or by ctrl-click-dragging from the track preview (or the track editor) to any UI item.
- All tracks in a plugin are quantized to the same clock, which is selected by the pop-up button in the top-right of the plugin window. This means that all recording and playback is quantized- as long as your clock is in sync with the real world, everything you record and loop will also be in sync.
- The Data Looper plugin has two basic interfaces- the "View All" interface, and a track editor interface. You switch between these by choosing which track you want to view (either you "View All", or you select a track to edit).
The "View All" Interface
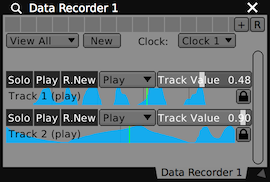
The "View All" interface displays an thumbnail preview and basic controls for every track in the plugin. Each track has its own set of controls for recording and playing back data, which are visible in this view- there's a pop-up button for changing the track's mode, and a value slider which is used by many of the modes.
Every track has a "mode"- this mode determines what the track is doing at any given point of time.
- "Solo" doesn't play back or record anything- if you're soloing, the track's data source value comes directly from the value slider. This mode offers a way to immediately get manual control over a track data source's value.
- "Rec(New)" deletes the existing track data and starts recording from the value slider. If you want to make a new loop, this is what you select.
- "Rec(Add)" will play back the track once (or continue to play it back if it's already playing back), and then as soon as the track finishes playing back it begins recording new data from the value slider.
- "Rec(Over)" immediately starts recording from the value slider over the existing track data. The track doesn't get any longer- it just keeps re-recording over the same duration indefinitely until you tell it to stop.
- "Play" loops whatever data you've recorded. Clicking on the preview will jump playback to the nearest quantized location, but aside from that there are no playback controls to speak of- it's just going to keep looping the data quantized to the selected clock.
- "Play once then solo" plays the track data a single time, and then immediately switches the mode to "Solo". If you want to "trigger" a track to play it back once and then switch to manual control over the data source value, this is how you do it.
The preview of the wave in the "View All" interface shows where playback is within the track (or how much data you've recorded, depending on the mode).
- Clicking on this preview will jump playback to the quantized location nearest your click
- Double-clicking on the preview will automatically start editing the track data
- ctrl-click-drag from the preview to any UI item to assign it that track's data source.
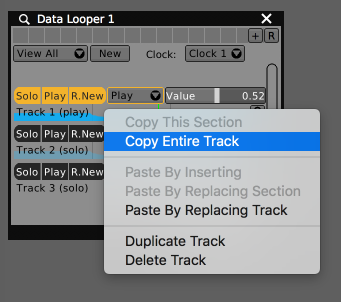
- Right-clicking on the preview will open a contextual menu with a number of options for copying, pasting, and deleting the track.
The Track Editor
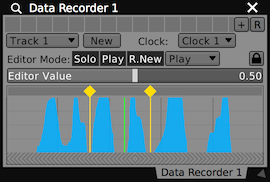
The track editor interface allows you to make chronological modifications to the track's data. You can switch to the editor UI by either double-clicking on a preview in "View All" or selecting a specific track from the plugin's pop-up button.
- The editor has its own "mode" pop-up button and value slider. The pop-up button and val slider from the track still work- this is an extra, dedicated set of controls that will always control whatever track is currently displayed in the editor.
- The editor has limited support for undo/redo- while you're in the editor, any changes you make to the wave can be "un-done" as expected.
- The "main" editor area has three basic sections- there's a small strip along the bottom that can be used to change the duration of the track. This automatically quantizes edits to the nearest full measure.
- Along the top of the editor is another strip- this strip lets you create or reposition warp points. Warp points are temporary markers that are used to distort or rearrange the data in a track. You click in the strip to make a warp point, and if you want to reposition a warp point you just click and drag it around. Warp points can be deleted by "tearing them off" the strip.
- The majority of the editor is taken up by a preview of the data you recorded. if you click on a warp marker in this area and drag it, the data on either side of it will be distorted. you can also click and drag on the space between warp points to slide it around, and rearrange the track data. if you hold down option while you click and drag, you'll copy the data before moving it.
- ctrl-click-drag from the editor to any UI item to assign it that track's data source.
- Right-click on the editor for a contextual menu with a number of options for copying and pasting track data.
- At present, there's no way to modify the track values- we experimented with this both manually (clicking & dragging to "draw" track data) and procedurally (like "erode", "noise", etc), but chose not to include this because during testing it was almost always faster and easier and the results were typically more in line with what was desired when simply re-recording the track. This is something we're open to re-visiting later, so if you have any strong opinions let us know!
The Data Looper Inspector
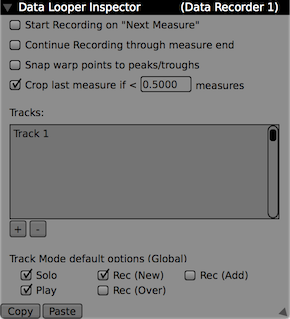
The Data Looper Inspector allows you to set a number of options that affect recording and editing behavior:
- "Start recording on next measure" is an option that comes into play with the "record new" mode. If enabled, recording won't start until the beginning of the "next measure"- this option is useful because it gives you an opportunity to "lead in" to the changes, which often produces a better output loop without editing.
- "Continue recording through measure end" is another option that can be used to help produce smoother loops. If enabled, this option will ensure that the track continues recording through the end of the current measure.
- "Snap warp points to peaks/troughs" does exactly what it sounds like- if enabled, warp points you drag around in the editor will snap to local peaks/troughs in the track's data.
- "Crop last measure if < XXX measures" will automatically crop the last measure you recorded if its duration is less than the provided value. This is enabled by default, and the goal here is to minimize the "cleanup" you have to do on your track: if you stop recording a little bit late then this option will automatically toss out the "extra" data you recorded.
The inspector also has some options for setting the global track mode default options. By default, the "mode" pop-up button for each track is created with a number of section presets for the modes we used most frequently while developing and playing with this plugin. These are the standard per-item presets, so they can be customized extensively by inspecting the pop-up button. You can also change the default presets that are created when you make a new track by using the checkboxes in the inspector.
HID Input
The HID Input plugin allows you to work with the devices such as gamepad, joysticks, controllers, etc that are compatible with the HID protocol. The UI is minimal- the plugin itself just has a pop-up button used to select an HID device. When you pick a device, the plugin will automatically create data sources for the available controls. The plugin's inspector displays a list of the control, and allows you to calibrate their min/max ranges. Button-type inputs in HID plugins can be used with "Detect" mode when setting up receivers (you can enable "Detect", then press a button on your HID device, and the assignment will automatically be created).
Also see Using Video Game Controllers With VDMX.
LFO
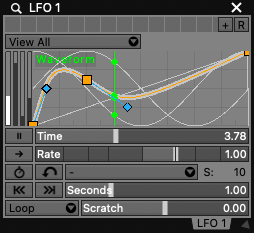
The LFO plugin, or low-frequency oscillator, generates control signals using built-in function generators (sine, cosine, random, etc.) and custom bezier curves.
For each LFO plugin you can specify:
- Any number of waveforms to evaluate
- The nominal duration over which the waveforms are evaluated in seconds or measures
- Standard transport controls- time scrub, pause, relative rate adjustment, loop-mode, reverse and jump-time
- A clock plugin to use as an external timer
- Options for the waveform record mode
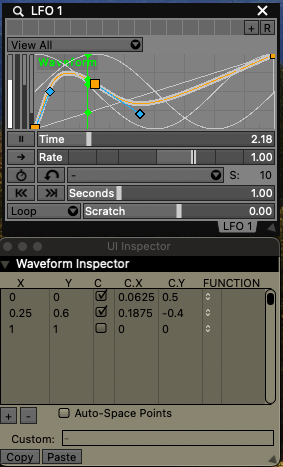
Additionally for each waveform you can set:
- The published data-source name
- Multiple sub-waveforms, each with their own type, to create complex piece-wise functions
- Control points for bezier curves and adjusting function generator frequency / amplitude
- A data-source that the waveform will use to create a new bezier curve when record mode is active
- Whether or not the waveform is visible in the curve editor
Main Plugin Interface
Curve Editor
Edit waveform in UI inspector - click on curve
Move node point - click and drag on the node
Add new point to selected curve - opt+click at new point location
Reveal control point for a node - cmd+drag on the node
Hide control point for a node - cmd+click on node or control point
Create / Duplicate waveform - right+click menu
Delete waveform - right+click menu
Length Field:
Set the duration over which the LFO will evaluate its waveforms when playing at a rate of 1x. When using an external clock plugin the units of measurement are bars, when using the internal LFO clock it will appear in seconds.
Level Indicator: Shows the current level of each waveform. Click on a column to select/inspect a curve.
Transport Controls:
Rate, time, loop-mode, reverse direction, pause and jump-time.
Section Preset UI:
Below the curve editor in the main plugin window is a standard VDMX section preset control for saving and restoring arrangements of waveforms.
The current transport control settings are not affected.
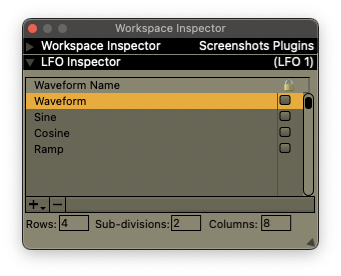
LFO Inspector Options
External Clock:
Set a clock plugin that the LFO should keep in sync with. When using an external clock the unit of length of the LFO switches from being in seconds to measures.
Waveform Manager:
Add, remove, rename and lock settings for individual waveforms.
Display Options:
Set the number of column divisions, sub-divisions and row dividers for the waveform editor display.
LFO Waveform Inspector
When an individual waveform is selected in an LFO it will become inspected in the UI Inspector window. From this control panel you can manually enter in the positions of each node and control point, as well as the function type for your custom curves.
Within a single waveform you can mix different function types to create complex piecewise functions.
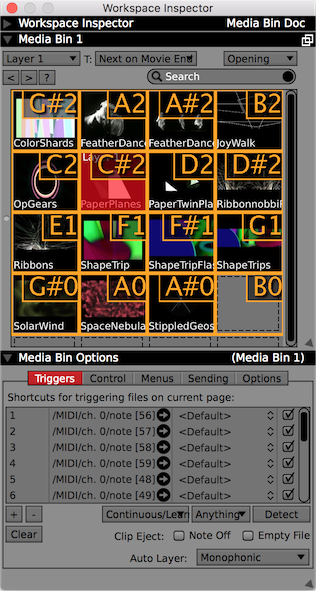
Media Bin
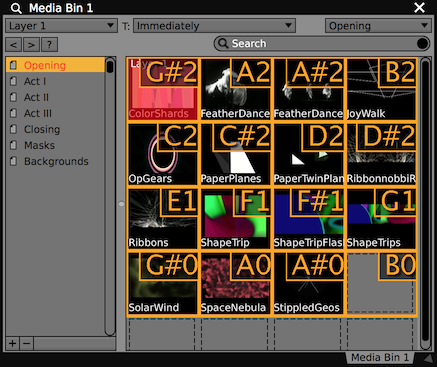
In the main interface for the media bin plugin the clips on the currently selected page can be loaded, browsed, organized and triggered to layers.
Page Viewer
The currently viewed page can be set either using the Page Menu at the top-right of the media bin or by clicking on the page in the Table of Contents list.
The page viewer has a number of useful features for working with clips and pages:
- Loading and Organizing Media Files - See the "Adding Files to a Project" for details on how to import media and perform common organizational tasks like moving and copying clips.
- Filtering - To filter the contents of the current page use the search field at the top of the media bin. Only files whose name or meta data match the entered terms will appear in the results.
- Sorting Clips** - Using the right+click contextual menu you can re-order the contents of a page based on the file name or by file path (groups clips by their location).
- Adding Pages - New pages can be created by clicking the + button (new empty page) or by dragging a selection of files (either from the file browser, the Finder or a page viewer in VDMX) into the Table of Contents. The order of existing pages can be changed by dragging within the list.
- Renaming Pages - Double click on their name in the list and typing in a new name. Pages must have unique names.
- Removing Pages - Clicking the - button will delete any pages selected in the list.
By default all pages are displayed in the Page Menu. This can be customized in the Menus section of the media bin options inspector.
Triggering Files
Once media files are added to a project they can be played back on layers. The media bin can be configured to trigger media using a variety of different hardware controllers or automated behaviors from within VDMX.
- Mouse Click - Clicking on a cell in the media bin will trigger the clip on the target layer.
- Keyboard, MIDI, OSC, DMX and other data-sources - In the first tab of the media bin options inspector is for setting up shortcuts for triggering clips with hardware controllers or VDMX's internal data-sources.
- To add a new receiver click the + button. ** To assign a hardware shortcut, select the row of the desired receiver, clicking the detect button and sending a keyboard / MIDI / OSC / DMX message to VDMX. ** The detect range option can be used to quickly set up multiple MIDI or OSC shortcuts by sending only the first and last note values. ** The shortcut also can be set to a specific data-source using the receiver list menu. ** Shortcuts can be removed using the - button or by using the Clear All button.
By default triggering a clip, whether by mouse click or a shortcut / data-source, it will begin playing back immediately on the target layer and continue to play until a new clip is triggered or the file is ejected from the layer.
The media bin plugin has several other trigger modes and options that can be used to customize the behavior of how clips are triggered.
*Voice Mode - Set the behavior for how the next target layer is determined when new triggers are received. * Monophonic (Default) - No automatic changing of the target layer when clips are triggered. Target layer can be manually changed using the Layers menu. * Cycle - Each time a clip is triggered the Layers menu in the bin will automatically advance to the next menu item as specified in the Menus section of the Media Bin inspector tab. * *Polyphonic - Triggers are sent to the next available layer based on the order specified in the Menus section of the Media Bin inspector tab.
Auto-Ejecting - Options for stopping playback on a layer.
- Note Offs - When the specified shortcut receives its applicable "off" message the clip it most recently triggered will immediately be ejected.
- Empty File - When a trigger is received for an empty cell an eject message will be sent to the target layer.
Adjusting Transpose - In the Control tab of the Media Browser inspector are three options for adjusting the transpose (offset) of the trigger receivers in the page viewer.
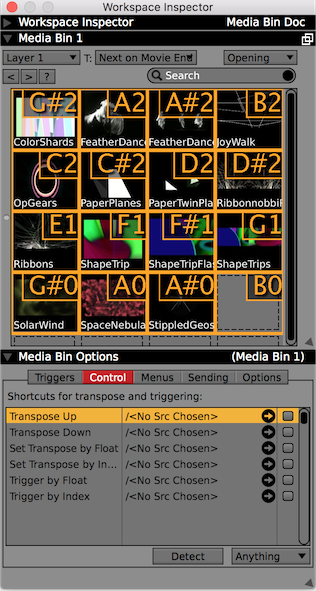
- Transpose Up - Increase the offset by the number of trigger receivers (row down).
- Transpose Down - Decrease the offset by the number of trigger receivers (row up).
- Set Transpose by Index - Send an integer (non-normalized) OSC, DMX, or data-source value to set the offset to a specific value.
- Play Next, Previous, and Random Clip - In the main media bin plugin window are two buttons that can be used to step backwards (<) or forwards (>) through a page one clip at a time instead of triggering specific clips via shortcuts or mouse click. A third button is available for triggering a random (?) clip in the page viewer.
*Trigger Clip by Index On Page - In the Control tab of the Media Browser inspector are two options for triggering files based on their position on the current page.
- Trigger by Index - Receives a non-normalized integer from OSC or VDMX data-source and triggers the clip at the specified index in the page viewer. When receiving from a DMX channel this will trigger clips in the index range 0-255. When receiving MIDI the clips index range is 0-127.
- Trigger by Float - Receives a normalized (0 to 1) value from OSC or VDMX data-source and scales it to the range of the current number of clips in the page viewer, then triggers the clip at the resulting index. When receiving DMX or MIDI the range is automatically normalized to the range 0-1.
Quantized Triggering - Using the menu next to the "T" in the main Media Bin interface you can select several different modes to quantize media triggers. The options for this setting include Immediately (no quantization), Movie End, Next On Movie End, Random On Movie End, and a Manual option. When the trigger option in the bin is switched from Immediately to Manual mode an extra button will appear in the media bin interface. In this mode any clip triggers for a layer are placed in queue until the button is clicked or banged by a data-receiver / shortcut.
Setting the Target Layer
The Layer Menu at the top left of the media bin sets which layer will begin playing back the next triggered clip.
By default all non-group layers are displayed in the Layers Menu. This can be customized in the Menus section of the media bin options inspector.
Echoing Triggers over MIDI and OSC and DMX
Basic Sender - Using the table in the Sending section of the Media Bin inspector you can set up MIDI and OSC destinations to echo trigger messages to.
- MIDI - Sends the index of the triggered clip, starting at 0, up to 127.
- DMX - Sends the index of the triggered clip, starting at 0, up to 255.
- When sending to an OSC destination you can choose between the following data types: *Float - Scales the index of the triggered clip to a 0 to 1 range and sends it as a float
- Int - Sends the non-normalized index of the triggered clip as an integer
- String - Sends the unique internal VDMX address of the clip.
Hardware Device Sync - For each trigger receiver specified for the bin the state of the clip associated with the receiver will be sent back to the same address on the specified hardware controller.
When using device sync and additional inspector panel will appear where you can set what messages are sent for each of the possible states. The settings will vary from device to device and there is a lot of room for customizing the look and feel of newer controllers that can light up in multiple colors.
The possible clip states are:
- Empty / Missing - No clip is matched with the trigger in the page viewer, or the media is unavailable.
- Available - The media for the clip is ready but not playing on any layers.
- In Queue - The clip is waiting to be triggered on one or more layers.
- Playing - The clip is playing on one or more layers, but not the current target layer.
- Playing on Target Layer - The clip is playing on the target layer.
Other Bin Settings
Preload Media - When applicable tells clips to prepare their media for playback. In some situations this can reduce the latency when triggering but can use up a lot of system resources.
Thumbnail Mode - Adjust how clips are displayed in the page viewer.
- Icons Only
- Names Only
- Icons and Names
Display Shortcut Paths - Hide or show the shortcut text from the trigger overlay.
Aspect Ratio - Set the aspect ratio of the icons in the page viewer.
Number of Columns -
- Auto Size - The number of columns will be automatically determined based on the number of shortcuts and the width of the page view.
- Fixed - Set the number of columns to a specific value.
Movie Recorder
Visit the Video Codecs page for tips on selecting the best format for your use case to when recording movie files
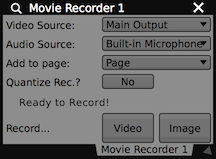
The "Movie Recorder" plugin lets you record audio and video generated by VDMX to QuickTime movie files that can be played back later.
- The "Video Source:" pop-up button lets you choose the video source you want to record
- The "Audio Source:" pop-up button lets you choose the audio source you want to record. If this button is disabled, you need to inspect the plugin and enable audio recording.
- The "Add to page:" pop-up button lets you designate the page in your VDMX workspace the recorded files will automatically be appended to. If this button is disabled, inspect the plugin and enable "Import recorded clips?"
- The "Quantize Rec.?" toggle lets you toggle quantized recording on and off- if it's enabled, quantized recording will delay the beginning (or ending) of recording until a specific time. When you enable this, a momentary button will appear next to it ("Now"): this button is used to quantize your recording- any recordings you try to start/stop will be held until the "Now" button is triggered. You can control exactly what events you want to use to quantize your recordings by syncing the "Now" button to anything you want. The most common use of this functionality is to automatically start and stop recording exactly at the beginning of a measure- to do this, you would enable quantized triggering, and then sync the "Now" button that appears in the plugin window to "Beat 01" of your Clock plugin.
- The status of the movie recorder plugin is displayed between the "Quantize Rec.?" and "Record..." buttons
- The "Record..." buttons let you start/top video recording and record still images from the selected A/V streams.
The Movie Recorder has a number of options which are visible in its inspector:
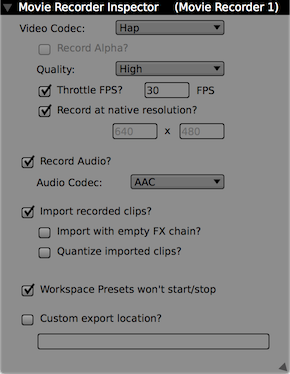
- The "Video Codec:" pop-up button displays the codecs the plugin can record to.
- The "Record Alpha?" toggle lets you decide whether to record the alpha channel being generated by VDMX, or to ignore it and record the video stream with a full alpha channel. If this button is disabled, it's because the selected codec doesn't support alpha channels (ProRes4444, Hap Alpha, and HapQ Alpha all support alpha channels).
- The "Quality?" pop-up button lets you select the encode quality. This is a per-codec option- some codecs support it, others do not.
- The "Throttle FPS?" toggle and accompanying number field let you decide whether to throttle the recording or not, and what FPS to throttle it to if you're doing so. If you aren't throttling the recording, frames will be recorded at whatever the native framerate of your source video stream is- this can vary widely depending on the source of the video and its native framerate (for example, some webcams only average about 24fps, while recordings of the "Main Output" will likely be 50-60fps).
- The "Record at native resolution?" toggle and accompanying number fields let you decide whether or not the recording should be the native size of your source video stream, and what size it should be saved as if you elect to resize it.
- The "Record Audio?" toggle lets you decide whether or not audio should be recorded. The "Audio Codec:" pop-up button immediately below it lets you decide what codec to record to (linear PCM, AAC, or apple lossless).
- If you are using Linear PCM you'll get the system default number of channels as the input device, but Apple Lossless only works with up to 8 channels and will be downmixed to stereo if there are more than 8 channels, and AAC does a stereo downmix if there's more than 2 channels.
- "Import recorded clips?" lets you determine whether or not the clips and pictures you record should be automatically added to your VDMX workspace.
- If "Import with empty FX chains" is enabled, the clips that are automatically imported have empty FX chains- when you trigger them, they will clear out any FX on that layer.
- If "Quantize imported clips?" is enabled, the clips that are automatically imported with quantized playback enabled- the quantized duration of the created clips is also automatically set based on the current BPM.
- If "Workspace Presets won't start/stop" is enabled, workspace presets that are triggered won't start or stop recording.
- The checkbox labelled "Custom export location" and accompanying text field allow you to specify where the files created by this plugin should be saved. By default, files you create with the movie recorder plugin will be created in the location described in the "Recording" section of VDMX's preferences- this checkbox allows you to save the files in a different, per-plugin location.
NDI® Output
The NDI® Output plugin can be used to publish video and audio streams from VDMX to other client software and devices that support the protocol.
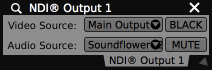
From the main NDI® Output plugin interface you can adjust the following settings:
- Video Source: Sets which video stream from VDMX is published.
- Black: Overrides the current output with a black frame of the same resolution.
- Audio Source: Sets the audio input device that is streamed along with the video.
- Mute: Overrides the current audio output with silence.
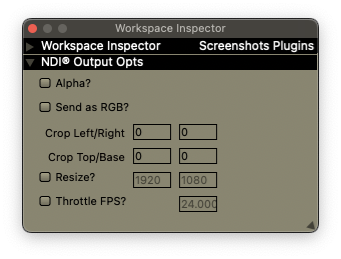
From the inspector panel additional options for NDI® publishing can be set:
- Alpha: Enables sending of alpha channel with the stream. Turning this on increases the bandwidth used for the stream.
- Send as RGB: Enables using the higher quality RGB mode for sending. Turning this on increases the bandwidth used for the stream.
- Crop (left/right/top/base): Set the number of pixels to crop off from the incoming video signal before publishing.
- Resize: Optionally resize the video stream before it is published.
- Throttle FPS: Optionally limit the rate at which video is published in frames per second.
OCR
The OCR Plugin can be used to analyze video streams for text and QR codes.
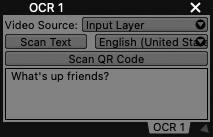
The main interface contains:
- Video Source: Specify which video tap to receive for analysis.
- Scan for Text: Use this button to scan the current frame for text.
- Language Selection: Set a preferred language for text detection.
- Scan for QR: Use this button to scan the current frame for QR codes.
- Detect Text Display: At the bottom of the interface is a text area that displays the most recently detected text or QR code string.
Any detected text or QR code strings are published as string data-sources which can be received by various text fields in VDMX, such as in the Control Surface and when using the Text generator layer source type.
Text and QR code detection can use up a lot of system resources, so it is recommended that you scan for updates as infrequently as possible.
The OCR Plugin does not have any inspector options.
Tips:
- Use the Text generator type for layers to render detected strings in the output. Use the UI Inspector with the text field to configure string receivers.
- String data-sources can also be used with the 'Choose by name' option on pop-up buttons found in the 'Nav' tab of the UI Inspector.
- Use a Control Surface plugin with Text Field UI elements to send string values to other software over OSC.
- VDMX can also generate QR Codes. Try the QR Code Overlay FX and CoreImage > QR Code Generator for adding QR codes to mix with the main output, or to save to disk using the Movie Recorder plugin.
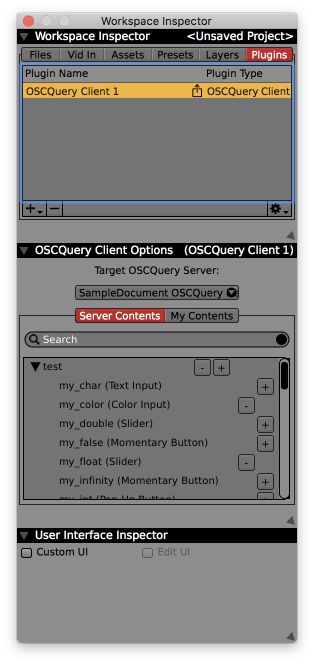
OSCQuery Client
Video Demo: OSCQuery Client and Control Surface
Using the OSCQuery Client plugin you can browse the address spaces of other software and quickly create UI controls that are automatically configured to send / receive data from other systems that publish their parameters using OSCQuery Protocol.
The main interface is similar to a Control Surface plugin except that the interface elements added represent parts of other applications that are being remotely controlled from VDMX.

Like with the Control Surface plugin, the inspector for the OSCQuery Client plugin is where you can select a remote server to connect to and which elements you'd like to remotely control:
VDMX supports bi-directional OSC messaging and when using OSCQuery Protocol, changes made on one system can be reflected in the user interfaces of each piece of software that is connected to it as a server.
Note that while VDMX supports bi-directional OSC message sending, other applications using OSCQuery Protocol may not. In these cases the VDMX interface may not dynamically update to keep in sync with remote servers, it will only send control information to them.
Preview
Video Tutorial: Preview Plugin
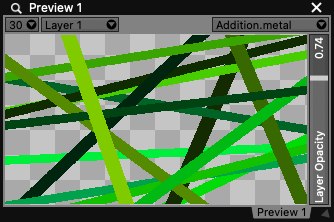
The "Preview" plugin lets you preview- and to a limited extent, interact with- the video sources you're working with in VDMX. These video sources could be coming from anywhere- a digitizer or window in another application enabled from the video inputs section of the Workspace Inspector, a layer (pre- or post-fx), another application publishing video via Syphon, etc.
- The pop-up button in the top-left corner of the plugin (it says "10" by default) is the approximate framerate of the preview plugin as measured in frames per second- the FPS of the preview plugin will not exceed this value. Under heavy loads, you can reduce this value to eke a bit more performance out of your setup.
- Immediately to its right is a pop-up button with a list of the available video sources. Selecting a video source from this list previews that video source. You could probably say that this is the "main" control for this plugin.
- If you select a layer from the list of available video sources, two additional controls appear: a pop-up button in the top right corner that lets you adjust the composition mode of the previewed layer, and a slider below it that lets you control the previewed layer's opacity slider.
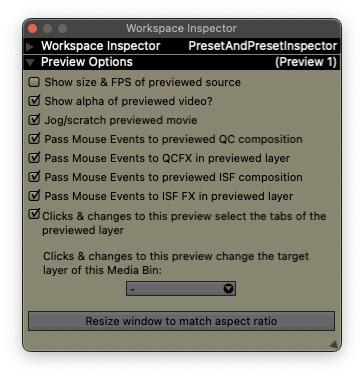
If you inspect a preview window, its options panel becomse visible and provide a number of options that let you use the preview image itself as an interface item:
- If "Show size & FPS of previewed source" is enabled, the resolution and framerate of the previewed video stream is displayed in the bottom-left corner of the preview window.
- If "Jog/Scratch" is enabled, clicking and dragging in the top half of the preview window jogs the clip (changes its speed) and clicking and dragging in the bottom half of the preview window scratches the clip.
- If "Pass mouse events to previewed web source" is enabled and the preview window is displaying a layer using a web source, and clicks and drags in the preview window are passed on to your web source.
- If "Pass mouse events to previewed QC composition" is enabled, any clicking and dragging you do on the preview window is passed to your QC composition, letting you interact with it directly as if you were in the QC editor.
- If "Pass mouse events to QCFX in previewed layer" is enabled, any clicking and dragging you do on the previewed window is passed to every QCFX in the previewed layer's FX chain. If you have FX that would benefit from direct mouse interaction, this option's for you.
- If "Pass mouse events to previewed ISF composition" is enabled, any clicking and dragging you do on the preview window is passed to your ISF composition.
- If "Pass mouse events to ISF FX in previewed layer" is enabled, any clicking and dragging you do on the previewed window is passed to every ISF FX in the previewed layer's FX chain. If you have FX that would benefit from direct mouse interaction, this option's for you.
- "Clicks & changes to this previewed layer select the tab of the previewed layer" is self-explanatory: this is a good way to let you use preview windows to quickly show and hide relevant portions of your UI.
- The Preview Window Options has a pop-up button with a list of media bins- you can select a bin from this list, and clicks on the preview or changes to its target layer will also change the target layer of the selected media bin.
- The "Resize window to match aspect ratio" button resizes the preview window vertically to match the aspect ratio of the previewed video stream.
Scopes
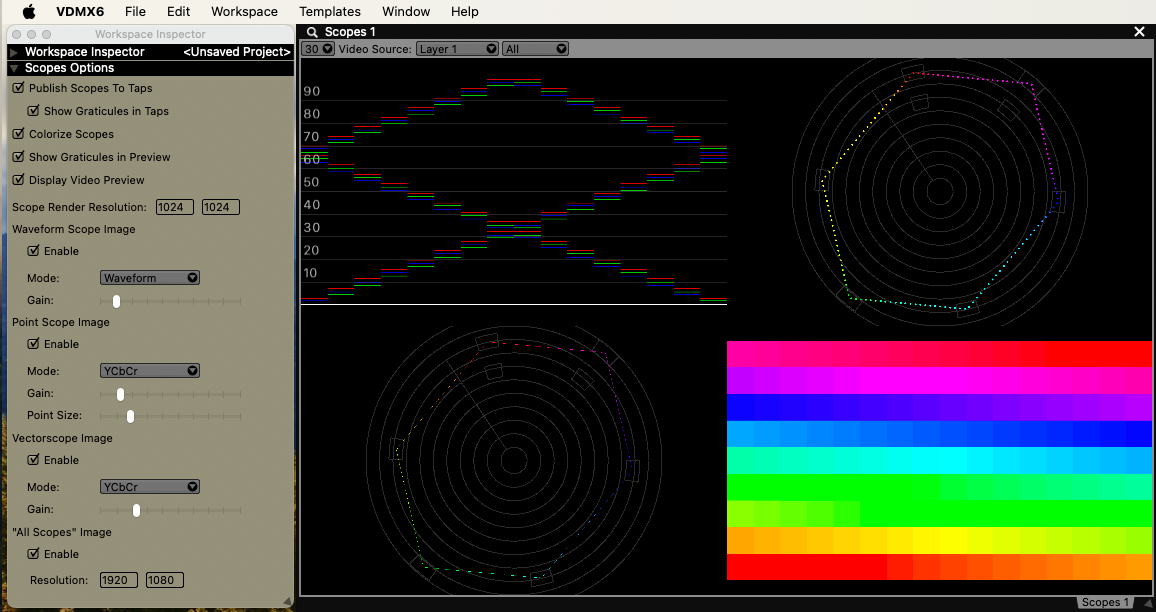
The Scopes plugin generates and displays a variety of useful visualizations of the color data for a provided video stream.
The main interface provides:
- FPS Menu: Adjust the rate at which the preview updates.
- Video Source: Specify which video source should be analyzed. Select any layer, or other available video tap.
- Display Mode: The Scopes plugin can be set to show All visualizations at once, or one at a time using this menu.
It contains three visualization types:
- Waveform Scope: Can be set to Waveform or Parade mode.
- Point Scope: Generates a visualization by drawing points with adjustable point size. Can be set to YCbCr or HSV display mode.
- Vector Scope: Generates a visualization by drawing lines. Can be set to YCbCr or HSV display mode.
The inspector also includes controls for:
- Publish each scope as a video tap that can be accessed by layers and other video receivers within VDMX.
- Turning the Graticules on or off for the published video taps.
- Colorizing the scopes, or having them in black & white.
- Individually set visualization type on or off using the 'Enable' toggles in the Scopes inspector panel. This can be useful to reduce the processing load on your system.
Step Sequencer
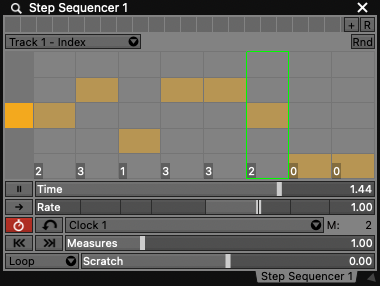
The "Step Sequencer" plugin is a control data generator where each track is set to a specific value at each 'step' in the timeline.
This plugin can be configured in a variety of ways, such as a router for switching between other data-sources (by using the column receivers for a track).
Each sequence can contain any number of data-tracks that are kept in time together.
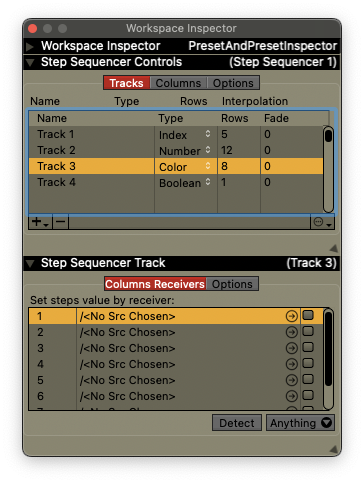
Tracks can be added, removed or otherwise modified in the Tracks section of the options inspector.
The editor view displays the track currently selected in the track picker menu:
- The published value at each step in the sequence can be set by clicking on the column you wish to modify.
- To **skip * over a step in a track click on the column while holding the cmd key. The column will become grayed out until cmd+clicked again.
- Overview Mode - When a sequencer has more than one track an additional view option is available which displays all of the tracks stacked vertically. In this mode tracks can still be edited.
Playback Settings
The amount of time over which the sequence plays once when at a nominal rate of 1x can be using the number entry field in the sequencer transport controls.
- Seconds Mode - Set the duration to a fixed number of seconds.
- Clock Mode - Specify the duration in terms of measures relative to the BPM to a clock plugin. Pick a clock from the menu and click the Q button to turn clock mode on.
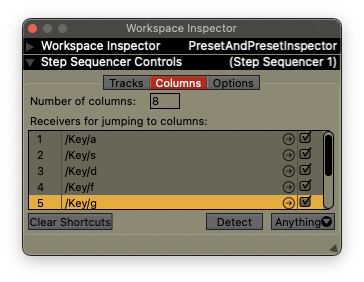
In the options inspector for the sequencer under the Columns tab you can change the number of divisions that each track will have.
For each step a data-source or shortcut can be assigned to jump to that point in the sequence.
In addition to setting the nominal duration and jumping to particular steps in the sequence, each plugin contains a set of movie-player style transport controls.
These can be used to adjust the playback behavior of the sequencer in a variety of ways.
- Time Slider - Click or use a data-source to jump to any point in the sequence.
- Pause- Stops the playhead for the sequencer from moving on its own.
- Scratch Slider - Click and drag to move the playhead relative to the current position.
- Jump Back / Fwd - Jump back or forward by the amount set by the jump slider.
- Loop Mode - Standard Play Once, Loop, or Reversing Loop options.
- Rate Slider - Speed up, slow down or change the direction of the sequence relative to its nominal duration.
- Reverse Button - Change the playback direction without changing the playback speed.
Tracks Settings
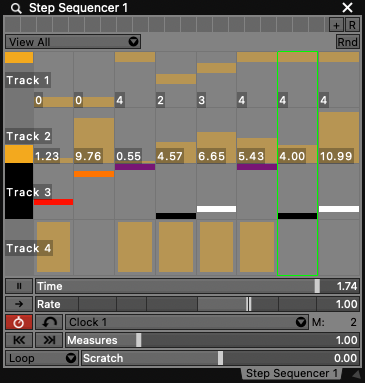
Each track can publish a value of one of the four value types:
- Index - Each row division represents a specific number value to publish.
- *Number - Set column values to any number.
- *Boolean - Set on/off state for each column.
- *Color - Each row represents a specific color to publish. Click on colors in y-axis to modify.
In addition to the type of data-source published by the track the following settings can be customized:
- Track Name - The name of the track as it appears in the data-source picker and plugin interface.
- Number of Rows - The number of row divisions (not applicable to boolean).
- Interpolation Rate - How far into the step to begin fading to the next column value (not applicable to booleans).
- Publish Normalized Value - Publishes Index and Number data types ranged 0 to 1 instead of a whole number based on the number of rows (on by default).
- Data Receivers for individual columns - For each column set a data-receiver (MIDI, OSC, DMX, or internal data-source) to set the published value.
For color tracks you can also globally set the following options:
- Publish as RGBA- In addition to publishing a color data-source to use with color pickers, the individual RGBA channels are published as numbers ranged 0-1.
- Publish as HSVA- In addition to publishing a color data-source to use with color pickers, the individual HSVA channels are published as numbers ranged 0-1.
In the options section there are also two useful settings for the editor:
- Draw Column Values- Hide or show the number display for index and number types.
- Restrict Clicks to Columns- Change the behavior when clicking and dragging across columns.
Sticky
The Sticky plugin lets you write notes in your setup- it provides a simple editable text field that you can write in. Formatted text is supported, and images can be embedded inline in the text- the UI is the standard text view for the OS. The plugin can optionally be "locked" by inspecting it, and disabling the "Editable" checkbox in the inspector.
Syphon Output
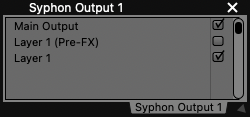
The Syphon Output plugin is how you make video streams in VDMX available to other apps via Syphon. This is a very simple plugin: just create it (you only need one instance of this plugin) and choose the video streams you want to publish. That said, there are a couple things you can do to optimize your setup if your primary use of VDMX is to publish video via Syphon:
- If you want to publish the Canvas/Main Output via Syphon, make sure that "Skip Canvas Rendering" is disabled in the Rendering Preferences.
- If "Display Drives Canvas Rendering" is enabled in VDMX's Rendering Preferences, the rendering speed (framerate) of the canvas/main output is being driven by the refresh rate of the display it appears on. While this looks nice and smooth, it may not be necessary- you may see better overall performance on your machine by disabling this, and manually setting the framerate of the canvas/main output.
Timecode
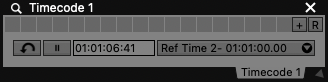
The Timecode plugin publishes a data source in VDMX, and is capable of both receiving and sending SMPTE timecode in a variety of formats.
- A single timecode plugin can only receive from one source at a time- it can receive from MTC (MIDI Timecode), LTC (Linear timecode), or from any data source in VDMX (including any MIDI/OSC/DMX data VDMX receives). Timecode plugins can also generate their own timecode locally, using a variety of framerates.
- The values received by a timecode plugin are published in VDMX as a data source as a floating-point number describing the time in seconds. These values can be used to drive cue lists, control movie playback directly, etc.
- A single timecode plugin can have multiple reference times, which are configured in its inspector- the time passed since the last reference time is published as a data source in VDMX, along with the index and name of the reference time.
- A single timecode plugin can publish its value to multiple destinations, in multiple formats. Values can be sent to other devices using MTC, LTC, and OSC.
Two Channel Mixer
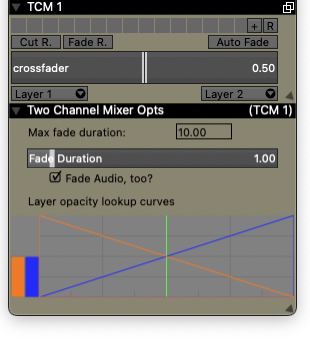
A common paradigm for realtime audio/video mixing is the ability to fade between two "channels" (or, in this case, layers). While this is largely built right into VDMX (just grab a layer opacity slider and start having fun), it's convenient for performance reasons to put this control in a dedicated plugin- this is what the Two Channel Mixer plugin is for. Don't be confused: the Two Channel Mixer plugin does **NOT * do any rendering/mixing/image processing. This plugin just changes the opacity of its target layers!
- The "crossfader" slider fades between the two selected layers.
- The pop-up buttons below the "crossfader" slider select the two layers you want to fade between. Again, this plugin doesn't do any image composition- it just changes the opacity sliders of the layers you select with these pop-up buttons!
- The "Cut" and "Fade" buttons above the crossfade slider let you cut and fade back and forth between the selected layers.
- The "Auto-Fade:" toggle determines whether or not the crossfade slider automatically fades in a layer when you trigger a clip in it.
If you inspect a Two Channel Mixer plugin, its options panel becomse visible and provide you with additional settings:
- The "Fade Duration" slider determines the time (in seconds) it takes the slider to fade from one side to another when you click the "Fade" button or trigger a clip while Auto-fade is enabled.
- The "Layer opacity lookup curves" allow you to set non-linear lookup curves- instead of being limited to a 1:1 relationship between the opacity sliders in the two layers, you can use this to adjust the lookup curves for the layer independently.
Video To DMX
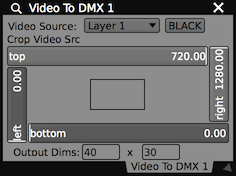
The Video to DMX plugin lets you publish a video source in VDMX as DMX data via Artnet, allowing you to put the video you generate on LED walls and other large-format displays that use DMX as an input source. A single "Video To DMX" plugin can publish a single video stream to a single DMX destination.
- The "Video Source" pop-up button lets you select the video source to publish. Immediately to the right of this is a "BLACK" toggle that blacks out the output if enabled.
- The "Crop Video Source" UI item lets you crop the selected video source- only the cropped area will be published.
- The "Output Dims:" fields allow you to specify the dimensions of the video you'd like to publish- whatever video you cropped will be resized to these dimensions before it is published.
- Video to DMX plugins output a video stream so you can preview the video you're sending to each output device- this is handled automatically, you can just select the video stream in any plugin window.
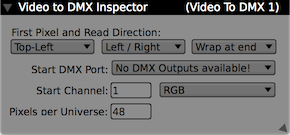
The inspector for the plugin has more options for determining how the DMX values are to be sent:
- The "First Pixel and Read Direction" pop-up buttons let you select thel ocation of the "first" pixel (Top-left, Top-right, etc), which direction the pixels are to be output in ("Left/Right", "Up/Down"), and how to handle the ends of each line ("Wrap at end"/"Snake at end").
- The "Start DMX Port" lets you select the DMX port you'd like to output on- if this pop-up button is empty, you need to navigate to the "DMX" section of VDMX's preferences and set this up!
- The "Start Channel" text field lets you specify which DMX channel to begin outputting on.
- Next to the "Start Channel" text field is a pop-up button that lets you choose what type of image to output (Grayscale, RGB, HSV, CMYK).
Video Tracking
With the Video Tracking plugin faces, hands, and human bodies can be detected and their positions published as data-sources for controlling parameters throughout VDMX. It can also be used to generate masking images and visualizations that can be previewed and used as part of the video processing pipeline.
As the Video Tracking analysis can use up a lot of system resources, it is recommended that you only the options that you need to use enabled in the inspector panel.
![]()
The main panel for the Video Tracking plugin contains a pop-up menu for selecting which video feed to analyze and a status indicator for the analysis.
For situations where multiple bodies and / or faces are detected, the provided 'prev', 'next', and 'rand' buttons can be used to switch between which is currently being tracked. When previewing the body and face tracking video streams clicking on a bounding box region can also be to change the active tracking.
The tracking options are as follows:
- Human Tracking: Detects human bodies and publishes the position as data-sources. This includes the center position, width, height, and the x/y coordinates of each corner of the box bounding detected people. A boolean 'Detected' data-source turns on / off when bodies are found.
- Face Tracking: Detects faces and publishes the position as data-sources. This includes the center position, width, height, and the x/y coordinates of each corner of the box bounding detected face. A boolean 'Detected' data-source turns on / off when faces are found.
- Hand Detect: Detects one or more hands and publishes the center position as data-sources. Includes options for specifying the maximum number of tracked hands and the chirality type (All, Left, Right, or Pairs). A boolean 'Detected' data-source turns on / off when hands are found.
- Human Mask: Generates a mask image that can be used e.g. with the Layer Mask effect to remove the background from images. Includes a quality setting (accurate, balanced, or fast). Also see the 'Remove Background' effect.
- Attention Saliency: Generates a mask image using an Attention Saliency algorithm.
- Object Saliency: Generates a mask image using an Object Saliency algorithm.
Where available the 'Publish Preview' option can be enabled for each tracking mode. This will create a video feed with overlays showing bounding boxes and other visualizations related to the analyzed images.
The "Minimum Latency" option in the inspector can be enabled to reduce latency (masks will be tighter) but takes longer to process (framerate may be lower, depending on the overall system load). This is option is off by default.
Wiimote
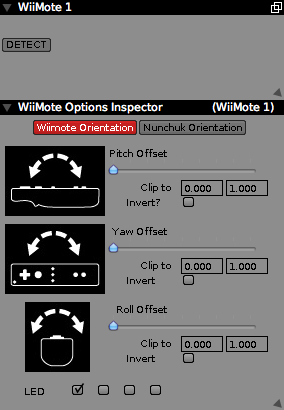
The Wiimote plugin lets you use a wiimote (and an optional nunchuk attachment) with VDMX. Using a wiimote plugin is fairly straightforward: you create the plugin (one per wiimote), click its "DETECT" button, and then connect your wiimote (either by pressing the red button in the battery compartment or by pressing and holding the 1 and 2 buttons simultaneously. Once connected, the data received from the wiimote is published as a series of data sources within VDMX- you can even just use the buttons on your Wiimote controllers with Hardware Learn Mode. The Wiimote plugin in VDMX is limited to the basic Wiimote, the nunchuk controller, and the "classic" controller- it does not support the Wii motion plus add-on, balance board, etc.
If you inspect a Wiimote plugin, its options inspector appears and offers you a number of controls for fine-tuning the pitch, yaw, and roll data sources.
Quartz Composer, TouchDesigner, and Vuo based plugins
Custom plugins for VDMX can be made using a variety of different node based languages.
More information about creating and installing custom plugins can be found on the following pages:
- Extending VDMX with Quartz Composer (Deprecated)
- Extending VDMX with TouchDesigner (Requires VDMX6 Plus)
- Extending VDMX with Vuo (Requires VDMX6 Plus)