Preferences
VDMX's preferences are accessed via the "VDMX6" menu. The prefs are split up into several different sections, which are listed in the left side of the window. Select a section to view its settings. Your preferences file is stored in /Users/yourusername/Library/Preferences/com.vidvox.VDMX6.plist.
Colors
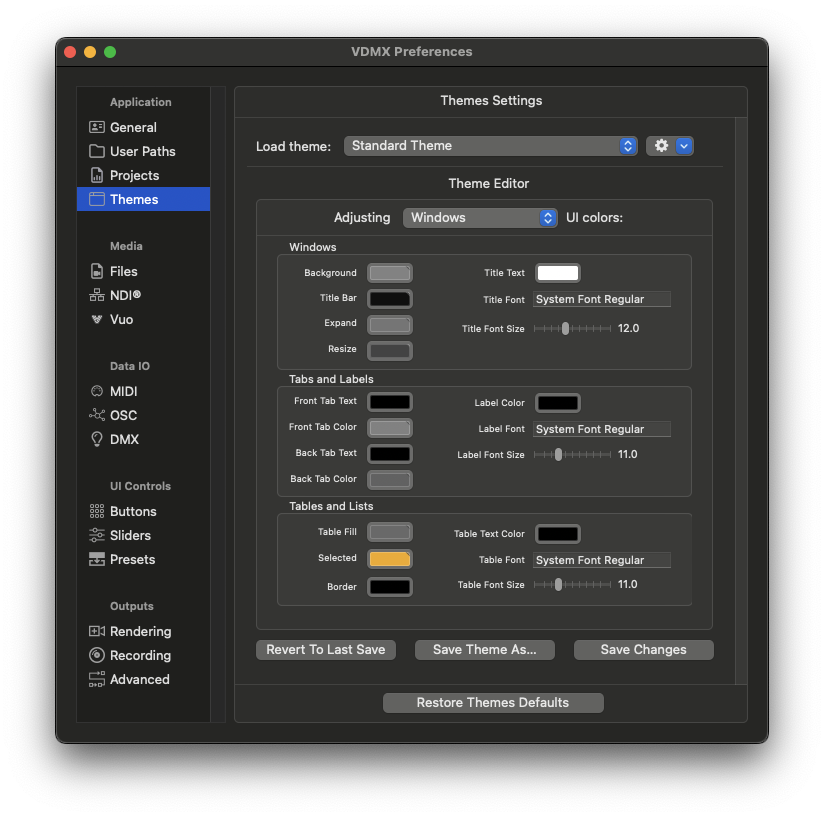
The appearance of VDMX is governed by hundreds of different colors, fonts, and options- all of which are in the "Colors" section of the preferences.
- When you get a set of colors you like, click the "Save Colors to Prefs" button. This save the current colors to your preferences, where they will be loaded next time you launch VDMX.
- If your colors get reset when you launch VDMX, you didn't save them to the preferences.
- "Revert to last saved prefs" loads any colors that are stored in the prefs. This overwrites any changes you made.
- Sets of colors may be exported so you can use them on other machines or shared with other users. A set of exported colors is called a "Theme". To export the current colors as a theme, enter a name in the supplied field and click the "Export Colors As:" button.
- The "Import Theme:" pop-up button lets you load a set of colors- when you load a theme listed in the pop-up button you'll start using its colors immediately, but the colors don't get saved to your preferences- unless you explicitly save the colors to your prefs, they will be reset when you relaunch VDMX.
- The default location for Themes is the "Themes" folder in your VDMX Resources folder (the default location is /Users/yourusername/Library/Application Support/VDMX/Themes). When you export a theme, this is where it goes- if you get a theme from someone, this is where you need to put it so VDMX can use it.
- Several sections of colors are multiplexed. For example, the set of colors for "Buttons" has a "Background" color. There's a "Background" color for the button's "On" state, another for its "Transition" state, and another for its "Off" state- that's a set of three different colors (you can switch between them with the "On/Transition/Off" radio buttons).
- Some UI items have different sets of colors if they're inspected, if one of their receivers is enabled, or both. To continue the previous example, buttons have three different "background" colors: one for when the button is "On", one for when it's "transition"ing from on to off (the "flash" you see), and one for when it's "Off". Another set of these three colors exists and is used if the button's inspected (the yellow outline can be much more than a yellow outline). A third set of these three colors exists and is used if one of the button's receivers is enabled (this is why some UI items turn green when they have receivers). A fourth set of these three colors exists and is used if the button's inspected and one of its receivers is used. A few other UI items have similar controls.
Files
- The "Files" tab allows for editing the default settings of newly imported files.
- When **Lock State * is enabled the playback settings for new clips can only be modified using the File Inspector.
- The default **Render Size * of resolution independent source types, such as CoreImage or Quartz Composer patches, can be set to default to match the size of the canvas, the size of the layer they are playing back on, or to a custom fixed size you can define.
- The **Text Style * sets the default player for newly created and imported text clips. Choose from any of the styles set up in the Text Assets section of the Workspace Inspector.
- The **Image Style * sets the default player for newly imported still image files. Choose from any of the image players set up in the Image Assets of the Workspace Inspector or use Direct Playback to bypass the QC based players.
- When using the preload option in the media bin, the **Max Preloaded Files Per-Page * setting in the preferences allows you to set the limit on the number of files that will be preloaded when a page is viewed.
- If you are working with very large image files that can not be handled by your system VDMX will automatically reduce their playback size to match the **Max Image Size * set in the preferences. If the horizontal or vertical size of an image exceeds the set value the image will be resized on the fly, maintaining the original aspect ratio.
MIDI
- The "MIDI Sources" tab displays various prefs related to received MIDI data
- The list of MIDI devices is provided to VDMX via OS X's CoreMIDI- you can enable/disable specific MIDI devices via the checkbox in this list. By default, VDMX will automatically enable and receive MIDI data from every MIDI input your system detects.
- The "Default Clock Source" pop-up button lets you choose a default MIDI device on your system to use wherever MIDI clock pickers exist.
- The "Dedicated Controls" tab lets you assign specific MIDI input sources as data sources while simultaneously removing their ability to trigger "Detects". This option was added for situations where you're sending control data between machines, but you don't want this control data to accidentally trigger any MIDI "Detects" you do (passing accelerometer or audio analysis data, for example). Simply click the "Detect New" button to start an auto-detect for the MIDI source you want to turn into a dedicated data source.
- The "Display Options" tab lets you choose whether you want to use natural names for MIDI notes or not.
OSC
- The "Regex-based wildcard address space" checkbox enables or disables regex-based pattern matching for OSC messages VDMX receives. In other words, if the address of a received OSC message contains a regex string, the message will be dispatched to every OSC address in VDMX that satisfies the regex query. The vast, overwhelming majority of users have no use for this and it is disabled by default.
- The "Input Ports" tab lets you create and manage OSC input ports which VDMX receives OSC data from. By default, VDMX creates a single OSC input that uses port '1234'. The presence of this OSC input is announced via bonjour/zero-configuration networking (other apps that support this will automatically "see" VDMX's input port as a destination). You can change the port by double-clicking on it, and create or delete ports by using the relevant buttons.
- The "Dedicated Controls" tab works identically to MIDI's "Dedicated Controls" tab.
- The "Output Ports" tab lets you configure outputs which VDMX uses to send OSC data to other machines. VDMX supports bonjour/zero-configuration networking, and will automatically create OSC outputs for any software or hardware on your network that uses bonjour.
DMX
- The "ArtNet Network" pop-up menu sets which network device (AirPort, Ethernet, etc.) to send and receive DMX data over.
- The "Dedicated Input Ports" number field sets the number of input universes to receive over ArtNet. These ports will be visible to other ArtNet controllers on the same network. Using the table you can specify the SubNet and Universe for each input port.
- The "Dedicated Out Ports" number field sets the number of output universes to send over ArtNet. These ports will be visible to other ArtNet controllers on the same network. Using the table you can specify the SubNet and Universe for each ouput port.
- The "Network Browser" displays other devices broadcasting on the ArtNet network. The Auto Setup Inputs and Outputs buttons will configure VDMX based on the detected devices.
Project Files
The "Project Files" preferences let you decide whether or not the first preset in a project gets triggered when you open it.
Recording
The "Recording" section of the preferences lets you set some default recording properties for video inputs. Please note that these settings only apply to video recorded directly from a digitizer or capture hardware.
Rendering
The rendering preferences are substantial- please keep in mind that each of these preferences operates completely independently of any of the others- there are literally hundreds of possible combinations for the rendering prefs, each with a different effect on your system, so it helps to know what each one does "behind the scenes".
- The "Restore default prefs!" button restores the default rendering preferences for your machine. Experiment without fear! If you get lost, just click this button and all will be restored.
- "QC antialiasing" lets you set the level of antialiasing applied to QC compositions. This affects all QC composition (whether they're loaded in VDMX as sources, FX, plugins, or whatever else). The default is 0 (no antialiasing); if you're going to set this to a non-0 number, you should really restart VDMX. If you don't restart VDMX, you won't be able to tell the difference between 1 and 8.
- "Display Drives Canvas Render" should be enabled by default. If this is disabled, the "Canvas" will render on its own thread- while this approach lets you set an explicit framerate (which might be nice if you're working with Syphon), any sync issues between the refresh rate of your monitor and this rendering thread will result in what appears to be dropped frames. Letting the display drive canvas rendering typically results in smoother output- which means a higher framerate, and usually a higher impact on your system.
- "VBL Sync" should be enabled by default. This option enables or disables vertical blank synchronization- the ability to flush drawing in time with the screen. If you disable this, frames might appear to draw faster- but you might also see "tearing" (the image displayed onscreen consists of half of one frame and half of another- you can see where the computer was writing to the buffer). If you enable this, you won't see tearing- but if you're pushing your GPU hard you may start to see some dropped frames. Generally speaking, dropped frames appearing slightly earlier isn't enough of a problem to justify the distraction of tearing (unless you're going for that sort of aesthetic).
- "Skip Canvas Render" is probably enabled by default on your machine. The Canvas is the composited result of all your top-level layers, and in order to display it onscreen VDMX has to composite all your layers, rendering them to an image (the "Canvas" image) which then gets drawn onscreen. This process adds an extra rendering pass- if you skip compositing the top-level layers (which has to occur at the canvas resolution- and that can be potentially massive) beforehand we can potentially save a lot of work for the computer by just compositing them once in the output. This approach has some drawbacks, though: since the "Canvas" image isn't being composited and then displayed, you can't preview the "Canvas/Main Output", apply FX to the Canvas, or use QC-based composition modes for any of the top-level layers (they'll default to their last-used or default CoreImage composition modes). This is an option we expect a lot of people to disable- it's a great speed-boost if you need it, but if you have the horsepower it's nice to have a preview and FX on the output.
- "Double-buffer output window" is exactly what it sounds like. under some circumstances, on some machines, double-buffering the output window yields a slight performance benefit. most of the time, it doesn't.
- "Output throttling mode" These options let you determine how much (if any) throttling VDMX does on its drawing. The general idea behind these is that if you overload your GPU then performance starts to degrade sharply- so some people like to throttle their output to achieve a more consistent performance profile (at the expense of fast framerates).
- "Every refresh" This is the default on most (if not all) machines. Every time your display refreshes, VDMX will ask your GPU to display a frame of output. This results in the smoothest output (at the refresh rate of your display if the "Display drives canvas renering" is enabled), but the highest GPU/CPU usage and interaction.
- "DB, skip if busy" Double-buffered output, but redraws are skipped if the GPU is busy. Frame A is drawn, frame B is drawn, the next frame isn't submitted until the drawing commands for frame A have finished executing, etc.
- "SB, skip if busy" Single-buffered output, but redraws are skipped if the GPU is busy. Frame A is drawn, and drawing commands for frame B won't be submitted to your GPU until the drawing commands from frame A have finished executing. This typically results in the most consistent output, but usually means your framerate is half the refresh rate of your monitor. If you're going to experiment with something, this is probably what you want to experiment with. This is also the default on machines with slow GPUs or drivers that seem to have problems under some circumstances.
- "Default Canvas Resolution & FPS:" sets the resolution/framerate (if applicable) of the Canvas when you make a new project or first launch VDMX. It does not change the resolution of the Canvas in your workspace!
- "Default Layer FPS:" sets the default framerate for newly-created layers. This only applies if multi-threaded rendering is disabled, and the default layer framerate may be overridden (if you trigger a file with an explicit framerate, for example).
Sliders
The "Slider" preferences contains the soft takeover settings for sliders described in the sliders section of the manual.
Buttons
The "Button" preferences contains the soft takeover settings for buttons described in the buttons section of the manual.
User Paths
- The "VDMX Resources" path determines where VDMX stores its plugins, qc composition modes, qcFX, qc image and text sources, templates, themes, etc.
- The "Flash Plugin" path lets you determine which flash plugin you want to use. By default this points to the standard location on your system for the flash plugin- if flash isn't working for you, please make sure the flash plugin is installed on your machine!
Misc.
- "Complete Hide Dock?" lets you completely disable the dock while VDMX is the foremost application.
- The "Add/Replace" radio buttons let you set the default mode in layer FX windows (new FX will either be added to the end of the existing chain or will replace the existing chain entirely).
- The function of the "Show Starting Point window on launch?" toggle should be self-evident.