Rendering: Layers on a Canvas
VDMX has a layer-based rendering engine- if you're familiar with photoshop, then you're familiar with the basic rendering model VDMX uses to produce its output:
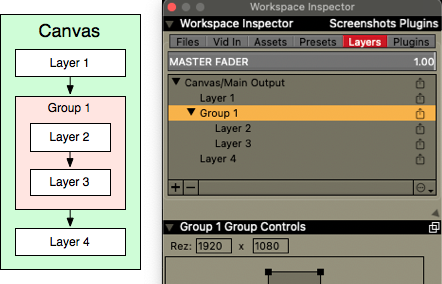
- Layers are the basic building block of this rendering engine. Each layer has a source (and only one source) which is some sort of media file (QT movie, QC composition, image file, etc) and an "FX Chain" which is a series of image filters that are applied to the video stream being produced by the layer's source. The post-FX chain video stream is then composited in the canvas using the layer's size, position, and composition mode (typically a CoreImage composition filter similar to a photoshop blend mode, but OpenGL and Quartz Composer comp modes also exist).
- A "group" is a combination of one or more layers that are composited together to produce a single image which is then treated as a layer (it has its own FX chain and composition settings, and is subsequently composited with other layers). This sort of hierarchical rendering is similar to flattening a couple of layers together in photoshop, and then taking that flattened image and re-compositing it with other layers.
- The "Canvas" or "Main Output" is the image VDMX is rendering for output. A canvas has an explicit size, and is treated like a group- all the canvas' sub-layers are composited (or "flattened" to use the photoshop metaphor) within the canvas to produce an image which is then run through the canvas' FX chain (a series of image filters which modify the image).
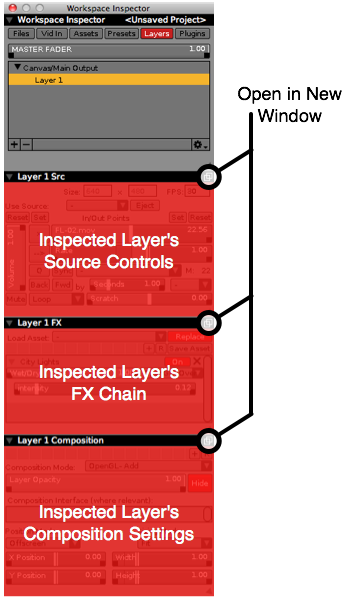
Layers are created, inspected, edited, rearranged, deleted, grouped, and generally controlled via the "Layers" tab in the Workspace Inspector. Most importantly, clicking on a layer or group in the list of layers will inspect that layer. If the layer's components haven't been opened into independent windows they will be displayed in the workspace inspector window, where you can interact with them. If the layer's components have been opened into other windows, their tabs are activated so the components are made visible in your interface.
The Workspace Inspector and Layers
- The "MASTER FADER" at the top of the workspace inspector is the master fader for your output. This is a quick way to fade to black.
- Immediately below the master fader is your list of layers. The "Canvas/Main Output" cannot be deleted or rearranged- your canvas is the final image being produced by VDMX's rendering engine. If a layer is a group, it can be expanded to display the layers inside it.
- Clicking on a layer in the list of layers will inspect that layer, showing its source, fx, and composition interfaces.
- To create a layer, click the "+" button.
- To delete layers, select them in the list of layers and click the "-" button.
- To rename a layer, double-click its name in the list of layers.
- If you click and drag a layer in the list of layers you can change the order of the layers- you can also drag layers into and out of groups in this manner. Changing the order in which layers are composited can change the look of your output dramatically- it all depends on the composition modes you're using.
- Clicking on the "sprocket" button opens a pop-up menu that allows you to perform several layer-based actions:
- If you select one or more layers and choose "Group Selected Layers", a new group will be created and the layers that were selected will be placed inside it. The layers inside this group are composited together to produce a single image- the group image- which is then composited with the other layers alongside the group.
- "Copy Selected Layers to Clipboard" is self-explanatory: the selected layer or layers are copied for later pasting. If you copy a group, the group and all its sub-layers are also copied.
- "Paste Clipboard to New Layers" takes the layer or layers currently on your clipboard and creates new layers from them. If the clipboard contained a group, the group (and all its sub-layers) will be pasted into the layer.
- "Duplicate Selected Layer" makes a copy of the selected layer.
Layers, In Detail
Functionally, layers have three discrete components: source, fx chain, and composition settings. Each of these components has its own inspector in the workspace inspector window, and each component may be moved from the inspector into its own window should you decide you want its UI in a more prominent location.
Layer Source
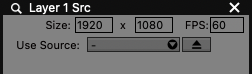
The layer source displays controls for controller the media file being used as the layer's source. In addition to various source-specific interfaces, the layer source has a couple dedicated UI items that don't change.
- The "Size:" text fields describe the resolution of this layer. Some media types- like QC compositions, or CI generators for example- can be resized, in which case these fields are editable.
- If multi-threaded rendering is enabled, the "FPS" field determines how fast the layer is rendering.
- The "Eject" button ejects the current source- with no source, the layer doesn't appear in the canvas/main output.
- The "Use Source:" pop-up button contains a list of built-in sources. This is an incredibly useful pop-up button because it lists every video generator and video stream available to VDMX- a huge number of sources- and lets you immediately start using any of them with one click. This pop-up button contains:
- Any connected digitizers made available via QuickTime
- Built-in CoreImage "generators"- these are included with your system (and may be downloaded from 3rd-party developers)
- FreeFrame and FreeFrame GL generators
- QC sources in VDMX's application support folder, which are treated as simple image/video generators
- Syphon sources published by other applications
- The rendered images of other layers and groups, including the canvas (both pre- and post-FX)
- Video sources published by QC plugins in your workspace
- Web sites
- New text files
- Windows in other applications may be used as video sources
Layer FX Chain
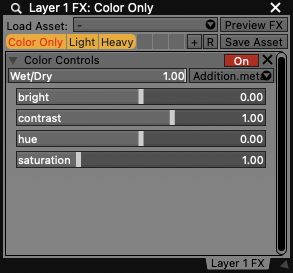
An FX chain is a series of image filters (or "FX"). Each of these filters is passed frames of video which they modify somehow, and the filters are applied one after the other (the output of the first filter is given to the input of the second, and so on). The filters themselves can be CoreImage filters (included with your system and available for 3rd-party download or purchase), FreeFrame (1.0) or FreeFrameGL (1.5) filters, or Quartz Composer (.qtz) compositions with the appropriate image inputs, or ISF / GLSL shader based FX (.fs).
In some cases you may find that multiple versions of the same FX are available in different formats. In general to get the best performance and stability we suggest using the ISF (.fs) versions of FX whenever possible.
The Layer controls in a Layer FX window are relatively sparse:
- The "Load Asset:" pop-up button lets you load a video fx chain asset (a saved video fx or chain of video fx). The vid fx assets may be customized and enabled/disabled via the Workspace Inspector's "Assets" tab.
- The "Replace"/"Add" toggle determines whether the assets you load entirely replace the FX chain or are just added to the end of it. By default this is "Replace", but you can change the default setting in the "Misc." section of VDMX's preferences.
- Immediately below the "Replace/Add" toggle is a "Save Asset" button- if you click this, the contents of the current FX chain are saved as an asset and may be recalled via the pop-up button in this and all your other projects.
- The **Section Preset UI item * in the Layer FX Window lets you quickly save and restore the contents of the FX chain.
There are a lot of different FX installed on your system and even more available for download, but all FX share certain common characteristics.
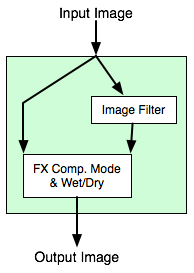
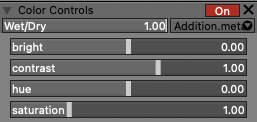
- All FX have an "On"/"Off" toggle which immediately bypasses/disables the effect. If this is "off", the effect isn't being passed any video data or processed in any way. By default, FX are "on", but you can change this default on an effect-by-effect (actually, asset-by-asset) basis or globally in the "Assets" section of the Workspace Inspector.
- All FX have a "Wet/Dry" slider which fades the effect in and out smoothly. If this slider is 0 (if the effect is faded all the way out) the effect won't be passed any video data or processed in any way. Again, the default is for this slider to be "1" (faded all the way in) but you can change this on a per-effect basis via the "Assets" section of the Workspace Inspector.
- All FX have a pop-up button with a list of composition modes- when you use the "Wet/Dry" slider to fade FX in and out you're actually compositing the pre-FX video stream with the post-FX video stream, and this lets you choose the composition mode. All the composition modes available to layers are available to FX (even the modes that use QC compositions to render timelines or animations).
Layer Composition
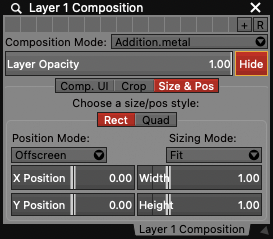
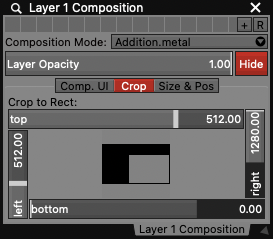
The composition controls of a layer determine how that layer is displayed within the canvas (or its parent group). This is broken up into three basic groups: how it gets composited with the layers below it (layer opacity and composition mode), how the image is sized and positioned in the output (rect or quad perspective map), and how the source image is cropped before display.
- The "Layer Opacity" slider sets the opacity of this layer. In most composition modes, this is handled by modifying the alpha of the video stream produced by the layer, which is then composited with other layers using the composition mode.
- The "Show/Hide" toggle next to the layer opacity slider is an independent control for quickly showing/hiding your layer. In older versions of VDMX, this would actually change the layer opacity slider value- this is no longer the case.
- The "Composition Mode" pop-up button lets you select the composition/blend mode used to composite this layer with whatever's below it.
- By default this is "OpenGL-Add": the GL blend modes are fast, but they aren't terribly interesting. If you click on this pop-up button you'll notice two subcatgories:
- "CoreImage" contains CIFilters in the "Composite Operation" category, many of which are familiar as they're comparable or in some cases identical to photoshop blend modes. By default, OS X ships with a bunch of CI comp modes, and more may be downloaded or purchased.
- The "Quartz Composer" category contains QC compositions in VDMX's "Application Support" folder- these compositions publish two image inputs (top and bottom image) and a number input (opacity) and are useful for making your own composition mode (transitions are especially easy to do in QC). VDMX ships with a bunch of sample QC comp modes, and you can easily download and make your own.
- The "GLSL" category contains GLSL compositions in VDMX's "Application Support" folder- VDMX ships with a bunch of sample GLSL comp modes, and you can easily download and make your own (see Making and Installing GLSL Composition Modes for VDMX). After the basic OpenGL-Add and OpenGL-Over options, the GLSL composition modes are generally the most efficient (compared to using CI or QC).
- The "Comp. UI tab" shows any custom input controls for Quartz Composer or Core Image based composition modes.
- The "Crop" tab shows the amount of the source image that will be cut off from the left, right, top, and bottom of the image before being sized and positioned in the output.
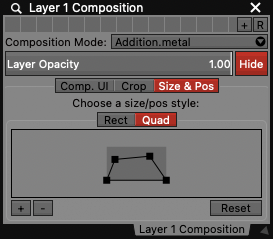
The Size & Pos tab in the composition controls can be switched between the simple "Rect" mode and "Quad" perspective warping.
Simple / Rect Mode
- The "X Position" and "Y Position" sliders describe the position of the layer within the canvas (or the layer's parent group). The units of these sliders is pixels, and by default both of these sliders should have a mark designating the "center" of the canvas.
- The "Position Mode" pop-up button sets the range of the position sliders.
- In "Offscreen" mode, moving the X or Y position slider all the way to the left or right will move the layer completely offscreen.
- In "Onscreen" mode the position sliders will move the layer left or right, but ensure that the layer doesn't get moved offscreen.
- "Center" mode splits the difference: move the position sliders all the way to the left/right will move the layer halfway off the canvas.
- The "Width" and "Height" sliders are size multipliers- a value of 1.5 will make the slider one and a half times larger in that dimension. By default, these sliders have marks at 1x.
- The "Size Mode" pop-up button lets you adjust the default size of the layer within the canvas.
- "Fit" makes the layer as large as possible within the canvas without cropping it or changing its aspect ratio (so you may see some letterboxing if the layer's aspect ratio doesn't match the canvas' aspect ratio).
- "Fill" makes the layer's deafult size large enough to fill the canvas- the layer's aspect ratio isn't changed, so there may be some cropping.
- "Stretch" makes the layer completely fill the canvas, distorting its aspect ratio if necessary.
- "Copy" does a simple 1:1 pixel copy- the "size" and "width" sliders are ignored, and bilinear filtering is disabled in the rendering engine. If you need pixel-perfect image reproduction with no interpolation in your output (bitmap art is one of many applications) you may want this mode.
Perspective Mapping / Quad Mode
In Quad mode the output layer is not limited to a basic rectangle shape- each of the four corners of the layer can be moved to create a perspective distorted image that can be projected onto a skewed surface.
- Drag handles in the position viewer to set the locations of each corner. Clicking on a handle will also inspect it in the UI inspector window where you can type in specific coordinates for the vertex, or assign MIDI/OSC/DMX data-sources to change the x and y location of the point. The arrow keys can be used to nudge the selected handle 1 pixel at a time.
- The "+" and "-" buttons zoom the handle position interface in and out.
- The "Reset" button returns the handles of the quad to their respective corners.
Layer Groups
A group is a way to take several layers, composite their video streams together, and treat the resulting video stream like any other layer (you can apply fx to the composited image and then composite it with other layers). In the parlance of photoshop, groups are what happen if you flatten a bunch of layers together, and then treat the flattened image as another layer. A group in VDMX is treated just like a layer- the resulting image has its own FX chain, layer opacity slider/composition mode/etc- you can even explicitly set the resolution in pixels and framerate at which the group's video stream is rendered. Practically, this sort of general, hierarchical approach has numerous advantages- from masking to feedback to positioning.
The "Canvas" is, for all intents and purposes, a group: it has an explicit resolution and framerate, its layers are composited together and the resulting video can be processed by adding FX to its video FX chain. Because the canvas is the top-level group, however, there are a couple important differences:
- You can't delete or rearrange the canvas
- By default, canvas rendering is skipped on many machines (this option is found in the "Rendering" section of VDMX's preferences). Instead of explicitly rendering the canvas to produce an image (which is then displayed onscreen), it's faster just composite the canvas' layers directly in your output window (or secondary display/s). This skips a rendering step and can increase your framerate (especially on older machines), but this approach has several important drawbacks:
- If you're skipping canvas rendering, there's no canvas image for you to preview.
- If you're skipping canvas rendering, you can't send the canvas image out via Syphon.
- If you're skipipng canvas rendering, you can't apply FX to the canvas video stream.
- To change the resolution of the canvas, inspect it in the Workspace Inspector- use the "Rez" text fields in the "Group Controls" window set specify the resolution in pixels. The controls for changing the default resolution of the canvas (when you make a new project or launch VDMX, this resolution will be used) are found in VDMX's Rendering Preferences.
- By default, the framerate of the canvas is driven by the refresh rate of your screen on many machines. Instead of rendering the canvas its own thread this draws the canvas every time the display connected to your computer redraws itself. In many cases this results in a faster framerate than most people might expect, which looks smoother- but it also means that you're asking your computer to do more work, and it effectively prevents you from manually setting the framerate (which may be a good thing: this is the default for a reason). The "Display Drives Canvas Rendering" setting in VDMX's Rendering Preferences lets you adjust this.