Saving Your Work
At some point, you're going to get things in VDMX arranged the way you like and will want to save that setup so you can use it again. The most common, portable, and generally useful way of saving your VDMX setup is to make a preset- which saves the state of your workspace- and then save a VDMX project file to disk (the project file contains your files and presets).
Project Files
A project file is the basic document type for VDMX6. A project contains all the information needed to recreate your VDMX workspace:
- All the pages and media files that were in your workspace last time the project was saved, and all the various settings for those files.
- All the presets that were in your workspace (your workspace presets) last time the project was saved, and all the various settings for those presets.
Project files are managed via the "File" menu:
- "New" creates a new project. Any files and pages you loaded are unloaded, all the layers and plugins in the workspace are deleted, and the workspace is generally returned to its default state.
- "Open Project" opens a project file on your computer. Any files and pages that are loaded will be unloaded and replaced with the files from the project- similarly, all the layers and plugins in the workspace are deleted. By default, the first preset in the project file is triggered, but this may be changed in the "Project Files" section of VDMX's preferences.
- "Update Preset and Save Project" is exactly what it sounds like: the currently-selected preset is updated (you'll get the usual warning if no presets are selected, or if the selected preset isn't the last preset triggered) and the project file is then saved to disk. The keyboard shortcut for this is cmd-S because the combination of updating the preset you're working on and then saving it to disk is something you'll probably be doing quite a bit.
- "Save Project (Don't Update Preset)" just saves the project file- no changes are made to any of your presets. If you just wanted to edit some file properties you might want to use this.
- "Save As..." has a similar pair of menu items- one updates the selected preset first, the other doesn't.
- "Revert to Saved" reverts the currently-open project file to its last saved version. This is basically the same thing as just opening the project file again.
Workspace Presets
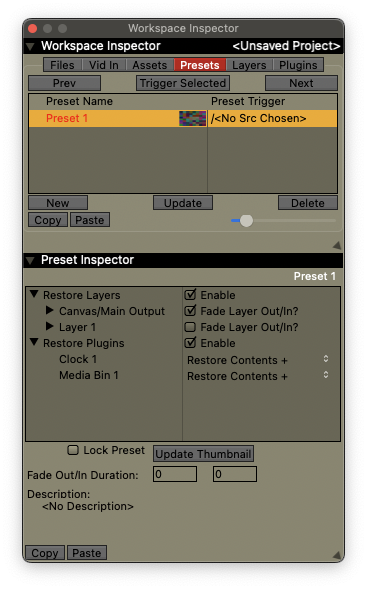
The goal of a workspace preset is to allow users to save a "snapshot" of their workspace: by default, a preset created via the Workspace Inspector will save the state of every layer, plugin, and UI item that currently exists so they can be recreated (triggered) later. The "Presets" tab of the Workspace Inspector displays the interface for creating, updating, managing, restoring these top-level presets.
- The dominant UI item in the "Presets" tab is the list of preset. Each preset has a unique name (left column), a thumbnail of your main output taken when the preset was created/updated (middle column), and a Boolean Receiver you can use to trigger the preset from any MIDI/OSC/DMX/data source (right column).
- Click on a preset in the list of presets to inspect it- the Preset Inspector appears in the bottom of the Workspace Inspector window. The preset's receiver- which exists so you can trigger the preset directly from any MIDI/OSC/DMX/data source- also gets inspected, and the corresponding Boolean Receiver Inspector appears in the UI Inspector window.
- Clicking on a preset thumbnail triggers the preset in addition to inspecting it.
- Double-click on a preset to change its name. Click and drag presets to rearrange them. You can create a "hierarchy" of presets (drag one preset onto another, one preset will go inside the other). Nesting presets inside of each other does not affect functionality at all.
- The "Trigger Selected" button triggers the preset selected in the list of presets. If no preset is selected, nothing will happen. The "Prev" button triggers the previous preset, and "Next" triggers the next preset.
- The "**New" * button creates a new preset- this new preset is basically a snapshot of all the layer and plugins in your workspace (the preset contains all the information VDMX needs to recreate all your layers and plugins).
- The "Update" button updates the currently selected preset so it describes the layers and plugins that are currently in your workspace. The previous contents of the preset are discarded.
- The "Delete" button deletes the currently selected preset.
- The "Copy" and "Paste" buttons copy and paste the selected presets (you can copy and paste presets across project files).
- The slider in the bottom of the Presets section controls the size of the preset thumbnails.
When you select a preset in the Workspace Inspector, that preset gets inspected- and the Preset Inspector will get added to the bottom of the Workspace Inspector window. The preset inspector lets you modify various properties of the preset, some of which alter how that preset is applied to your workspace.
- Most of the space in the Preset Inspector is taken up by the outline view (a list with collapsible items) at its top. This lets you edit how the inspected preset is applied to the workspace.
- "Restore Layers" determines if the layers saved with the preset are restored or not. If it's enabled, the layers will be restored- if it's disabled, then the layer information in your preset will be ignored and the layers in your workspace will be left alone.
- "Restore Plugins" is just like "Restore Layers", but affects whether plugin data is restored or not.
- If you expand either "Restore Layers" or "Restore Plugins", you can further edit details of how each layer component (src, fx, and composition) and plugin in the preset are restored. This is accomplished via a menu for each item:
- "Restore Contents + Window Pos." is the default- both the state of the item and its UI (which window it was in, where the window was) are restored. This is what you want most of the time.
- "Restore Contents" restores the state of the plugin or layer component. If you change the FX component of a layer in a preset to "Restore Contents" then triggering that preset will restore the layer FX chain- but it won't change the window it's currently in. "Restore Contents" will change what your layers and plugins are actually doing- so it will affect the contents of your canvas/main output- but it won't rearrange or move your windows.
- "Restore Window Pos." restores the window-related information about the component you're editing: the size and location of the window/which window it's in, the state of the receiver used to trigger its tab- generally speaking, this affects your UI without affecting the contents of your main output.
- The "Lock Preset" checkbox locks a preset and prevents it from being updated accidentally.
- The "Update Thumbnail" button updates the thumbnail of the selected preset- when you click the button a frame from your canvas/main output is saved with your preset. Please note that "Skip Canvas Render" needs to be disabled for thumbnails to work.
- Presets have a "Description" field you can use to jot down some short notes about your preset.