UI Items
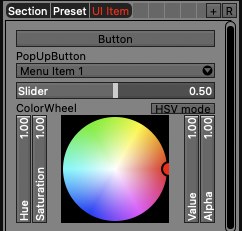
User Interface items are the bits and pieces of VDMX that you will interact with to control it. The basic set of UI items consist of sliders, buttons, pop-up buttons, and section preset UI items. These four UI elements are found everywhere in VDMX. Every effort has been made to make UI items as flexible and powerful as possible- they can all be controlled from hardware and software that sends OSC or MIDI or DMX data or from other data sources within VDMX, and they're all also capable of sending their value out via OSC, MIDI, and DMX. Every effort has also been made to make UI items as similar- and working with them as consistent- as possible, particularly within the UI item inspectors.
UI Item Similarities and Inspector Consistency
Like most things in VDMX, UI items can be inspected and modified with the UI item inspectors- when a UI item is inspected, its outline color changes (by default to yellow, but this may be changed via the color preferences). The inspectors for the different UI items are similar in many regards, because all of the basic UI items share some common functionality: they can all be controlled by MIDI, OSC, and DMX data from other hardware/software (usually found in the "Receiving" tab), they can all send MIDI, OSC, and DMX data to other hardware/software (found in the "Sending" tab), and they all have some sort of local presets found in the "Presets" section which let you quickly save and restore the state of that single UI item. Like everything else, these inspectors are contextual- you may inspect a slider, add a receiver, then inspect that receiver to modify it further (and so on and so forth).
Sliders
Sliders are UI items that describe a value within a specific range. This is one of the most common UI items you'll encounter in various FX.
- Click and drag on a slider to change its value (and inspect it), or shift-click on a slider to inspect or uninspect it without changing its value. You can also use the "Value" text field to manually enter a slider value.
- Sliders have a min and a max envelope which may be used to restrict the value of the slider to a specific range. You can adjust these envelopes by clicking & dragging on their black handles in the finder, or by holding down option (moves the min envelope) or command (moves the max envelope) while you click + drag on the slider. You can also use the "Min/Max Env" text fields to manually enter min/max values.
- The Slider UI may be locked so it doesn't respond to accidental clicks and drags by checking the "Lock slider UI?" box in the Slider Inspector.
- By default, sliders are linear- but any slider may also be made logarithmic via the "**Slider mode" * pop-up button in the Slider Inspector. Please note that log sliders only really "work" if the range of the slider is sufficiently large (for example, a slider ranged 0-10 won't see a very dramatic change from being made logarithmic- but a slider ranged 0-10000 will change substantially).
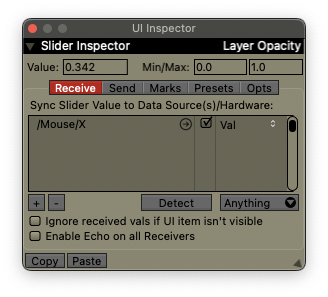
- Sliders can have multiple receivers- in other words, sliders can be controlled by multiple data sources/hardware controllers/etc. at the same time. Sliders use decimal data receivers, and the interface for creating, inspecting, and editing a slider's receivers is shown by clicking the "Receiving" tab in the slider inspector.
- If a slider has one or more enabled receivers, the color of the slider changes. By default it turns a light green color, but this may be changed in the "Colors" section of VDMX's preferences.
- You can disable a slider's receivers if the slider isn't visible- this is a quick and easy way to multiplex your hardware (put a couple different sliders in different tabs in the same window, sync them all to the same hardware slider- the hardware slider will only alter the currently-visible slider). Just click the "Ignore received vals if UI item isn't visible" box.
- Sliders can have multiple data-senders: a single slider may send its value out to any combination of OSC, MIDI, or DMX destinations. The interface for creating, inspecting, and editing a slider's senders is shown by clicking the "Sending" tab of the Slider Inspector.
- Sliders can have "marks". A mark is a defined slider value- it appears in the UI as a line on the slider, and if you click and drag on the slider it will "snap" to the mark when you get close to it. Marks are typically used to define important values- for example, the position and width sliders in a layer's composition tab, or the speed slider in the movie player controls have marks on them.
- To create or delete slider marks inspect a slider, click on the "Marks" button in the Slider Inspector, and use the "+" and "-" buttons to add or remove marks. When you add a mark, its value is set to the current value of the slider.
- Marks can be triggered via MIDI, OSC, DMX or any other data source in VDMX- when you "trigger" a mark, the slider jumps to the mark's value. To configure this, just click on the mark in the Slider Inspector- this inspects the mark, and opens a Boolean Data Receiver inspector.
- The Slider Inspector may be used to change the value of the mark- if you created a mark in the wrong place, you can enter the value you want the mark to have manually by double-clicking on the mark's value.
- Slider marks can be positioned manually (by clicking and dragging with the mouse). Just un-check the "Lock Marks" toggle in the Slider Inspector, and all the marks on every slider in VDMX will turn white and get "handles". Click and drag on one of these handles to move the mark.
- Sliders can have multiple presets, and the interface for creating, inspecting, and editing a slider's presets is shown by clicking the "Presets" tab of the Slider Inspector. Each slider preset can be triggered via a Boolean Data Receiver (shown by inspecting the preset), and the presets themselves may be inspected and modified to only change certain properties of the slider (the preset may only change the sldier's receivers, for example).
- Sliders have built-in smoothing, which can be configured under the "Opts" tab of the Slider Inspector. In addition to specifying a per-slider smoothing value, you can also elect to use a global smooth value (set in the "Sliders" section of VDMX's Preferences).
Buttons
Buttons are the most common UI item you'll encounter in VDMX. There are two basic kinds of buttons: toggle buttons represent a boolean value (YES/NO, on/off, etc), while momentary buttons are used to perform actions much like any other button in any other application.
- Click on a button to trigger it (momentary buttons) or toggle its value (toggle buttons). Clicking on a button also inspects it- you can shift-click on a button to inspect or uninspect it without changing its value.
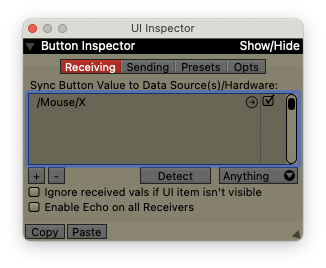
- Buttons can have multiple receivers- in other words, buttons can be controlled by multiple data sources/hardware controllers/etc. at the same time. Buttons use Boolean Data Receivers, and the interface for creating, inspecting, and editing a button's receivers is shown by clicking the "Receiving" tab in the Button Inspector.
- If a button has one or more enabled receivers, the color of the button changes. By default it turns a light green color, but this may be changed in the "Colors" section of the preferences.
- You can disable a button's receivers if the button isn't visible- this is a quick and easy way to multiplex your hardware (put a couple different sliders in different tabs in the same window, sync them all to the same hardware button- the hardware button will only alter the currently-visible slider). Just click the "Ignore received vals if UI item isn't visible" box.
- Buttons can have multiple data-senders: a single button may send its value out to any combination of OSC, MIDI, or DMX destinations. The interface for creating, inspecting, and editing a button's senders is shown by clicking the "Sending" tab of the Button Inspector.
- Buttons can have multiple presets, and the interface for creating, inspecting, and editing a button's presets is shown by clicking the "Presets" tab of the Button Inspector. Each button preset can be triggered via a boolean receiver (shown by inspecting the preset), and the presets themselves may be inspected and modified to only change certain properties of the button (the preset may only change the button's receivers, for example).
Pop-Up Buttons
Pop-up button UI items are used when you have to choose one from a list of several different choices. To save space, the different choices are presented to you as a menu which appears when you click on the pop-up button. Among other things, pop-up buttons are used to let you choose composition modes, browse lists of FX, choose video sources, etc. Like all other UI items in VDMX, pop-up buttons can be controlled via MIDI, OSC, DMX, or other data sources in VDMX.
- Click on a pop-up button to display its contents as a menu (this also inspects the pop-up button). This menu may be hierarchical (may have multiple levels). Shift-click on a pop-up button to inspect it without displaying its menu.
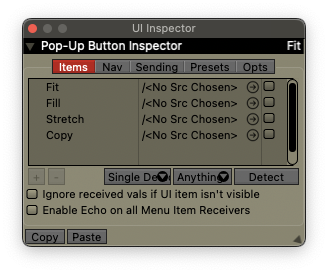
- The "Menu Items" tab of the Pop-Up Button Inspector lets you configure the receivers on the individual menu items. Every menu item in a pop-up button has its own Boolean Data Receiver- which means you can use MIDI, OSC, DMX, or other data sources in VDMX to trigger the menu items directly. Just click on a menu item to inspect its receiver.
- The contents (the menu items) of some pop-up buttons are editable- the "+" and "-" buttons in the "Menu Items" section of the inspector are enabled in these pop-up buttons. At the time of this writing, the only editable pop-up buttons are in the "Control Surface" plugin (you can make custom menu items in any pop-up buttons you create).
- The "Navigation" tab of the Pop-Up Button Inspector lists a number of built-in receivers that control the selection of the pop-up button. There are receivers that let you move the selection up and down within the menu, choose random menu items, choose menu items with normalized data, choose menu items by item index, or choose menu items by sending a string (via OSC) with the name of the item. As with any receiver, these can all be controlled by any data source in VDMX or data received from MIDI or OSC or DMX controllers.
- If a pop-up button has one or more enabled receivers (including its navigation receivers), the color of the pop-up button changes. By default it turns a light green color, but this may be changed in the "Colors" section of the preferences.
- Pop-up buttons can have multiple data-senders- a single pop-up button may send its value out to any combination of OSC or MIDI or DMX destinations. The interface for creating, inspecting, and editing a pop-up button's senders is shown by clicking the "Sending" tab of the Pop-Up Button Inspector.
- Pop-up buttons can have multiple presets, and the interface for creating, inspecting, and editing a pop-up button's presets is shown by clicking the "Presets" tab of the Pop-Up Button Inspector. Each preset can be triggered via a boolean receiver (shown by inspecting the preset).
Section Preset UI Items


Section Preset UI Items are used to provide you with an interface for quickly saving and restoring presets which only affect a specific and limited area of the application. For example, Section Preset UI Items are found in many plugins- these presets affect only the specific plugin they appear in (the section preset UI item in the audio analysis only affects the audio analysis, etc). They're unobtrusive- particularly when they're empty- but section preset UI items are found in a lot of places within VDMX. Section Preset UI Items are just another kind of preset- different artists have different workflows, so VDMX offers as many different kinds of presets as possible.
- Shift-click on a section preset UI item to inspect it without triggering or updating any of its presets.
- Clicking the "+" button on the right side of a section preset UI item creates a new local preset. The new preset is given a name by default and appears as a button starting on the left-hand side of the UI item.
- Clicking directly on a preset in a section preset UI item will either trigger the preset (read the preset) or update the preset (write the preset). The action that is taken is determined by the "R"/"W" toggle button on the far right of the section preset UI item. If the button says "R" then clicking on a preset will trigger it; if the button says "W" then clicking on a preset will update it. You can also configure the Section Preset UI Item to automatically disable writing after updating a preset via the "Section Presets" entry in VDMX's Preferences.
- If you make "too many" presets, two buttons will appear within the Section Preset UI Item ("<" and ">")- these buttons let you page back and forth between your presets.
- Like pop-up buttons, section preset UI items have navigation receivers that let you navigate their presets (trigger next/prev preset, trigger random preset, trigger preset by name, etc). These navigation receivers are listed in the "Navigation" tab of the Section Preset UI item inspectors.
- Each preset in a section preset UI item has a receiver attached to it. This means that each preset in a section preset UI item can be triggered directly from any MIDI/OSC/DMX/Data source.
- The "Presets" tab of the Section Preset UI item inspectors lists all the presets. From this panel you may inspect the receiver attached to each individual preset. You may also update the inspected preset from this tab.
- Section Preset UI Items can have multiple data-senders: a single UI item may send its value out to any combination of OSC, MIDI, and DMX destinations. The interface for creating, inspecting, and editing a preset item's senders is shown by clicking the "Sending" tab of the Section Preset Item Inspector.
UI Items and Soft Takeover
When you use a hardware controller (that sends MIDI, OSC) to send values to a UI item in software, one of the conceptual problems you may encounter is the "jump" between the hardware value and the software value. For example, let's say you have a slider in VDMX- the value of the slider is 0.75, and it's receiving from a slider on a MIDI controller you're using. if the MIDI controller's value doesn't match the slider's value, as soon as you move the slider on your MIDI controller the slider in your software will "jump" to the hardware value. This "jump" is considered undesirable by many artists, and soft takeover is how you prevent it.
Generally speaking, soft takeover is the name given to a series of options that let you prevent or work around this jump. Since sliders and buttons are at the forefront of hardware/software interaction, sliders and buttons both offer soft takeover options. For each UI item, different soft takeover settings may be used if the values are being received from a MIDI or OSC controllers, or data sources from within VDMX. All soft takeover settings are global (affect all sliders or all buttons, respectivaly), and are found in the "Sliders" and "Buttons" sections of VDMX's preferences.
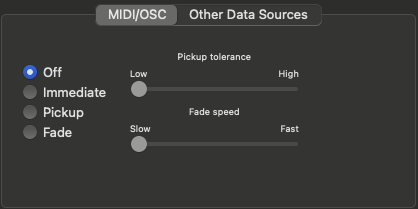
Each set of "soft takeover" settings offers four different soft takeover modes:
- "Off"- If you click and change the value of a VDMX slider receiving from a MIDI slider, the VDMX slider's value will stay to whatever the value was set by your mouse. When you move the MIDI slider again, the VDMX slider will "snap" to the MIDI slider's value. Soft takeover is off- the value of the VDMX slider is the last value it was set to, either by your mouse or your MIDI slider.
- "Immediate"- If you click and change the value of a VDMX slider reciving from a MIDI slider, the VDMX slider's value will immediately snap back to the last-received value from the MIDI slider as soon as you release the mouse button.
- "Pickup"- If you click and change the value of a VDMX slider receiving from a MIDI slider, the VDMX slider's value will stay to whatever the value was set by your mouse. When you move the MIDI slider again, the VDMX slider's value will stay where the mouse left it- until your MIDI slider gets close to the value of the mouse slider, and you "pick up" the VDMX slider's value with your MIDI slider. The pickup tolerance determines how close the MIDI slider's value has to get to the VDMX slider's value before the pickup occurs.
- "Fade"- If you click and change the value of a VDMX slider receiving from a MIDI slider, the VDMX slider's value will smoothly start fading back to the last value received from the MIDI slider. The speed it fades back is determined by the "fade speed slider"
Keep in mind that there's a set of these options for controlling soft takeover for both MIDI/OSC and internal data sources, and sliders and buttons each have independent sets of soft takeover settings!
UI Items and Their Presets
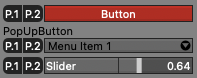
The most commonly used UI items- sliders, buttons, and pop-up buttons- each have their own set of presets. Each of these UI items has its own set of presets which affect that UI item and only that UI item. Pictured at right are several UI items that each have local presets (if the text of a local preset is green, it's because that preset's receiver is enabled).
- The main place you will interact with presets local to UI items is in the UI item's inspector: Slider, Button, and Pop-up button inspectors all have a "Presets" tab which lets you inspect, edit, create, and delete presets for that specific UI item.
- These UI items can have as many different presets as you want/as you can fit in there. The presets appear as "buttons" in the UI item- clicking on one of these buttons will trigger it and restore the preset. The preset "buttons" work with hardware learn mode, and you can also "drag and drop" data sources onto them.
- Like the section preset UI item, each preset has a receiver attached to it which may be used to "trigger" the preset via a data source or other MIDI/OSC/DMX source.
- Presets for some UI items may be inspected, and the scope of the preset may be changed. For example, a slider-specific preset may be configured to only change the slider's "senders", or only change its "receivers". The most common use of this is multiplexing: setting up a series of different presets that tell the slider to switch between different receivers/different data sources.
UI Items and Hardware Learn Mode
Hardware learn mode is the fastest way to set up a bunch of UI items to receive data from a MIDI, OSC, or DMX data source. Hardware learn mode (HLM) is activated via the "Workspace" menu ("Hardware Learn Toggle", or cmd-L)- when enabled, every UI item that works with HLM turns bright blue. Just click on a blue UI item and wiggle the appropriate control on your MIDI/OSC/DMX device- VDMX will automatically configure your UI item to receive from the control you moved. If you change your mind, just wiggle a different control. Hardware learn mode will stay enabled until you explicitly disable it via the same means- so you can set up a bunch of UI items without interruption.
If you just want to quickly synchronize one UI item to a MIDI or OSC or DMX slider, you can also take advantage of the single-shot hardware detect: if you select this menu option (or its command-key equivalent, cmd-D) and then wiggle a MIDI or OSC or DMX source the presently-selected slider/button/receiver will automatically be synchronized to your control. If you inspect a different UI item the detect will be cancelled- and the detect will also be canceled immediately upon receipt of control data from a MIDI or OSC or DMX source.
It's worth noting that both of these function via receivers. While hardware learn mode has the function of letting you quickly synchronize UI items in VDMX to MIDI or OSC or DMX data, this is accomplished via receiver inspectors (and is why their inspectors turn red- technically, the receiver inspector is what's doing the detect). The implication of this is that hardware learn mode actually works with any inspected receiver in VDMX- any receiver in any UI item can be immediately synchronized to your hardware just by inspecting it and wiggling a control...
Syncing UI Items to Plugins by right-click dragging
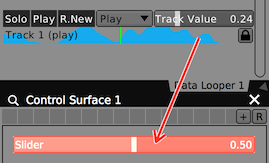
"Detect" and "Hardware Learn Mode" are great because they offer a simple and fast way to create a mapping between an input device and a property in VDMX. There's a similarly direct way to create a mapping between data sources created by plugins in VDMX- many plugins allow you to create connections to their data sources by right-click-dragging (or ctrl-click-dragging) from the data source to the UI item you want to use it. As you do, you'll notice a red arrow going from the source of your drag to your mouse cursor, and as you mouse over UI items they'll turn red, indicating that they can accept the drag.
If you dropped onto a **slider * or button, the first receiver in the slider/button will automatically be set to the data source you dragged from (a receiver will be created if one does not already exist).
If you dropped onto a pop-up button, the "Choose by float" nav receiver in the pop-up button will be set to the data source you dragged from.
If you dropped onto a local preset in a slider/button/pop-up button or onto a local preset in a section preset UI item, the receiver used to trigger that preset will be set to the data source you dragged from.
Clock plugin: right-click-drag from anywhere in the dial to sync the drop target to the measure position of the clock
**Control Surface * plugin: right-click-drag from any slider, button, or color wheel to sync the drop target to the value of that slider/button/color wheel.
**Cue List * plugin: right-click-drag from any cue to sync the drop target to the value of that cue's data source
**Data Looper * plugin: right-click drag from the "preview" of any wave ("View All") or from the editor to sync the drop target to the value of the dragged track.
LFO plugin: right-click drag from the value bars on the left or from any wave in the preview to sync the drop target to the value of the dragged LFO.
**Step Sequencer * plugin: right-click drag from the leftmost column (the "track name" column if the plugin is in "View All" mode, the step value column if the plugin is viewing a single track) to sync the drop target to the value of the dragged track.
UI Items and Echo Mode
Many MIDI and OSC devices support the ability to update their UI by sending them MIDI or OSC data. For example, many MIDI controller consist of grids of light-up buttons- the buttons can be lit up (and frequently, their color changed) by sending the controller MIDI data. Another example would be OSC-based software- such as Lemur, or TouchOSC- updating the slider on a touchscreen UI by sending it OSC data.
- Sliders, buttons, and pop-up buttons in VDMX all have the built-in ability to automatically "echo" their value back out to the MIDI or OSC device they're receiving from. Simply make sure the "Enable Echo on all Receivers" checkbox in the Slider/Button/Pop-Up Button Inspector is checked.
- Echo only works if the UI item is receiving from a MIDI or OSC source.
- Functionally, "echo" is set on a per-receiver basis- if your UI item is receiving from multiple receivers, this allows it to echo its value back out to all it sources.
- You can also change which device a given reciver echos its value back out to- by default this should be set to the source from which the MIDI data was received.
- If you're using MIDI Note On/Off messages to control your UI item, VDMX allows you to customize the velocity value accompanying the note. On several pieces of hardware, this is how you change the color at which the corresponding MIDI button lights up.