Video Output: Display Options, Fullscreen modes, and multiple GPUs
Fullscreen Output to External Displays
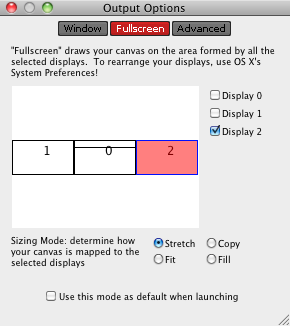
When using VDMX for video output to external monitors and projectors that are connected as standard system displays:
- Cmd-F opens the "Output Options" window.
- Cmd-Shift-F toggles fullscreen mode on and off. Once you're in fullscreen mode, you may have to use the "Output Options" window to decide which screens you want VDMX to go fullscreen across.
- If you're in fullscreen mode, pressing the **Esc * key will disable fullscreen on your "Main" screen (the screen with the menubar). You'll still be in fullscreen mode.
- All the output modes have various sizing modes- these work the same way as the layer size modes mentioned earlier:
- "Fit" makes the canvas as large as possible within the chosen output area without cropping the canvas or changing its aspect ratio. If the aspect ratio of your canvas doesn't match the aspect ratio of your window/fullscreened displays, you'll see letterboxing.
- "Fill" makes the canvas large enough to completely fill your window/fullscreened displays. The aspect ratio of the canvas isn't changed, so if there's a mismatch your canvas will be cropped.
- "Stretch" makes the canvas completely fill your window/fullscreened displays. If the aspect ratio of the canvas doesn't match the aspect ratio of your output area, the canvas image will be distorted to fit.
- "Copy" does a simple 1:1 pixel copy of the canvas to your window/fullscreened displays. If you need pixel-perfect image reproduction with no interpolation in your output (such as bitmap art) you may want to use this mode.
VDMX has three different output modes: "Window", "Fullscreen", and "Advanced". None of these modes affect your layers or rendering engine- once you've rendered the canvas, these output modes just determine how the resulting video is displayed on the various output devices connected to your computer.
- At the bottom of each of the output modes is a "Use this mode as default when launching" checkbox you can use to force VDMX to use a specific output mode on launch.
- "Window" is the default output mode when you first launch VDMX. The canvas is displayed in a window- click and drag on the window to move it around, click and drag in the lower-right corner to resize it. The standard sizing mode choices are available- "Fit" is the default (your canvas will be as big as possible in your window without distorting or cropping it).
- "Fullscreen" is the fastest and easiest way to make your canvas fill one or all of the displays connected to your computer- just select the displays you want VDMX to go fullscreen on, and your canvas will be displayed in the area common to all enabled displays using the selected sizing mode. This is the fastest and easiest way to split up a single big image into a bunch of smaller images on different displays.
- "Advanced" lets you create windows one by one, specify the video source you want to appear in the window (not just the canvas/main output), the dimensions you wish to use in the video source, and the sizing mode you want to use to fit them in the window. The "+" and "-" buttons in the toolbar create/delete windows- all the other properties are edited via the table view. The "Advanced" output mode isn't useful for most situations because it requires you to manually specify a substantial amount of information- but at the same time, it lets you explicitly specify a number of extremely important and otherwise unavailable options. The settings for an advanced output layout can be exported and imported again for later use.
Advanced Fullscreen Options CSV Format
The files exported from the from the advanced fullscreen are created in a simple CSV (comma separated value) format which can be opened and manually modified using a standard text editor or spreadsheet software.
For each row in the file, the following information is provided:
- name of the video source
- x coord, area of the video frame to use
- y coord, area of the video frame to use
- width, area of the video frame to use
- height, area of the video frame to use
- which display the output window's coords are relative to
- which corner of the indicated display is used as the origin (TL or BL) when describing window position
- x coord of output window frame, relative to indicated display's origin
- y coord of output window frame, relative to indicated display's origin
- width of output window frame, relative to indicated display's origin
- height of output window frame, relative to indicated display's origin
- how the source rect of the video source should be displayed in the output (FIT, FILL, STRETCH, or COPY)
- CROP or NOCROP, indicating whether or not the provided output window's coords should be cropped to fit within the display
For a set of settings like this this:
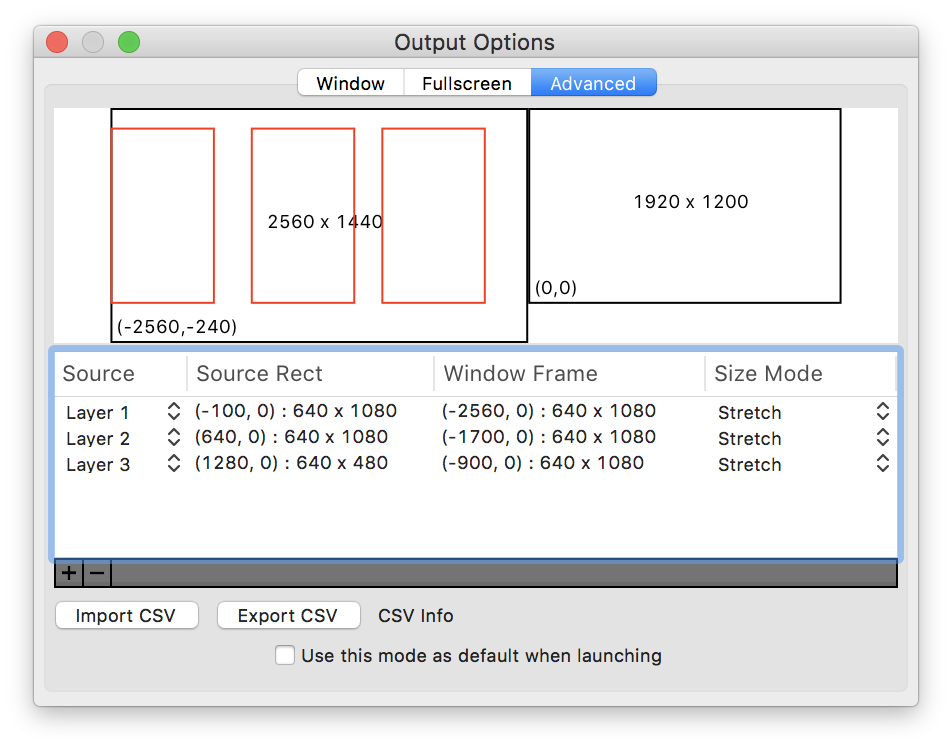
In the layout file exported from VDMX, each of the elements are relative to the bottom-left coordinate of the main screen (display 0). The contents of the csv file will look like:
"Layer 1",0,0,640,1080,0,BL,-2560,0,640,1080,STRETCH,NOCROP
"Layer 2",640,0,640,1080,0,BL,-1700,0,640,1080,STRETCH,NOCROP
"Layer 3",1280,0,640,1080,0,BL,-900,0,640,1080,STRETCH,NOCROP
When creating your own csv files, the coordinates can optionally be specified relative to the top-left coordinate and specific displays.
In this second example the coordinates are relative to display #1 and using the top-left coordinate mode:
"Layer 1",0,0,640,1080,1,TL,0,0,640,1080,STRETCH,NOCROP
"Layer 2",640,0,640,1080,1,TL,760,0,640,1080,STRETCH,NOCROP
"Layer 3",1280,0,640,1080,1,TL,1520,0,640,1080,STRETCH,NOCROP
Multiple GPU Support
VDMX seamlessly supports the use of multiple graphics cards, including eGPU units - you don't have to do anything to enable it, it just works. Ideally, the GPUs should be from the same manufacturer (there are slowdowns when sharing data between ATI/NVIDIA GPUs), but VDMX will always make a best-faith attempt to display the resulting image onscreen. For more information see the full notes on using multiple GPUs with VDMX.
Recording Movies
For more information on recording video streams as movie files see the Movie Recorder plugin.
Other Output Techniques
Syphon Output
For information about using Syphon to output video, see the Syphon Output plugin.
NDI Output
For information about using NDI to send audio / video streams over a network, see the NDI Output plugin.
BlackMagic Output
For information about using NDI to send audio / video streams over a network, see the NDI Output plugin.
Other Examples
Troubleshooting
If you have issues with using any of the above output types, see the VDMX Troubleshooting notes.