Video Inputs
Use the Vid In section of the Workspace Inspector to configure settings for web-cams and other live a/v capture devices in VDMX.
There are multiple ways to send video to VDMX from other software or by hardware capture. Some examples:
- Syphon is a mac-specific technology that allows applications to share video with one another. Syphon is fully integrated- any video sources published by other applications are automatically made available to VDMX. There's no setup required in VDMX.
- Digitizers and Capture Hardware are hardware devices- USB inputs or PCI cards- that digitize a video input (component, composite, s-video, etc) and make the resulting video stream available for use within VDMX.
- Windows in other Applications may also be used as video sources in VDMX.
Video Digitizers / AVF Capture
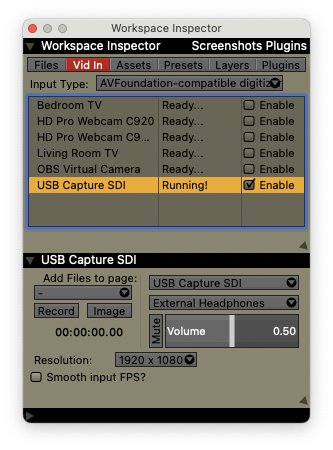
VDMX supports the use of digitizers, capture cards, and other video input devices via QuickTime- as long as your device is QuickTime-compatible (and nearly all mac-based capture cards are), it will work seamlessly in VDMX. Unlike Syphon inputs, video digitizers come with an explicit cost- processing video from a digitizer usually makes more work for your CPU (sometimse a lot more- it depends on the digitizer), so by default video digitizers are disabled. Triggering a disabled video input- or selecting it from the "Use Source:" pop-up button located in every layer source- will automatically enable it with its default settings.
Clicking on a video digitizer inspects it- the inspector for a video digitizer lets you modify its options. If the video digitizer's running, this also displays a preview of its video stream in the workspace inspector.
- "Add File to page:" presents you with a pop-up button listing all the pages in your workspace. As you record clips from the inspected digitizer, they will automatically be added to the selected page.
- The "Record" and "Image" buttons let you start/stop recording from the input or take a snapshot of the input and store it as an image, respectively. Immediately below these buttons is the recording duration, expressed in SMPTE. The settings used for recording files directly from video inputs- including the location of the saved files- are found in the "Recording" section of VDMX's preferences.
- The "Use Device Codec" toggle determines whether or not VDMX uses the default code for your digitizer when saving the video to disk (by default, VDMX uses the device codec). Not using the device codec makes extra work for your CPU, but may be appropriate under some circumstances (for example, your drive may not be fast enough to keep up with recording uncompressed HD video to disk- transcoding it might be a good idea). If you aren't using the device codec, the codec to use is set by the "Recording" section of VDMX's preferences.
- The "Rez" and "FPS" fields let you attempt to set the resolution and framerate of the inspected digitizer. Running at full-resolution is usually a good idea because changing the resolution makes more work for your machine- if you're going to change the resolution, halving it (or quartering it) is usually faster than resolution changes which aren't an even multilple of 2.
- The "No Sound" pop-up button shown in the picture at right lets you choose an audio input to record from if your video input isn't muxed.
- The "Play-thru" pop-up button lets you choose an audio output to play the inspected digitizer's audio stream through.
- The "Volume" slider and "Mute" button adjust the audio of the digitizer.
BlackMagic Inputs
Hardware from BlackMagic Design used for video capture is natively supported in VDMX and can be accessed like other live inputs. From the VidIn section of the Workspace Inspector additional options can be selected for each input:
- 'Detect': On supported hardware VDMX can attempt to auto detect the incoming video format.
- 'Continuous Detect': Also known as Hot Swap mode, when enabled this option will detect changes in the video format and automatically change with it.
- Format Selection: Select a supported format for input.
- Smooth input FPS?: When enabled can smooth out inconsistent frame times if needed.
See the BlackMagic Output plugin for information on using BlackMagic output devices.
Windows from other applications as Video Inputs
Syphon is great, but a lot of applications don't support it yet- so this feature in VDMX is one way to get video out of apps that don't support Syphon. This will list every visible window (if a window is hidden or in the dock, it's not listed) with a title on your system. If a window you want to use isn't visible, make sure it has a valid title. Window video sources will work even if the windows are covered up by other applications, so you don't need to worry about setting aside unobstructed space onscreen for the window you want to use: it can be behind VDMX and still work. The main drawback to this approach is that it's not as fast as Syphon- the OS X window manager has to make an additional copy of the contents of the output window in RAM, then push it to your GPU- which can take a while (especially if you have an old GPU/computer/if you're working with large windows). A side-effect of this is that if the window is redrawing very rapidly or at an unusual framerate, you may see flickering or tearing- which can be adjusted by changing the framerate of the window input. Regardless, this approach is extremely useful for quickly letting you pull video from other software.
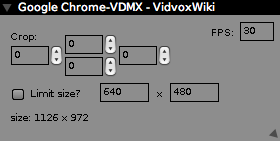
Like video digitizers, clicking on a window input inspects it and lets you set a couple basic options:
- "Crop" lets you specify a crop rectangle for the video input as expressed by pixels from the left/top/right/bottom side of the frame. This is useful to crop out scroll bars, title bars, and other unwanted portions of the window.
- "FPS" lets you set the rate at which VDMX tries to get new images of the inspected window from OS X's window manager. The higher the FPS, the more data you're copying and pushing to your GPU. If you see flickering, you should make sure the FPS field is an even multiple of the refresh rate of the display your window's on.
- "Limit Size?"- if enabled- limits the size of the window input to the specified resolution. By default, this is enabled and window inputs are limited to VGA-res (640x480). The higher the resolution, the more data you're copying and pushing to your GPU.
Displays Capture
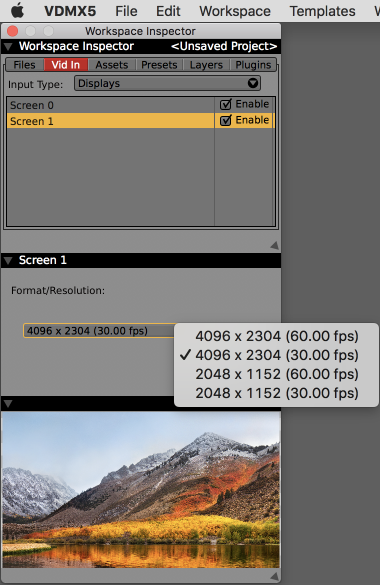
Similar to capturing windows from other applications, VDMX can use the content of an entire display as a video input source.
From the sub-inspector for each display the resolution and capture fps can be specified based on settings available from the OS.
NDI® Receiving
VDMX is now capable of sending and receiving a/v streams over a network using the NDI® protocol from Newtek. Multiple streams can be used in each direction, within the limitations of your network bandwidth and system resources.
10/100 Ethernet will work for a single connection, but Cat-6 Gigabit 10/100/1000 is better for multiple NDI connections.
Video streams published by other applications and devices on your local network work similarly to other video input types:
- From the Workspace Inspector in the VidIn section you can directly manage which streams are enabled and adjust the input settings:
- Receive as RGB: Requests receiving a high quality / higher bandwidth video stream.
- Audio Playthru: If an audio stream is provided, allows for selecting an audio output device to use for playthru. Volume and mute controls are also provided.
- NDI® receiving streams can be directly accessed from the Use Source menu in the Layer Source Control panel. Selected streams will automatically be enabled if not already turned on.
- NDI® receiving streams can be added to Media Bin pages to be triggered like any other media type by using the Media Browser panel or by using the 'Add Clips From Built-In Sources" option from the page right click contextual menu.


See the NDI® Output plugin for information on sending video froms from VDMX with NDI.
Layer Source Controls by Media Type
Depending on the type of clip is playing on a layer, the layer source window will show a different set of UI controls for working with that specific media type.

Movies (Quicktime)
Visit the Video Codecs page for tips on choosing the best format for your use case to when creating movies and tips on how to transcode your media files
- "Time Slider" Shows the name of the currently playing movie and the current time in seconds. Click or sync to a data-source to jump to a different point in the movie timeline. The min and max range handles can be used to set the in and out points of the movie.
- "Set" buttons will adjust the in or out loop-point of the movie to the current movie position.
- "Reset" buttons are available for changing the in and out loop-points of the movie to the beginning and end points respectively.
- "Pause" toggle button (= or > depending on the state) can be used to start and resume playback without adjusting the playback rate.
- "Rate" slider sets the direction and speed at which the movie plays back.
- "Reverse" toggle button (--> or <--) allows for changing the direction of playback without changing the speed.
- "Q" toggle enables and disables rate quantization. When active the playback rate of the movie at 1x will be stretched or compressed to match the number of measures specified relative to the currently selected clock. If the BPM of the clock changes, the speed of the movie will change by the same percentage.
- "Sync" button jumps the movie time to match the current measure time of the selected clock when quantization is active.
- "Clock" pop-up menu sets the Clock plugin instance that the layer should sync with when quantization is active.
- "M" text field sets duration of the movie in measures, used along with the BPM to determine the playback rate of the movie when quantization is active.
- "Back" and "Fwd" buttons cause the time slider to jump backwards and forwards in time relative to the current movie time.
- "Jump By" slider and "Jump By Units" pop-up menu set how far backwards or forwards the movie will jump when the back / fwd buttons are used. Units can be set to Seconds, Frames, or Beats. When using Beats the jump time will be relative to the currently selected clocks BPM.
- "Scratch" slider can be used to slide the movie time backwards or forwards relative to the current movie time. When using a mouse click with this particular slider you can drag infinitely left or right. Data-sources can only scrub within a limited range so it is often useful to switch receivers on and off via slider presets.
- "Loop Behavior" pop-up menu sets what happens when the movie time reaches the in or out point boundary. Can be set to cut-to black on end, hold on last frame, loop, or reversing loop.
- "Volume" slider adjusts the overall loudness of the movie.
- "Mute" toggle button switches sound output on and off without adjusting the volume.
- "Audio Device" pop-up menu sets which interface is used for sound output. The "Default Audio" will use the device specified in the VDMX preferences.
- "Audio Channels" pop-up menu sets which stereo output channels are used by the layer for sound playback when using an audio interface that supports multiple channel outputs.
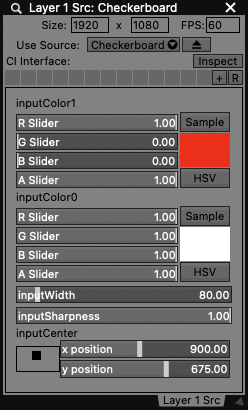
Video Generators: CoreImage, Quartz Composer, FreeFrame and Flash
For source types that have custom pre-defined input parameters VDMX will automatically create a user interface with the appropriate controls for each setting. Like with the control surface plugin, the layout for these interfaces can be customized by clicking the additional "Inspect" button in the layer source window.
Additionally a Section Preset UI control is available for saving and restoring different sets of values and states of each individual UI item.
Some common examples of how parameters are mapped to UI items include:
- Numbers -> Sliders
- Booleans -> Buttons
- Integers / Indexes -> Pop-up Menu
- Colors -> Color Picker
- 2D Point -> 2D Point UI
- Images -> Pop-up Menu with list of available video senders in VDMX
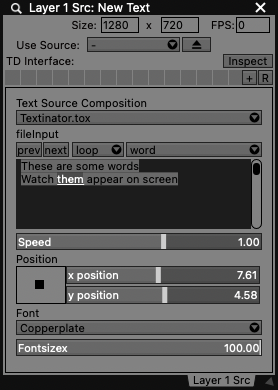
Text
Text layers are similar to video generators, with a few additional UI items. Below these special controls will appear any additional parameters specific to the special handler patches that are being used to convert the text strings into video.
- "Text Source Composition" pop-up menu chooses which patch should be used to render the text for output. These Quartz Composer patches can be found in the qcTextSources folder in the Assets directory.
- "Text Units" pop-up menu sets how the text file should be broken up- by character, word, sentence or line breaks.
- "Prev" and "Next" button changes the current output string to the previous or next chunk respectively. Note that some text styles may use their own internal playback timing that will automatically step through the text.
- "Loop Behavior" sets whether the text parsing should stop at the last chunk or repeat when finished.
- "Text Editor" is used to preview and edit the contents of the text clip. Double click on a block of text to set it as the chunk that will be displayed next.
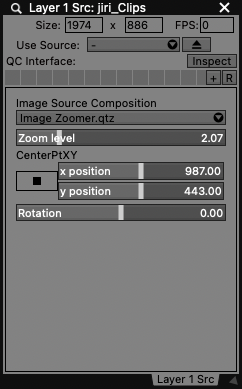
Images
Still images loaded on a layer by default will render with no additional controls.
Optionally, images can be passed off to a custom Quartz Composer patches for additional processing, such as zooming or resizing before being passed off to the layer FX and composition. This can be useful when working with large images whose dimensions are bigger than your canvas size. Once a custom patch is selected from the "Image Source Composition" pop-up menu additional UI items may appear that are specific to the chosen patch.
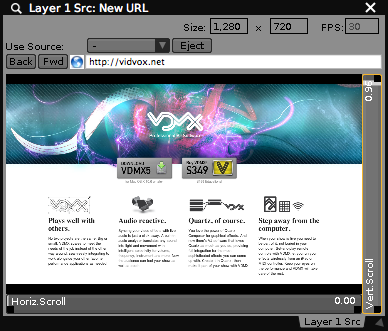
Web
The web source type controls contain a miniature browser for interacting with and navigating between web pages.
- "URL" text field is used to enter web addresses.
- "Back" and "Fwd" move through the browser history.
- "Web Preview" is a scaled down version of how the site is rendered for output. Interact with links, text fields and other UI items via clicks.
- "Horiz" and "Vert" scroll sliders adjust the horizontal and vertical offset positions of the web page view.
Video Receivers: Live Inputs, Plugins, Layers, Window Inputs, Syphon
When a layer is set to receive video from another source, there are no additional playback controls in the layer source window.