Using Control Surface Expressions
Control Surface Expressions are a powerful way to manipulate and process control data within VDMX.
General notes
Creating Expressions and Input Variables
Code snippets for Expressions can reference the numeric values from UI items and other expressions within the same Control Surface. Click the 'Show Variables' button to reveal a pop-over that contains a list of the accessible variables.
- Expressions can be added, removed, and renamed from the Expressions tab of the Control Surface inspector.
- Edit the code for an Expression in the UI Inspector by selecting from the list.
There are four types Control Surface Expressions:
- Float Expressions
- Boolean Expressions
- 2D Point Expressions
- RGBA Color Expressions
Each of these publish a data-source of their corresponding type.
While most data-receivers in VDMX are designed to receive normalized values (0 to 1) by default, the float expressions can produce values that are non-normalized (unranged numbers). Where appropriate data-receivers within VDMX can be set to work with non-normalized values.
When working with boolean receivers in VDMX be sure to check if they are on 'Toggle on Input' or 'Val from Input' to get the appropriate behavior on the receiving end.
Built in functions and variables
Control Surface expressions are evaluated using the ExprTk library. A full listing of available built in functions and variables can be found on the ExprTk documentation page.
Examples of using Control Surface Expressions in VDMX
Pass through float value
Although not a particularly useful real world case, the most basic demonstration of Expressions is a simple pass through for a float value.
Float_Expr:=Slider_1
The important detail here is that we used the ":=" in order to set the output variable Float_Expr. Within ExprTk this is an Assignment operation.
Pass through bool value
Bool values work essentially the same way as floats.
Bool_Expr:= (Slider_1 > Slider_2)? 1.0 : 0.0;
In this case we will use a ternary operator to determine if Slider_1 is bigger or less than Slider_2, and set the output bool to 0.0 or 1.0 accordingly.
Basic 2D Point
For this simple example we will take two sliders, Slider_1 and Slider_2, and combine them into a single 2D point data-source.
Point_Expr_x:= Slider_1;
Point_Expr_y:= Slider_2;
The important detail here is that we used the '_x' and '_y' usage in order to set the respective x and y portions of the 2D point variable Point_Expr.
Basic RGBA Color
For this simple example we will take three sliders, Slider_1, Slider_2, and Slider_3 combine them into a single RGBA, with the alpha always set to 1.0.
Color_Expr_r:= Slider_1;
Color_Expr_g:= Slider_2;
Color_Expr_b:= Slider_3;
Color_Expr_a:= 1.0;
The important detail here is that we used the '_r', '_g', '_b', and '_a' usage in order to set the respective RGBA components of the variable Color_Expr.
Average two values
A slightly more useful example would be to have our Expression return the average of two sliders.
Float_Expr:= avg(Slider_1, Slider_2);
This is a demonstration of using a built in function (avg()) available from ExprTk.
Input gate
Traditional if / else statements are also supported for Expressions code snippets.
if (Button_1)	{
	Float_Expr:= Slider_1;
}
This is a basic example of how "if(condition) { ... }" can be used as a gate. When the Button_1 value is set to On, the if statement is executed, and the output variable is set to the slider value. When the Button_1 value is set to Off, the code inside the if statement is skipped.
if (Button_1)	{
	Float_Expr:= Slider_1;
}
else if (Button_2)	{
	Float_Expr:= 0.0;
}
A more advanced version of this could have a second button that changes the behavior to optionally set to a default value like 0 when the first condition is not met.
Switching between two inputs
Another example of conditionals and ternary operators being used for simple logic within Expressions is switching between two or more inputs. A simple two input switch using a ternary operator could look like this:
Float_Expr:= (Button_1) ? Slider_2 : Slider_1;
In this example a button provides a boolean value that is used to switch the output between two different sliders.
Switching between more than two inputs
A form of case based switch statements can also be used within Control Surface Expressions.
switch
{
	default: 0.0;
	case PopUpButton_1 = 0: Slider_1;
	case PopUpButton_1 = 1: Slider_2;
	case PopUpButton_1 = 2: Slider_3;
};
In this example a PopUpButton with three menu options is used to switch between three different slider inputs.
Routing between two or more outputs
In some cases it may be useful to have a single input that is selectively sent to one of several possible outputs.
switch
{
	default: 0.0;
	case PopUpButton_1 = 0: Slider_1;
};
switch
{
	default: 0.0;
	case PopUpButton_1 = 1: Slider_1;
};
switch
{
	default: 0.0;
	case PopUpButton_1 = 2: Slider_1;
};
In this example a PopUpButton with three menu options is used to adjust which three different output expressions is actively receiving from Slider_1. Otherwise the value is set to 0.
Logic Operators
Standard logic operators like and, nand, nor, not, or, xor, xnor are supported.
Bool_Expr:= (Button_1 and Button_2)
Bool_Expr:= (Button_1 or Button_2)
Here are two code snippets, the first using an and operator on Button_1 and Button_2, and the second using an or operator.
Declaring and using local variables
Control Surface Expressions allow for creating local variables that can be used to simplify expression logic.
var tmp:= Slider_1;
tmp:=clamp(Slider_2, tmp, Slider_3);
Float_Expr:= tmp;
In this example the value of Slider_1 is stored in the variable tmp, which is then clamped to the range of Slider_2 (min) and Slider_3 (max). The final return value is then set to our tmp variable.
Working with arrays of values
Revisiting our example of creating an average of two values, another way to do this would be to put the values from Slider_1 and Slider_2 into an array, and then passing the array into the avg() function.
var vals[2]:= {Slider_1, Slider_2};
Float_Expr:= avg(vals);
Here we declared a variable called vals, an array with two elements, Slider_1 and Slider_2.
Cross Fading Between Two Values
Here we use a slider titled 'Mix_Point' to crossfade between Slider_1 and Slider_2 using a weighted average.
Float_Expr:= Slider_1 * (1.0 - Mix_Point) + Slider_2 * Mix_Point;
This is a basic weighted average function. When Mix_Point is 0.0, the output is the value at Slider_1. When Mix_Point is 1.0, the output is the value at Slider_2. When Mix_Point is at 0.5, we have a standard average between the two inputs.
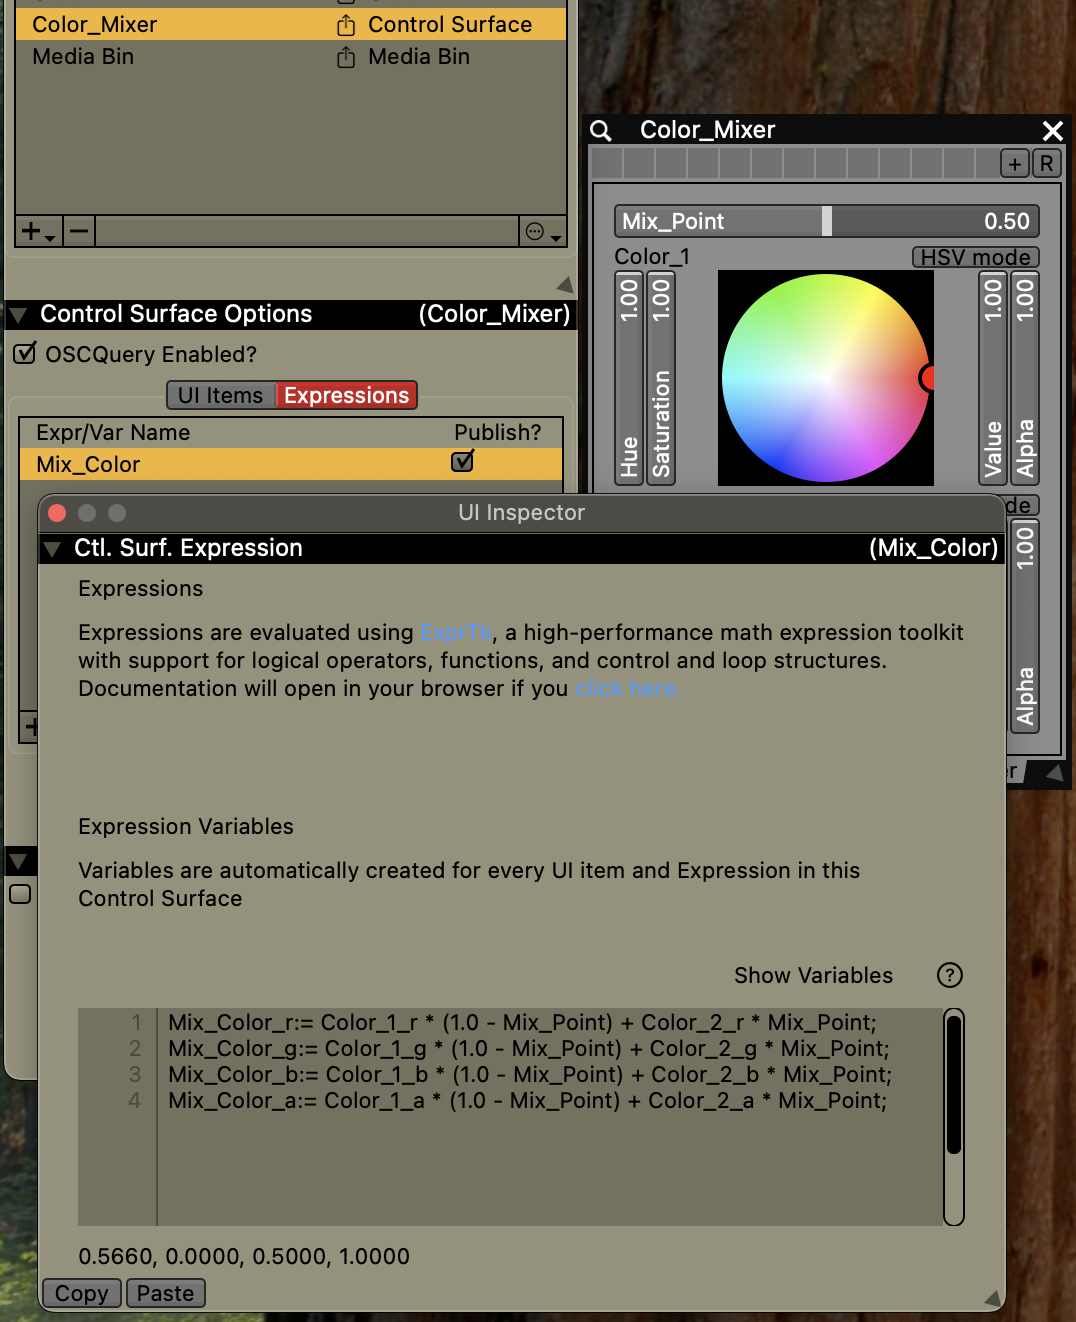
We can apply the same concept to crossfade between two colors, taking the weighted average for each of the RGBA components from Color Wheels.
Color_Expr_r:= ColorWheel_1_r * (1.0 - Mix_Point) + ColorWheel_2_r * Mix_Point;
Color_Expr_g:= ColorWheel_1_g * (1.0 - Mix_Point) + ColorWheel_2_g * Mix_Point;
Color_Expr_b:= ColorWheel_1_b * (1.0 - Mix_Point) + ColorWheel_2_b * Mix_Point;
Color_Expr_a:= ColorWheel_1_a * (1.0 - Mix_Point) + ColorWheel_2_a * Mix_Point;
Color to Grayscale
Common color math can be used on RGB values, such as computing the grayscale value.
Float_Expr:= ColorWheel_1_a * avg(ColorWheel_1_r, ColorWheel_1_g, ColorWheel_1_b);
Here the R, G, and B components are averaged, and then multiplied by the alpha level, to get the appropriate output grayscale level.
Computing distance between points
Basic math operations like sqrt and pow allow for computing the distance between two points provided by 2D point inputs.
sqrt(pow(Point_1_x - Point_2_x, 2.0) + pow(Point_1_y -Point_2_y, 2.0));
Here we use the x and y components of Point_1 and Point_2 as the variables in a standard distance function.
Multi-Sliders
Multi-Slider UIs from Control Surface plugins can be accessed by expressions by using their x / y grid position with underscore notation similar to how the xy or rgba components are accessed by 2D point and color type inputs and outputs.
var vals[4] := {MultiSlider_0_0, MultiSlider_1_0, MultiSlider_0_1, MultiSlider_1_1};
Float_Expr := avg(vals);
Here we have a 2x2 multi-slider as an input. The four values are placed in an array and then averaged for output.
Multi-Buttons
Multi-Buttons from Control Surface plugins can be accessed by expressions, but their usage may vary depending on the data-source publishing mode for the Multi-Button group. The three options are:
- Publish normalized float of last button.
- Publish index of last button.
- Publish as many bools.
Multi-Buttons also have a setting for allowing more than one button to be enabled at a time instead of the default behavior of forcing the buttons to be mutually exclusive.
When using the first or second publishing option, the expression snippet for a pass thru would look something like this:
Float_Expr:= MultiButton
When using the 'publish as many bools' option, each button from the Multi-Button is available as its own boolean variable within the expression the same way as with Multi-Sliders.
var vals[4] := {MultiButton_0_0, MultiButton_1_0, MultiButton_0_1, MultiButton_1_1};
Float_Expr := avg(vals);
Each MultiButton_x_y boolean contains a 0 or 1. We can use these for math and logic operations. Taking the average of these values gives us a normalized count of how many buttons are active.
Creating LFOs
Trigonometry sine and cosine functions can be used to create custom LFOs that use a slider input for its time value.
Float_Expr := 0.0;

var freqs[3]:= {2, 4, 6};
var amps[3]:= {0.2, 0.3, 0.5};

var mypi:= 3.141592653589793238462643383279502;

for (var i:= 0; i < 3; i += 1)	{
	var tmp := amps[i] * sin(freqs[i] * mypi * Slider_1);
	tmp := (tmp + 1.0) / 2.0;
	Float_Expr += tmp;
}
Here we have three frequency and amplitude values stored in arrays along with a for loop that evaluates each sine wave, normalizes it to 0.0 to 1.0, and then adds it to our final result.